February 22, 2012

Book Review

A History of the Peninsular War, Volume II: January to September 1809:  From the Battle of Corunna to the End of the Talavera CampaignA History of the Peninsular War, Volume II: January to September 1809: From the Battle of Corunna to the End of the Talavera Campaign by Charles Oman

My rating: 5 of 5 stars


There isn't really much I can add to the praise I have given to the first volume of this seminal work about Peninsular War. Extremely detailed, meticulously referenced and written in very accessible style - as long as you have a genuine interest in the topic, it is pure pleasure to read Oman's account of this conflict.

If I would choose to nitpick, then my only reservation would be in regard of Oman's almost absolute support of Wellesley's generalship. I would suspect that not everybody will agree with author's undeniably pro-British stand. That is however question of possible differences in opinions between the author and the reader and doesn't take away from the high quality of work in this book.


View all my reviews

February 04, 2012

Troops, WEAPONS & Tactics – First Impressions

In this post I refer on several ocassions to the ruleset “I Ain’t Been Shot, Mom”. It is important for me to clarify that all of those references are done in respect of second edition of that ruleset. I am aware of the fact that a third and strongly redone edition of IABSM has been recently released by Too Fat Lardies. I am however yet to aquire that updated version and am thus unfamiliar with its contents.

Troops, Weapons & Tactics or TW&T is a ruleset for low level combat during World War 2 from one of my favorite game designing companies, Too Fat Lardies. If you are thinking “But Too Fat Lardies already have published a rather popular ruleset for low level combat during World War 2, it’s called I Ain’t Been Shot Mum”, then you are correct. What’s more, if you after a quick glance at the contents of TW&T say “Heck, this reminds me of IABSM quite a lot!”, you will also be 100% correct. The fact is that it is hard not to regard TW&T as a very close sibling of IABSM and those who are familiar with IABSM will immediately feel right at home with TW&T.

TW&T and IABSM - what’s the same?
For those not familiar either of the two rulesets, here’s a quick overview of main features shared by both of them:

  • Card-driven game mechanics. Each unit and leader is represented by his own card - once a card is drawn, unit or leader is allowed to act. Additional cards depict national characteristics, random events, etc.
  • All units start the game as unspotted and are represented by blinds (generic markers). Units under blinds enjoy some advantages, but operate under certain restrictions. Individual units are deployed on the table either voluntarily or when they are spotted by enemy.
  • Basic actions for units are spotting, movement, spotting.
  • Every unit has an inherent number of so called initiative dices, usually 3D6. Those dices are used by active unit to perform one or more actions when unit’s card comes up or if it’s activated by leader. For example if unit wants to move short distance, two out of its three dices can be rolled, the result indicates the distance in may move. One initiative dice remains to be used for something else.
  • Casualties are represented by kills (one kill = one figure) or by suppression points (called wounds) that affect the effectiveness of the unit.
  • Leaders, aka “Big Men”, may be used in different ways, for example to generate momentum for own side’s actions, improve effectiveness of individual unit or rally a unit by removing their “wounds”.
  • A game turn ends when a so called “Tea Break” card is turned over. When that happens, all units that didn’t have their card played or have unused initiative dice may perform a limited set of actions. Once that’s done, the turn ends, all cards are reshuffled and next turn begins.

TW&T and IABSM - what’s the difference?
As far as I can see, there are three things that make TW&T into a beast that is significantly different from IABSM.

The first of those differences lies in the way infantry units are represented on the table. Both rulesets try to depict low level engagements, with squads as basic manoeuvre units. However, in IABSM the representation of units is rather generic - a platoon consists most often of three or four squads, with no distinctions between them except perhaps number of soldiers in each of them. In TW&T, the platoons and squads are modelled in much more detail. Platoons consist not only of its squads; their HQ and support elements are also represented as separate entities. Squads are split into their sub-elements (most often squad leader as a Big Man, a rifle section and automatic weapon section). Squads of different nationalities can therefore be differentiated better than in IABSM. For example, German squad with MG42 LMG and bolt action Mausers has different characteristics than American squad with M1 Garands and a BAR as squad support weapon. Thanks to the higher “resolution”, players can now act more realistically with their squads and apply same doctrines that were used in real life.

This low granularity of TW&T is also reflected in changes of the card activation system. In IABSM, a card usually activated an individual leader or a platoon, thus allowing the user to act with all of its squads at once. In TW&T each squad has its own card.

Role of Big Men in TW&T is very different from that in IABSM. In IABSM, they are an abstract construction derived from qualitative differences between command&control of different units. Those differences are handled mainly by making different number of Big Men available on the table, but the ruleset does not attempt to recreate real command structures. In TW&T on the other hand, Big Men are directly anchored with “reality", so number of officers and NCO:s (i.e. Big Men) on the table is exactly the same as it would be in real life. Each squad has its own leader, each platoon has a platoon commander and so on.

The “improved realism” of command structure in TW&T doesn’t end with correct depiction of command structure. Each Big Man in TW&T is graded in four levels, with level 1 being the lowest. When Big Man’s card comes up, he is then able to perform at minimum one, but possibly more actions in that turn. Actions available for Big Men can be split into two groups - personal (such as moving from squad A to squad B, directing fire of a machine gun or giving a pep talk to a rifle section under heavy fire) or unit activations (making them use their dice for spotting, shooting or movement). His chance for multiple actions and how many of them will be available at the time his card turns up are decided by his level in combination with luck in the draw of cards. I won’t go into details of this game mechanism, but I must say that it is rather ingenious.

Last noticeable difference in TW&T when compared to IABSM lies in the fact that when a unit card comes up, it can shoot and spot, but is only allowed to move if it is activated and ordered to do so by appropriate Big Man. In other words, squads cannot normally move on their own initiative. This seemingly small change, in combination with the way Big Men operate in TW&T, has in my opinion dramatic implications on the gameplay. In fact, I would like to go as far as saying that thanks to the introduction of this restriction, the “missing link” of IABSM has finally been put into place.

Let me explain what I mean. My understanding is that the main purpose of Big Men both in IABSM as well as in TW&S is for them to act as a motor providing the momentum for the units under their command. This goal (once again in my humble opinion), was never fully achieved in IABSM, mainly because of the limitations imposed on Big Men in that ruleset. However, in TW&T the Big Men are not only the sole “source” for unit movement, but what’s even more important, the differences in leadership quality of different Big Men also have a direct impact on reaction speed and degree of coordination between different units on the table.

Testing the new ideas
Characteristics of TW&T described above had a huge impact in the test game that T. put together for us last Sunday. The idea was to have two squads of British infantry make a sudden raid on a German communication bunker defended by a small garrison of second rate troops. British side had two leaders, one of grade 4 and one of grade 3. Their opposition consisted of second grade platoon with three squads without any automatic weapons, an MMG position and a couple of AA-guns. They were led by four Big Men, all of grade 2.

Our small test run turned out to be a perfect illustration of TW&T:s strenghs. Despite being inferior in numbers and being activated less often, British platoon was able to coordinate its actions much better than the Germans and overwhelmed opposing units with fire and manoeuvre one unit at a time. It also became clear that the activation system for Big Men has a bit of a nasty streak built into it - because of the way that game mechanism works, Big Men of higher grade “soak up” possibility for multiple activities for their counterparts of lower grade. This fact put the Germans at additional disadvantage, because German Big Men never had a chance to grab initiative (in form of multiple actions) and form a coherent defensive line before their individual squads were defeated.

WP_000032 Not the best picture quality, had to use my mobile phone
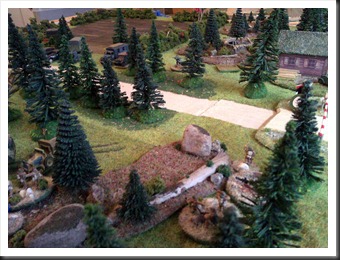
WP_000038 British patrol entering the enemy territory

WP_000036 Nearing the objective

Different strokes for different folks
My personal first impression of TW&T is mostly very positive. First of all, I am a huge fan of the stuff that comes from Too Fat Lardies and I always liked IABSM, even despite the flaws that I see in that ruleset. TW&T follows in its predecessor's footsteps, but manages to avoid the issues that always bothered me when I played IABSM. Overall, the game design of TW&T seems slicker and more coherent to me than that in second edition IABSM.

T. on the other hand didn’t like TW&T at all. His opinion was that the increased detail in depiction of the squad structure and its equipment didn’t contribute much to the fun, but made the game “plotty” and slow. He also expressed a worry about games demanding too much time and frequent down-times for “not active” players, especially in larger games. His objections against Tea Break card also remained unchanged (even though we played with two of those cards in the game deck).

In other words, the verdict over TW&T seems to be a one to one split decision. Considering the fact that I currently don’t have neither figures nor terrain for WWII games, I probably won’t have opportunity to play more of TW&T for at least a good while. But it may very well be so that TW&T will be the final straw that breaks my resistance against ordering a bunch of those 10mm Pendraken minis I’ve been glancing at so often over last couple of years.

Another painting project, in yet another scale? Oh…. thanks for that one, Too Fat Lardies! :-)

January 23, 2012

Stop the presses!

It was bound to happen sooner or later – I’m actually done with a project!

Some time ago I started to paint first batch of 6mm Napoleonic French with the intention to run a test game with General De Brigade rules. Object of my interest was one of the smallest scenarios in first scenario book for abovementioned ruleset - Hilaire's  assault on Laichling villages during battle of Ekmuhl. At the time it seemed like a relatively quick job - eleven batalions for the French, ten battalions and some cavalry for the Austrian, three batteries of artillery. How long would it take to paint up those figures? I expected to be done in six or seven weeks, at the most.

Well... those six to seven weeks turned out to be closer to five years, but who's counting, right? The important thing is that I am done - all figures are painted and based, bases are flocked, flags are mounted.

Below is the first batch of pictures - eight battalions of French Line infantry, ready for action.

Widepic

At Angle Closeup2 

Closeup 

At Angle2

January 08, 2012

First look at 6mm European buildings from Total Battle Miniatures

I won't say that it's my New Year resolution, but I do hope to be more active here than I was last year. At the same time I'm a strong believer in putting the bar as low as possible (nice way to avoid disappointments), so my goal at the moment is to double the number of posts per year.

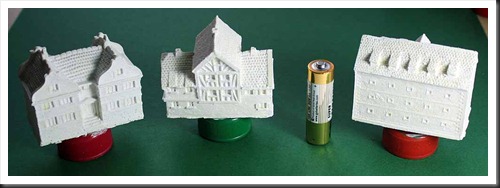
OK, with the solemn declarations out of the way, let's get to the business of the day. Sometime in 2011 a relatively new company, Total Battle Miniatures, came to my attention. Their rapidly expanding product lineup consists of terrain pieces in all main scales, but I was especially interested in their 6mm European buildings. They seemed perfect for my General de Brigade project, so a couple of weeks ago I've grabbed the entire lot and here they are.

The first picture shows the smaller buildings in "of the shelf" state. I haven't done anything with them yet. The second picture shows the larger buildings with first coat of white primer already applied.

Buildings1

Buildings2

Why white primer, you ask? Well, the guys from Total Battle Miniatures were kind enough to include a little tutorial describing their painting method with the buildings they sent to me. Their approach is to first paint the buildings white and then follow up with washes of the subsequent colors. If one is to draw conclusions from the pictures of painted buildings at their site, the end result is very subtle and realistic. Since I liked that look, I decided to skip my usual hatchet job consisting of black basecoat and old-fashioned drybrushing once-over and give their method a shot. Results of this experiment will of course be posted here in due time.

In any case, based on my impression of those very nice miniatures, Total Battle Miniatures is a very welcome addition to the relatively small group of manufacturers of 6mm terrain. The buildings I've got are of the high quality I've previously only seen in products from Timecast Models.

January 01, 2012

WAB raiding season - game 1

What better way to start 2012 than with a game. And since I was finally ready with the terrain required for the first scenario of our long planned WAB campaign, it was the logical choice for today's entertainment.
Couple of words about the campaign itself. It's taken from "Age of Arthur" supplement for Warhammer and consists of a series of battles that, depending on results in last engagement, are selected from a batch of fifteen scenarios in the book. The resulting campaign is linear, but varied and the fact that scenarios are connected gives much better "feeling" than one-off games we run until now.

The scenario

Initial scenario in the campaign is an opposed river crossing. A slight twist in deployment is provided by period-typical single combat between champions of the opposing sides. In our case it didn't make much difference (except for the quite enjoyable fact that H. had to witness his champion being butchered by my hero :-), but if finished quickly, it can make things little more difficult for the attacking side.

In any case, by the time preliminary pleasantries were finished, Saxons had their army ready for a push across the river. The bridge allowed only for passage of units with single figure width, so he choose to ignore it. River itself was difficult terrain (movement reduced by 50 percent), except in the middle where a ford was located and provided normal passage.

Setup

Neither H. nor I spent any time on painting... eh, I mean recruiting since our last game, so it was the gathering of usual suspects all over again. H. placed his chief and his merry band of butchers in the middle with clear intention of punching a hole straight through the middle of my line. He was supported by his light cavalry unit from behind. On both sides of the cavalry he deployed his three units of warriors. His archers opposed mine near the bridge.

My deployment was anything but innovative. My milites got their orders to oppose initial Saxon cavalry charge and beat back any incursions by Saxon warbands. My pedes were deployed near the bridge - I intended to get them into position near the river, form shieldwall and hope for the best. Mounted commanipulares were kept in second line as reserve. The only sneakiness in my initial setup was the fact that I placed my light cavalry on the road leading to the bridge. My intention was from the start to deploy them into march column as soon as possible and thereby threat H. with a move across the bridge and against his flank.

The battle

Since my champion won the single combat, I had the advantage of moving first. My infantry moved toward the river, light cavalry deployed into march column and some innefective shooting was done by skirmishers. H. followed his apparent plan and released his cavalry, with infantry moving in support. One of his warbands was placed to counter my light cavalry, which was just fine with me, as long as they weren't participating in the assault across the river.

P1000800 Single combat… ending with victory for defenders of civilization. :-P

P1000806 Both armies march toward each other.

In second turn we had the expected clash of Saxon cavalry and my milites. The results were both expected and a little surprising. The expected part was that my infantry held (those extra points for ranks will decide the result as long as casualties among infantry are kept at reasonable level). What surprised both me and H. was that his chief not only failed to cause any casualties, but also broke and drew the other cavalry unit into ignominious flight. Even though he rallied two turns later, he was out of the picture for the rest of the game, while the light cavalry unit unceremoniously left the field of battle altogether.

One can only wonder what his followers among infantry thought of this display of dubious behavior, but all warbands continued with their advance regardless of their leader's cowardly behavior (hey, my blogg, my prerogative for slander of the enemy:-). The foremost warband smashed into my victorious milites, routed them in two turns and managed not only to stop my subsequent cavalry charge, but were winning the melee that followed. Remaining unit of Saxon warriors moved in support and were met by my peasants with shields and crudely fashioned spears. The result of that fight was another surprise - my peasants pretty much bitch-slapped Saxon warriors and stopped them in their tracks.

P1000814 Saxon warbands try to save the day…

P1000820 …but get stuck.

By then we reached the end of sixth and final turn of the game and it was all over but the weeping for the Saxons. Their victory condition was to have two or more units (not engaged in combat) on the other side of the river by the end of the game; they had none. Their king was however still breathing, which meant that my success was only of minor nature. In next game, the Saxons will try at it again, but at a different ford.

Musings after the battle

The one thing of interest is that this was our first game with Warhammer 2.0 rules. I can't say that I am very happy with that "newish" second edition.

First of all, the language used in the rulebook is quite infuriating - I don't need a narrative and motivation of the rules in the rulebook itself, just give me the rules in clear and unambiguous manner.

Second, the new edition is incompatible with "Age of Arthur" supplement on at least one count - rules for warbands are formatted differently and we had to double-check with the original version for which rules were applicable to Saxons. No biggie, but a bit confusing.

Also, since H. didn't have time to read the second edition yet, we skipped most of the "novelities", such as giving up ground and disengagements. The only new rule I insisted on applying (for egoistic reasons ) was the fact that marching columns don't have to stop when they are within 8'' from the enemy. To be honest though, I really can't see how this rule can be used effectively when units, especially cavalry units, are in march columns. Even with movement rate of 24'' my light cavalry wouldn't even have cleared the bridge, if I decided to move it.

In any case, it was quite enjoyable game, finished in little over four hours including the setup and after game-cleanup. Nice start of 2012, hopefully I will have more to write about really soon.

December 01, 2011

Book Review

Battle Tactics of the American Civil WarBattle Tactics of the American Civil War by Paddy Griffith

My rating: 3 of 5 stars


Ok, first of the bat - if you don't know your American Civil War, THIS IS NOT THE BOOK TO START WITH. Instead, find McPherson's 'Battle Cry For Freedom' or Shelby's superb three volume narrative of the conflict.

This little volume deals with something very specific - it's an attempt to answer the ever raging (trust me, in certain circles, this is not an uderstatement) question wheter American Civil War was the last war of Napoleonic times or first of modern wars? All main aspects of armed combat during ACW are examined and evaluated on their own and a final analysis of the conflict is presented in the last part of the book. It is up to each and every reader to agree or disagree with author's conclusions (chances are they will make your blood rush faster, if you don't), but the entire book is very well thought out and author's ideas cannot be dismissed out of hand.

The thing is though that, regardless of author's apparent knowledge, his ideas don't feel 'fleshed out' - the book is simply too short to be able to convincingly tackle the topic. Those who know the topic of discussion will understand Griffith's logic without any problems, but then they will also already be familiar with the argument he's making. Those who are new to the topic of this book, will propably be left with more questions than answers after reading this book. Also, I can't help but feel that Nosworthy's 'Crucible of Courage', which attempts to achieve exactly same thing as Griffith in this volume, is much better spent time if you're genuinly interested in deeper understanding of American Civil War from more "technical" perspective.


View all my reviews

November 12, 2011

C4 Open 2011

Just a quick post with a link to pictures I've taken at this year's C4 Open exhibition. You can find the best of them in a gallery I've created at Facebook, click here to go to it.