November 18, 2017

Battle of Hatchie’s Bridge… or “We don’t need your stinkin’ bridge!”

One of highlights of the year arrived last weekend. Having prepared the latex river and the bridges, I was finally able to run the Hatchie Bridge scenario from Caliver Books’ “Hearthland” scenario book! With actual games becoming a rather rare events these days, it was indeed something to savour… at least to begin with.

Historical background and scenario setup

Allright… so this one is a bit of an ‘odd duck’ even on paper and it became even more so during the game. The historical background is as follows. On October 4th 1862, the Confederate Army of Tennessee under general Van Dorn was badly mauled during its failed attempt to take town of Corinth. The day after this failed assault, Southern army was quickly falling back toward their supply center before Federal forces in the area could concentrate and finish them off.  Unfortunately, the retreat path led across Hatchie river with only a couple of useable bridges across it. As Van Dorn’s vanguard units arrived to the bridge he selected for crossing, they bumped into one of Federal columns sent to reinforce garrison of Corinth, under command of general Ord. The intended crossing of southern troops then turned into a delaying action, as Confederates desperatly attempted to hold off Union troops as bulk of their forces escaped southward, toward another crossing point.

The scenario starting point is after initial contact between rebel vanguard units and Ord’s column. This initial encounter didn’t go well for the Southerners. This is reflected in the scenario by the fact that on turn 1, a Confederate brigade enters the table on wrong side of the river, under Retreat orders. It is followed on turn 2 by another brigade under Rout orders. Only on turn 3 do Union troops start to appear on the table.

Before we start the after action report… just so everyone knows who the geniuses are in this encounter – yours truly accepted the challenge of Confederate command, while L. brought with him his blue kepi and led the Federal troops.

The game

In tradition by now well established on this blog, I will let the pictures tell the story with support of shorthand narrative.

Hatchie_River_001_1

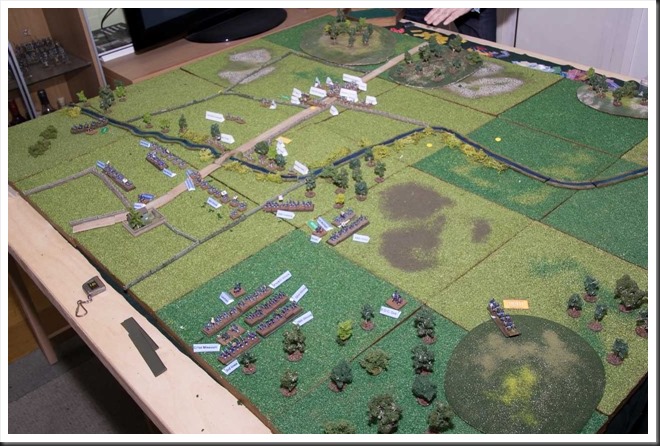
This is the starting situation – Adam’s brigade retreats toward the bridge after encountering Federal troops. Ross’s brigade, on the right side of the river, marches in opposite direction.

Hatchie_River_002_1

Round 2 – Adam’s brigade is now across the bridge, Moore’s routed rebels enter the table. On the left, pretty much all of artillery available to Van Dorn rushes toward the bridge in hope of stopping the Union troops from crossing long enough to allow him to escape southward.

Hatchie_River_003_1

Round 3 and 4 – things are taking a turn from bad to worse for Confederates. Once across the bridge, both regiments in Adam’s brigade fail to rally from their Retreat state, promptly turn into routed mob, which subsequently disperses from the field of battle. Their example is followed their comrades in Moore’s brigade, from which I manage to salvage a single regiment of skirmishers.

With half of my infantry units gone before the first shot was fired, my situation turned from serious to desperate. Since there was no chance to make a stand on the river, I decided to delay Union crossing across the bridge with Ross’s tiny brigade while I deployed the artillery respectable distance from the bridge.

L.’s response was as obvious as it was correct. One of his brigades advanced toward the bridge and engaged southerners skulking on the other side of the river. The other brigade took its time in a flanking march threatening my open left flank. Meanwhile, his cavalry, present on both flanks, scouted for a suitable crossing point.

Hatchie_River_004_1

First shots were exchanged between Ross’s Texans and Federals approaching the bridge. The rebels, obscured by vegetation, did quite well for a short while. But then the weight of Union line became too much. With casualties mouting rapidly, both regimens broke and routed of the field.

Hatchie_River_005_1

Battlefield arount turn 5 of the game. All Union troops are now on the table.

Hatchie_River_006_1

Veatch’s brigade engages the rebels making the stand on the opposite river bank.

Hatchie_River_007_1

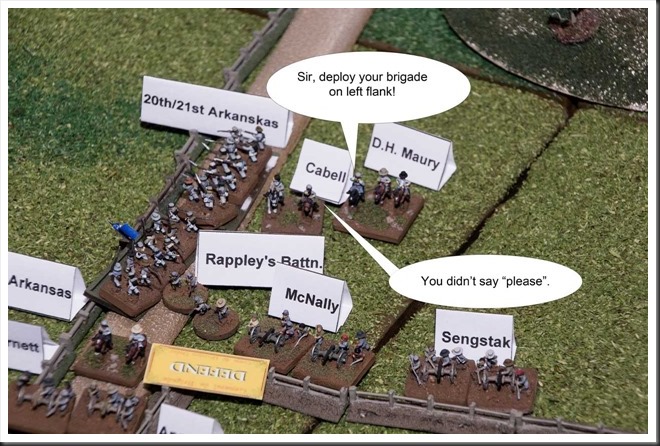
The unfortunate collapse of Ross’s brigade was mainly caused by this little squabble. General Cabell refused to follow orders of his commander and deploy his brigade in support of artillery line. It took two rounds for him to ‘receive the message’ and what I presume, a rather heated face-to-face with Maury. As the two gentlemen discussed finer details of the concept of chain of command, Ross’s brigade was left hanging without orders to retreat and was shot to pieces as result.

I must say that I find the “Guns at Gettysburg” restriction of just one change of brigade order per turn somewhat rudiculous. But I will wait some more before tinkering with this aspect of the ruleset.

Hatchie_River_008_1

Union cavalry on left flank found a crossing point rather quickly. Their joy was however chilled rather abruptly as salvo after salvo from confederate 12-pounders tore into their column, stopping their advance to a screaching halt. As the game progressed, this regiment was reduced to shambles and dispersed – it was one of the few highlights of the evening for confederates.

Hatchie_River_009_1

Flanking force progresses toward the river.

Hatchie_River_012_1

Hatchie_River_013_1

By the time this shot is taken, we’re around round 9 in the game. By then L. has gone home and four days have passed. I am now in sole command of both sides and the rest of the game is just a simple learning experience in mechanics of “Guns at Gettysburg” rules set.

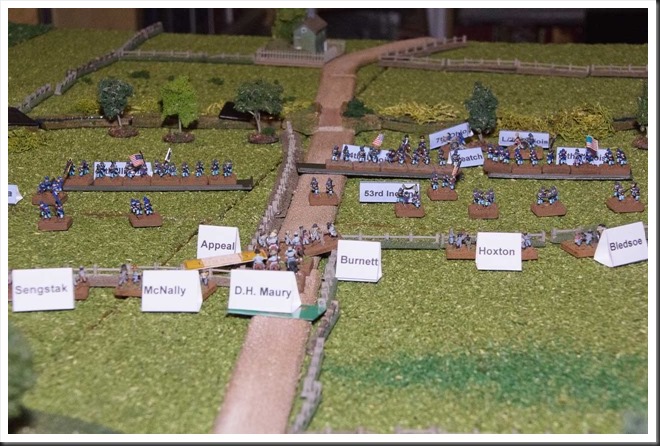
By now both Union columns are across the river. Veatch’s brigade used primarily the bridge, although discovery of a fording point to the right of it did help. Once on the other side, 53rd and 25th Indiana regiments deployed into skirmish order, screening the regiments that followed. They suffered horrificly as result, but did manage to shield their comrades from the worst effects of concentrated Confederate artillery fire.

Lauman’s brigade on the right had much more peaceful time getting across the river. Facing only the tiny remainders of rebel infantry, they could take their time crossing the river at yet another conveniently discovered ford and then deploying in line.

Hatchie_River_014_1

Round 12 – things are looking bad for the rebels on the left…

Hatchie_River_016_1

…and they aren’t much better on the right neither! Time to pack up the guns and get back to the main army!

Hatchie_River_017_1

Final event of the game – Lauman’s brigade charges the ‘thin grey line’ in overwhealming numbers… and fails miserably! Composite 41st/53rd Illionis is met by a thunderous salvo from the rebels and stopped in their tracks. 25th Illinois gets in contact with their opponents, but fail to make an impression.

Hatchie_River_018_1

Situation at the end of round 15. Confederate artillery, having done its job, retreats toward the position of main army. Cabell’s Arkansasians hurl insults at their opponents before following their artillery and leaving the field of battle.

Musings after the battle

Let’s start with the ruleset itself. This was the second time I’ve used “Guns at Gettysburg” and the experience didn’t give me any cause to change my initial positive reaction toward it. It is what it is – relatively simple, traditional IGOUGO ruleset which provides slow but enjoyable game. One thing I liked in particular was how the ruleset handles skirmishers. Unlike “General de Brigade”, its ACW spinoff allows for much more flexibility and deployment alternatives. But despite added complexity, it’s remains very simple and elegant aspect of the game.

One of other “major” ACW additions to the original Napoleonic ruleset – open order deployment for line units – turned out to be a bit of a disapointment. Beside being able to deploy in longer lines, the major effect of this formation is a –1 when shooting and –1 when checking for casualties. Neither of these modifiers do much to affect the outcome in a firefight.

Apparently, artillery plays major role in this scenario and as it turns out, it is deadly! Veatch’s brigade, which faced the Confederate guns, paid terrific price and was reduced by over 30 percent by the time I decided to quit. Mind you, none of rebel batteries were full strength. If they were, I doubt any of Union regiments would get anywhere near Confederate positions.

So what about the scenario itself? Well, I won’t lie, it was a bit of a letdown. Creator of the scenario apparently attempted to re-create the historical situation, but the game mechanics let him (or at least me) down. Once Adam’s and Moore’s brigade evaporated from the table, the course of the game was set and there really isn’t that much any of the players can do to alter it significantly.

Nor does the scenario manage to actually re-create the historical situation! The special rules say that a crossing point can be found at any point of Hatchie when a 6 is rolled. And just to clarify things, the dice can be rolled by any and all units standing by the river. With this allowance in his head, the Union commander doesn’t have to regard the bridge as main crossing point and can allow himself to re-direct any and all units toward any point along the river – after all, a 6 will be rolled sooner or later! In real battle, Ord didn’t have this luxury and tried stubbornly to force the crossing across the bridge. Confederate artillery was apparently set up at a point where it enfiladed the road on the other side of the river and caused severe casualties among Federal units trying to cross the bridge. In real battle, none of them succeeded! Perhaps the biggest “mystery” of this scenario is that such enfilading position is nowhere to be found on the provided map.

Having said all that, if one accepts the “excercise” nature of the engagement, it does present an intellectual challenge to the players. Depending on success rallying the retreating brigades, Confederate commander will have different options for his defensive plans. On the other hand, Union commander may actually have less luck than L. and I did when rolling for fords across the river. I’m pretty sure that, depending on these factors, this particular scenario can play out very differently every time one runs it.

November 12, 2017

C4 Open 2017

Yet again, C4 Open modelling exhibition has come and gone. As is my tradition, I took a bunch of photos... and here they are!

Some great builds this year, but the trend of fewer and fewer dioramas with each passing year is unfortunately still 'strong'. OTOH, number of German 'big cats' was definitely lower, instead quite a few Soviet/Russian AFV:s seem to be in vouge! And that's a good thing, a bit tiresome to see 20 Tigers and 15 Panther's year after year.

Apparently Google, in its eternal wisdom, decided that embedding albums created in their own photo storage service on their own blog service is too much hassle. So no more embedded flash movies, my lovlies. Instead, if you want to see the pictures, click on image below – it will lead you to my Google album containg all the goodies. Hope you like the pictures!

C4_Open_2017_001_1

November 04, 2017

Photography for wargamers – Part 2 – Equipment

Let’s yet again start with a small clarification. When it comes to photography equimpment, two things become apparent as soon as you start dipping your toe in this particular hobby. First and foremost, if you want something better than the basic stuff for snapshots, the price-tag rises rapidly and steeply. Second, the better equipment really does produce better quality images and gives you more flexibility in regard of what kind of images can be taken… if you take time in finding out how to take advantage of its potential.

That being said, even the most basic of today’s cameras are surprisingly capable, especially if you’re don’t bump too hard into their technical limitations. Under normal lighting conditions (always the most important factor), taking snapshots is, as I already said in previous post, a no-brainer! Personally, I’m neither interested in nor able to spend massive amounts of money on cameras, lenses and periphery equipment and my kit is as basic as it gets.

Before we get any further - as it turns out, this post is quite long and meandering all over the place, but arrives to a pretty basic conclusion. If you’re an experienced photographer or don’t have the patience to read through my rantings, please skip straight to the bottom where you’ll find the only really relevant point I’m hoping to express here.

Cameras in general

If we take a quick look at what’s available on the market, I think the cameras can be split into three groups.

  • Mobile phone cameras – pretty much everyone has a mobile phone these days and they’re all equipped with a camera. Quality of those tiny cameras varies widely, but I must say that I am constantly amazed by the capability of one that is built-in in my (by now ancient) Samsung S4 phone.

    Out of necessity, mobile phone cameras are technically limited. The lens is small and they lack much of manual control available in ‘proper’ cameras. Also, they usually save images in compressed format, which limits post-processing possibilities.

    On the other hand, the automatic controls of mobile phone cameras are these days extremly capable and will usually produce a sharp and vivid image of whatever you’re pointing the camera at. I would advise everyone to spend some time experimenting with their mobile phone camera, you may be very surprised by what can be achieved with it.

    Perhaps the most important advantages of mobile phone cameras are of very basic nature. They’re free, you get one when you buy a mobile phone. Also, this is the one camera that you usually have with you! There is a reason for saying that the best camera you’ll ever have is the one that you have with you. Smile

  • Compact cameras – this type of cameras ranges from simple point-and-shoot affairs to some pretty advanced, professional products with very impressive optics and features. Prices vary accordingly. From wargaming perspective, I’d say that a suitable compact camera should have following features:
    • As good optics as you can afford - there is no coming around the fact is that the better optics, the sharper and better pictures you’ll get ‘out of the box’. On a flipside of the coin, keep in mind following – ‘wargames’ pictures are most often intended for the net. For practical reasons, image files for the net need to be small, with obvious consequences for image quality. So if you intend to use your compact camera primarily for wargames and shots of minis, it doesn’t make much sense to spend a lot of money on top of the line products!
    • Shortest focusing distance – try to get a camera with short ‘shortest focusing distance’. Being able to focus on small objects short distance away from the lens is very practical feature for wargamers!
    • Decent zoom capability – being able to zoom on stuff is always useful, but don’t go overboard. Currently, the craze for maximum zoom capability is the ‘next best thing since sliced bread’, but very high zooms are of limited useability if you can’t stabilize the camera, usually by putting it on a tripode. A zoom of x10 is more than enough under most circumstances.
    • Ability to take RAW images – RAW is digital equivalent to film negative of old times. Shooting in RAW gives you a lot of possibilities to adjust the image in post-processing and this feature is pretty much a must if you’re intending to get a bit more serious about photography in general.
    • Small aperture – heads up(!!!), this one is a bit counter-intuitive, because small aperture is represented by large number in ‘f-stop’-variable. But basically, you want a camera where you can make a very small hole in your shutter. Look for maximum number for your f-stops, bigger is better. For now you’ll need to take my word for it – it is important.
    • High ISO range – being able to push ISO sensitivity of camera sensor reduces exposure times and allows for taking sharp images in crappy lighting conditions. Photographers usually wrinkle their nose at high ISO setting, because it impacts image quality… but once again, if image is intended for Facebook or a blog, sharpness is usually more important factor than some color distortion.
    • Tiltable LED display – I’ve learned this one the hard way. The representation of the image your camera will take is shown in two ways – through a traditional view-finder (not necesserily included in compacts these days) or a LED display. Most photographers will rave about necessity for a traditional view-finder. Personally I’d say that for wargaming purposes a good quality, large LED display is much more useable. And it should be tiltable, because we often want to place the camera in small, constrained places and at wierd angles. Being able to tilt the display and see what image will show is very useful in these situations.
    • Small footprint – once again, constrained places and wierd angles. Small cameras are easier to handle.

  • DSLR cameras – DSLR stands for Digital Single Lens Reflex and DSLR cameras are the ‘big wigs’ among cameras. They consist of a camera body and wide range of exchangeable lenses, often designed for a specific type of photography. DSLR cameras take (at least in theory) best pictures and offer most flexibility for the photographer. They’re also expensive, bulky as hell and have the steepest learning curve if you want to use them to their full potential.

    If you think of picking up a DSLR camera, you actually have two decisions to make. The first consists of the choice of camera house. This is a serious commitment, because camera houses are expensive. More importantly, you bind yourself to a specific brand.

    Your decision should be based on two consideration – what producer and how advanced the camera-house is to be. From technical perspective, I’d say that the considerations are the same as for a compact camera. As for the producer, you have couple to choose from – Canon, Nikon, Sony and Pentax are some of the biggest names on the market. All make excellent products. While prices for different types of camera houses (entry level, enthusiast and professional) are pretty much the same regardless of producer, there can be relevant differences in performance of inner electronics, advanced features and layout of the camera interfaces (buttons and software). This last factor can be of particular importance, so try stuff out at your local dealer before you commit.

    Choice of lenses is as important aspect as the camera house if you decide to pick up a DSLR for your wargaming photography. When you buy a DLSR camera, you’ll usually get a so called stock lens. Let’s put it straight – stock lenses are usually crap and of lowest available quality when it comes to optics quality. They will do to start with, but sooner or later you will probably want to upgrade to something better and more flexible.

    The range of choices when it comes to lenses is mind-boggling, but basically you have two types of lenses for DSLR:
    • prime lenses – these lenses have a preset, non-adjustable focal length, measured in mm. Lenses with short focal lenght are used to take images with wide angle or close-ups. Lenses with long focal lenght are used to take images with ‘small’ angle and at longer distances. Advantages of prime lenses are that since they are simpler to construct (less moving parts and less complex optics) they tend to be cheaper and able to produce really good pictures. The drawback is that since you can’t zoom with a prime lens, you need to place your camera in ‘right’ place och change the physical lens between shots.
    • zoom lenses – these lenses allow you to zoom on the image subject and are therefore much more practical. There are two types of zooms – normal and tele. Normal zooms can vary between 10-20mm and 50-100mm. This gives you good flexibility at distances between below a meter and maybe 10-15 meters. Telezooms are used for long distance photography, but are also very useful if you want to zoom on couple of 6mm minis from 5-6 meters away.

Here’s the thing about lenses – personally I am yet to find optimal choice when it comes to good lens for wargamers. I won’t go into details right now, but there is a couple of very specific and conflicting aspects when it comes to wargaming that make choice of optimal lens a bit of a challenge.

Other equipment

Beside the camera itself, unless we’re talking about mobile phone cameras, I’d consider a good tripode with adjustable mounting head the most useful addition to your photography kit. Tripods come in different sizes. A table tripod like a Joby is very practical for small cameras. Full-size tripode is bulky, but is indispensable if you want to take sharp photos, especially when long exposure times are necessary.

One piece of equipment I’m very divided about are camera flashes. Every camera has one built in. They’re usually crap, for a multitude of reasons. First and foremost, photos taken with built in flash are pretty much always washed-out and flat, because the light ‘floods’ the subject. Second, the range of a built in flash is usually very limited. This means that a couple of meters directly in front of the lens is properly illuminated and the rest of the image is significantly darker. There are ways to control first of these undesireable effects, but you can’t do much about the second. Thus, if I can avoid it, I don’t use built in flashes. This limitation is especially important in my opinion in regard of compact cameras.

On the other hand, I am currently seriously considering getting proper flash light for my Canon DSLR. External flash lights for DSLR are extremly powerful and with long range. They have no problem with properly illuminating a medium sized room. The trick is to learn how to control the light they’re making, so you don’t get these washed out images I mentioned above.

My own stuff

IMG_0067

Here’s what I use these days:

  • Camera in my Samsung S4 mobile phone. Up ‘til now, I’ve mostly used it when I wanted to take a quick snapshot of something close up or didn’t want to fiddle with adjusting the images afterward. However, over last couple of days I’ve done some more in-depth tests with this camera and I must say that I am mightily impressed by its capabilities. I may very well have underestimated its useability up ‘til now!

  • Panasonic Lumix LX-7. I fell in love with this little compact camera as soon as I saw its specifications. At the time, I was under the impression that the most important factor was wide aperture, usually a quite expensive feature in camera optics. This little thing is capable of f1.8 at its shortest focal length (that’s when you take ‘wide’ images) and it blew my mind at the time. These days I’m of the opinion that wide aperture isn’t as important as I have once believed. Nevertheless, I still think this little camera is very useful for wargaming photograpy. It takes sharp images and is capable of focusing at very close ranges. It is however limited by crappy build-in flash, limited zoom (3.5x) and, ironically, limited smallest aperture (f8.0).

  • Canon 1200D DSLR camera. The ‘big gun’ in my arsenal and under right conditions a very capable beast. This model is an ‘entry level’ DSLR camera from Canon, but it’s very good piece of equipment. But it’s not the easiest camera to use and on a bad day I can be quite frustrated by a galore of blurry images it delivers to me after a gaming session. After having it for a couple of years, I am still learning how to use it properly. At times it can be as frustrating as a baby crying its head off for no apparent reason. But, as long as I pay it the time and attention it requires, it is also the most fun camera I’ve ever had.

    My DSLR has usually a cheap Tamron telezoom mounted on it. I’m pretty sure that it is one of root causes of these less than perfect pictures I’m sometimes getting out of this rig. It turned out to be less than optimal choice for wargame photography, but it was cheap and it has a wide zoom capability. It has to do for now.

    My other lens (beside the stock lens that followed with the camera and which I never use) is a Canon 50mm prime lens. This little puppy is as cheap as it gets and delivers shockingly sharp images. It is also totally unuseable for wargaming purposes. Its minimum focus distance is not short enough to allow for useable closeups and it requires too much distance between the camera and the table for good wide angle shots. I love this little lens to bits as long as we’re talking normal photography (portraits and street), but it’s useless for wargames.

Additional comments

One thing that is perhaps worth mentioning are compact system cameras, which is a hybrid between a compact camera and a proper DSLR camera. They’re usually very capable, advanced products with all the features of a DSLR, but in smaller package and sometimes with single, permanently mounted zoom lens. Since I don’t own one, I have no experience of this type of camera. And so, I skipped over it in my post. However, compact system cameras may very well be optimal choice for a wargamer who wants to have some fun and be able do a bit more with his kit.

Another thing that I would like to touch upon are ‘current trends’ in photography equipment. Some ten years ago, the craze was all about megapixels, the more the better. Of course that’s not the case, but it was an easily defineable ‘good, better, best’ factor when marketing a camera. Number of pixels is basically number of dots that can read light and color in a sensor. The ‘gut feeling’ may suggest that more dots equals sharper images and that’s correct assumption… under some very specific and for wargaming purposes irrelevant circumstances. Where ‘megapixels’ or resolution comes into the picture (no pun intended) is when pictures are printed on paper – large size prints do require high image resolution to look good. And by ‘large print’ I mean poster size pictures! For standard prints a 10 megapixel sensor is more than enough. For web photos on a blog or Facebook you can probably use 3 megapixel camera and not see any difference.

Today, the craze is about extreme zoom capability. This in itself can be very useful for wargamer, but keep two things in mind. First of all, pushing zoom lenses to the extreme does come at a price and you pay it with reduction of image quality. Also, the more zoom is used, the more sensitive the camera becomes to vibrations. If you think you can zoom your camera to those 30x while holding it in your hand, you’ll in for a surprise when you see the image you’ve taken. So, if you intend to play with extreme zooms, get a tripode and save yourself a lot of frustration.

Final thoughts

Allright, so that’s the ‘rant’ about equipment, Hopefully I had something useful to tell you, but in the end it all boils down to this single piece of advice I can give to anyone thinking about investing in equipment to take ‘better  pictures’ – advanced and expensive kit doesn’t automatically equal better pictures. Cameras are precision tools and just like any other tool, the more advanced it is, the more expertise and dedication it requires to get most out of it. If you’re ‘just’ interested in taking some snapshots and aren’t interested in investing time and effort in learning about photography, then there is really no point in investing in more advanced gear. Buy stuff that fits your needs, aspirations and your level of interest in photography and don’t expect miracles first time you use that shiny new DSLR. Smile