Well... yet another change of layout - this time good, plain black. No it's not a reflection of my mood, but forced necessity. Earlier today I took a quick pick at the blogg and imagine my suprise - most of it was plastered with adds for Photobucket, encouraging me to create proffessional account. The explanation for this phenomenon was quite simple - custom template I've used has all of its graphic elements posted on Photobucket and owner apparently reached his bandwidth limit.
The lesson is learned - I'm sticking to a plain design with no frills. Sure, the page looks slightly boring without all the fancy gradients, but at least I am in control now. And I have to admit that I like the way pictures pop out with that black background.
June 23, 2009
June 21, 2009
Adler ACW range review redux - part 4
This is the final, at least for the moment, part of my review for figures suitable for the Union troops.
Regimental command strip
Regimental command strip ACW20A consist of one officer, one drummer and two flag bearers. As can be seen in pictures above, I always add one such strip to all of my units.
This strip and its sibling with figures in hats are perhaps the only source of problems in the entire range. Reason for those problems is quite obvious - flag poles are quite easy to break off, and I did receive strips with poles that were weakened by the transport or where poles were already broken off. There is really not much one can do about it, the metal used for figures is quite soft and any prolongated parts will have tendency to break off. My advice is simply to order twice as many command strips as you need and select those with strongest poles. Extra cost is negligable and you will save yourself a lot of grief.
 ACW20A - Command group in kepis
Union artillery
ACW artillery in Adler range is limited to smoothbores and Parrot guns. Crews are also limited to two variants, one in hats and the other in kepis. For Union artillery I use strip ACW19A, but I guess you could mix both variants for the sake of variety.
 ACW19A - Artillery crew in kepis
 Union battery ready to open fire
Final comment on Union infantry
It is perhaps needless to say that strips with numbers 1 and 2 make up the bulk of my Union regiments. I would however like to recommend to everyone to at least order some samples of figures in Collector series - even at this scale they will add a lot of variation to your units.
June 17, 2009
Other that that, Mr. M, how was the ruleset?
Following Sunday's event, it would perhaps be a good time to write couple of additional words about “They Couldn’t Hit an Elephant”. My first impressions were confirmed – it is very playable and relatively simple ruleset. Before our game, I’ve prepared a set of two Quick Reference Sheets and a page listing possible actions for each of the players. Quick walkthrough of basic principles took about half an hour. Then we started to play and after a couple of turns, things flowed rather smoothly.
Our game also confirmed the fact that as in any other ruleset from TFL, cards and luck can sometimes make or break you. The infamous sudden death card, called ‘Coffee’ in TCHAE, didn’t bother us so much for the simple reason that I’ve inserted two of those in the deck. However, cards limiting actions of generals of certain type (‘Cautious’ and ‘Political’) can, with a bit of bad luck, still ruin the day for individual players. In Sunday’s game, player handling the Union brigade in the middle that was completely neutralized by ‘Cautious’/’Political’ card being turned over and over again just before his turn. Word of advice – be very careful with use of a single general with this attribute in your OOB, unless you dislike the player that will assume this command.
As always, some mistakes were made. The most important one in our game was the fact that I’ve forgot about the rule prohibiting use of multiple pips for movement, once a unit reached certain distance from the enemy. This seemingly small mistake made it much easier for units to get into close combat. On the bright side, my mistake may not have been a bad thing, since gave us experience with the rules that handle melees. As it turns out, bayonet charges are very unpredictable in “TCHAE” and should not be attempted by those faint of heart. At the same time, certain critique can once again be raised against the layout of the ruleset. My mistake could have been easily avoided if the ruleset made clear connection between movement rates, infantry fire ranges and the above mentioned restriction.
So what did my friends think of “They Couldn’t Hit an Elephant”? It will come hardly as a surprise that P, who was forced to suffer wrath of Confederate artillery without being able to do much about it, wasn’t very happy about it. T’s opinion was a little more of a surprise – he found randomness of TCHAE somewhat annoying and missed the detail and period flavor of “Long Road North” (my previous choice of rules for this period). L-A, Ha.and He. were much more positive – they liked the confusion created by the card draw and appreciated uncomplicated game mechanics used in TCHAE.
In other words, THAE didn't receive standing ovations, but neither did I hear any petitions for ritual burning of the pages. Personally, I have to say that this ruleset grows on me. There is certain elegance in those hidden relations between different mechanics of the game, although I wish they were clearly stated in the text. Also, what I saw on the table reminded me in many respects of the accounts by Shelby and Sears - confusion, units that moved erratically, heroics of the officers that changed the tide of battle... So with some tweaking, THAE has the potential of being a lot of fun.
 Terrain
 Union blinds on the move
 Closing with the enemy
 On to the top
 Meanwhile, on the other hill
Mr. Elephant meets my friends
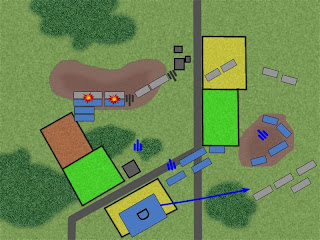
Introduction of “They Couldn’t Hit an Elephant” finally arrived last Sunday. Two Confederate brigades were to stop four Union brigades in their attempt to push their way across the gaming area. Wanting to make things slightly more interesting, I’ve added couple of twists to the scenario. Unknown to Union CinC during his planning phase, one of brigades under his command got lost during the advance to the battlefield. There is a very prosaic reason for this decision; one of Union players had to cancel and I needed to jump in instead. However, I wanted to ensure that my “familiarity” with the setup wouldn’t spoil the fun and decided to play as passive role in the game as possible.
Confederate side was served their own surprise – initially there would be only one brigade on the table. Arrival time of the second brigade was unknown to players on the Rebel side. Furthermore, I planned to give fair warning to the Union brigade commander on the flank that would be hit by Confederate reinforcements.
On the paper it actually did sound like a pretty good scenario – I imagined that Union troops would hit outnumbered Confederates in force, only to be distressed by sudden appearance of additional enemy troops on their flank. As everybody knows, things seldom turn out as planned, especially when you use TFL rules.
Stage 1
Union commander decided to enter the field on broad front – three brigades in line, with the fourth in support (my ‘no show’ command). Initial orders were to take holding positions along southern edge of the field, anchoring one flank on a nearby height.
At the same time Confederates attempted to show strength, moving the blind with “real” brigade into central position, while making best possible impression with dummy blinds.

Stage 2
Having assumed the intended holding position, two of Union brigades were either spotted or unmasked the blinds voluntarily. Confederate blind on the right was exposed and removed. Long range artillery duel started, causing some casualties and some consternation among one of Union regiments, but otherwise causing little damage. At the same time Union commander on the right flank received reports about substantial Confederate reinforcements moving rapidly toward his position.

Stage 3
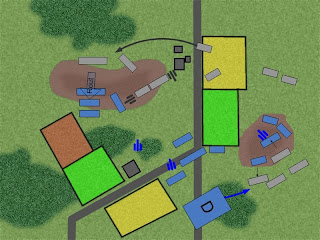
Union brigades on the left and in the center receive orders to advance on Confederate position. Rightmost brigade moves rapidly and infantry on both sides start to exchange fire. Brigade in the center never moves out of its position. Confederate artillery fire starts to take effect, demoralizing one of the blue-clad regiments.
New arrivals show up on the field – lost Union brigade shows up, but far away from the expected entry point. At the same time, Confederate reinforcements show up on Union right flank. However, two of the rebel regimental commanders misunderstood their orders and got separated from the rest of the brigade. This causes some confusion and puts severe strain on newly arrived Confederate brigade commander.

Stage 4
Union assault on the left flank advances to contact with Confederate units on the high ground that dominates left portion of the field. Rebels are thrown back and appears to rout, but a courageous colonel manages to stem the flight and rallies the troops. Union right prepares for inevitable assault of Confederate reinforcements. Union center fails to support their comrades on the left, but the attached battery knocks out one of rebel guns.
Stage 5
What seems to be the final push on the Union left smashes into the battered Southern line. Amazingly, the line holds and same soldiers that were on brink of collapse just couple of minutes ago manage to throw back the blue onslaught in disarray. As so many times before, inexperienced troops can be very eager, but can also turn out to be very brittle tool.
Indecisive assault on the right flank ends in stalemate, while Union brigade in the center finally starts to show signs of activity. Unfortunately, it’s too little and too late, as both sides decide they had enough for the day.

Confederate side was served their own surprise – initially there would be only one brigade on the table. Arrival time of the second brigade was unknown to players on the Rebel side. Furthermore, I planned to give fair warning to the Union brigade commander on the flank that would be hit by Confederate reinforcements.
On the paper it actually did sound like a pretty good scenario – I imagined that Union troops would hit outnumbered Confederates in force, only to be distressed by sudden appearance of additional enemy troops on their flank. As everybody knows, things seldom turn out as planned, especially when you use TFL rules.
Stage 1
Union commander decided to enter the field on broad front – three brigades in line, with the fourth in support (my ‘no show’ command). Initial orders were to take holding positions along southern edge of the field, anchoring one flank on a nearby height.
At the same time Confederates attempted to show strength, moving the blind with “real” brigade into central position, while making best possible impression with dummy blinds.

Stage 2
Having assumed the intended holding position, two of Union brigades were either spotted or unmasked the blinds voluntarily. Confederate blind on the right was exposed and removed. Long range artillery duel started, causing some casualties and some consternation among one of Union regiments, but otherwise causing little damage. At the same time Union commander on the right flank received reports about substantial Confederate reinforcements moving rapidly toward his position.

Stage 3
Union brigades on the left and in the center receive orders to advance on Confederate position. Rightmost brigade moves rapidly and infantry on both sides start to exchange fire. Brigade in the center never moves out of its position. Confederate artillery fire starts to take effect, demoralizing one of the blue-clad regiments.
New arrivals show up on the field – lost Union brigade shows up, but far away from the expected entry point. At the same time, Confederate reinforcements show up on Union right flank. However, two of the rebel regimental commanders misunderstood their orders and got separated from the rest of the brigade. This causes some confusion and puts severe strain on newly arrived Confederate brigade commander.

Stage 4
Union assault on the left flank advances to contact with Confederate units on the high ground that dominates left portion of the field. Rebels are thrown back and appears to rout, but a courageous colonel manages to stem the flight and rallies the troops. Union right prepares for inevitable assault of Confederate reinforcements. Union center fails to support their comrades on the left, but the attached battery knocks out one of rebel guns.

Stage 5
What seems to be the final push on the Union left smashes into the battered Southern line. Amazingly, the line holds and same soldiers that were on brink of collapse just couple of minutes ago manage to throw back the blue onslaught in disarray. As so many times before, inexperienced troops can be very eager, but can also turn out to be very brittle tool.
Indecisive assault on the right flank ends in stalemate, while Union brigade in the center finally starts to show signs of activity. Unfortunately, it’s too little and too late, as both sides decide they had enough for the day.


June 02, 2009
Devil lies in the detail
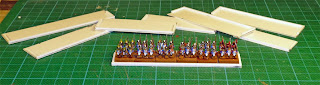
Sometimes even a small detail can enchance the game experience - custom made quick reference sheets for each player, measurement tools specific to the ruleset, perhaps nice labels. In my case it's the movement trays - because of the lack of space and cost, I mostly use 6mm miniatures for games that are really intended for 15mm or 28mm. The end result is that bases are small and fiddly, which in turn results in lot of mishaps when they are moved on the table. Obvious answer to my problems was of course making a bunch of moving trays, but I couldn't decide on what material to use - thick cartoon, metal sheets, plastic...
In the end I've decided on using plastic. Bases themselves were cut out of 1mm thick plastic sheet, which is easy to cut with common kitchen scissors. Plastic sheet this thin is quite woobly, so I stiffened it with 1.5mm square profile rods from Evergreen - just front and the sides. Since bases for both my ACW and Napoleonic miniatures are 1.5cm wide, I've made a bunch of bases for various number of miniature bases. One important thing to remember is to add 3mm to each base width to compensate for width or the rods. In fact, I've added 5mm, as my miniature bases aren't very precisely cut. Better to have few milimeter gaps, than an unusable base. I've also decided to add 5mm to the shorter side - this will give me space to add labels with unit names and maybe some basic data. Self-adheseve label paper will be perfect for this purpose.
OK, so it's nothing revolutionary, but I'm quite pleased with the end result and somewhat suprised over how little time it took. I've made about 30 bases in about 2 hours. A quick spray paint job and I'm done.

June 01, 2009
They Couldn't Hit An Elephant - first impression
Three days weekend and quickly approaching date of introduction of the ruleset to my group gave me enough motivation for a quick test of “They Couldn’t Hit an Elephant”, Two Fat Lardies’ ruleset for American Civil War. Since my intention was to familiarize myself with the ruleset mechanics, I've decided to keep it simple, charge up a hill and see what happens.
For no particular reason I choose the Confederates to be on the defensive – two brigades, each consisting of four regiments and attached artillery battery were to receive an attack by three similar Union brigades. Terrain was created ad hoc from available terrain (made of GHQ TerrainMaker hexagonal tiles).
Thoughts after first reading
“They Couldn’t Hit an Elephant” is written in a style that is similar to that of other rulesets from Too Fat Lardies – clear and logical at first glance, but with some ambivalences and omissions that can confuse players rather quickly in their first games.
Like all TFL games, TCHAE is card-driven – basic cards activate either a brigade or division commander (depending on unit scale in the game). Upon activation, units that are part of leader’s command may move, fire, change formations or attempt to improve their current morale state. Amount of possible activities is limited by number of command pips, decided by a roll of an average dice.
Period flavor is defined by additional cards, which influence leaders of different character. For example a random cautious leader may be restricted to firing, but no movement, while inspirational leaders can get an opportunity to rapidly rally a unit or lead it into a sudden assault.
Last, but not least, there is the ‘Coffee’ card. When it is turned, it automatically triggers end of turn sequence of activities, after which the turn ends, deck is reshuffled and new turn begins. 'Coffee' card introduces fair amount of friction and uncertainty into the game, as players never know who will be able to act in current turn. It is also one of the usual TFL game mechanics that create most controversy among the players – it is either beloved or despised.
As is common for most rulesets, both units and commanders may be of varying quality and character. Unit morale state during the game is covered by four states – normal state allows the units to obey all orders, units that are ‘fightin’’ are locked in combat and won’t advance, while ‘defeated’ units are on the brink of breaking and will try to extract from combat. Finally, units that break, enter rout state and will run away until they find cover or are rallied.
Both ranged and close combat causes single figure casualties and may influence unit morale. Effectivness of firepower is low, most of the time there is either no effect or a single figure is lost by a regiment. Loss of two figures is a rare occasion.
All main game mechanics – movement, firing, close combat and command&control - are quite simple, but cover all the bases. At first glance I couldn't spot any bottlenecks in regard of game speed (very few dice modifiers) and there is just enough period flavor without the 'chrome' overloading the ruleset. So far so good… now on to my game.
 Confederate right flank...
 ...and the left
Union brigade on my left was quickly spotted by commander of the Confederate brigade on nearby high ground, forcing them to deploy while still in marching column. Confederate artillery opened fire on Union artillery battery while it was still limbered and drew first blood.
 Union blinds enter the battlefield
 Union brigade prematurely spotted
Union brigade on my right took its time and approached more cautiously, taking care of changing its Blind formation to ‘deployed’ before they were spotted by the Southerners. However, at the time they were spotted, woods on both sides of their advance route delayed their movement and made deployment of their artillery very difficult.
Last Union brigade swung through the open terrain in the middle and upon being spotted stacked its regiments in a single column. My intention was to throw those units against Confederate position on the hill and see what the result would be.
 Overall situation in the middle of the game
 Confederate view from the high ground
As the Union brigades moved into small arms range, both sides started to trade volleys and the ruleset started to show its strength. Units that suffer casualties need to take so called status check – first failure will cause the unit to assume ‘Fightin’’ status, which prohibits them from advancing any further. This very simple mechanics portray very well the character of ACW battles which often degenerated into two infantry lines pouring fire into each other until one side had enough. This is exactly what happened to the Confederate regiment in the woods on the right flank of Rebel line. Under pressure of a Union regiment and a battery of light artillery, they became first ‘Fightin’’ and then ‘Defeated’. Finally they were forced to move back into the woods.
The assault column in the middle came under intensive artillery fire from the hill in front of them. Advance of the regiment in front of the very Napoleonic formation stalled, as it became ‘Fightin’’. Second regiment bypassed them, as they recovered, but that was all their commander could do with his allotment of pips.
On Union right flank, things became very precarious for the blue-clad troopers. Difficult terrain hindered that brigade from deploying into effective formation. Furthermore, some rather silly decisions on the part of the player (yes, that would be me) caused one of the regiments to advance much too far without adequate support. The result was devastating – two Confederate regiments and an artillery battery opened fire and in a blink of the eye shattered their reckless opponent. The routed Union regiment…
 Union right in peril
Dazed and confused
…at this point the ruleset stopped making any sense to me. You see, routed units perform mandatory flight movement as soon as the appropriate brigade card comes up. But for two rounds, the command card that would allow the broken regiment to run away didn’t come up. I refused to believe that this is how TCHAE was supposed to handle such situations, but the ruleset refused to give me an indication of how I was to proceed. Nevertheless, I came to the conclusion that I must have misunderstood some vital rule section. As it was 1.45AM, I've decided to call it a night, without achieving the goal of a close combat.
Afterthoughts
Even though this first test run was something of a failure, it confirmed my first impression of TCHAE as very quick ruleset with adequate feel of the period. After a couple of rounds I had pretty good understanding of the flow of the game, so the learning curve is low and even beginners should be able to grasp the basic concepts with relative ease.
At the same time, TCHAE also showed its weaknesses, which are quite typical for TFL rulesets. Some very fundamental concepts are either omitted or explained in convoluted manner that leaves them open for different interpretations. One of those omissions caused my confusion in test game above – as it turns out, status check for a unit that takes casualties is being done after ALL firing of ACTIVE enemy units is done. I on the other hand got the impression that status should be checked on every occasion a unit suffered casualties. My interpretation completely change the game - the unfortunate Union regiment that was shot to pieces made six test, but only two were required. Furthermore, some additional afterthought could have been given to placement of certain rules. For example, at the end of definition for 'Defeated' status there is a rather ingenious paragraph that effectively prohibits situation in which my Union regiment found itself in after being shattered. But as the situation was created as a result of firefight, I've primarily looked for the answers under sections dealing with combat and status checks.
Fortunately there is a very active Yahoo group that supports TFL games. After posting my questions there, I’ve had everything explained to me promptly and in very friendly manner. Next weekend I will run same scenario again and keep you updated about the outcome.
For no particular reason I choose the Confederates to be on the defensive – two brigades, each consisting of four regiments and attached artillery battery were to receive an attack by three similar Union brigades. Terrain was created ad hoc from available terrain (made of GHQ TerrainMaker hexagonal tiles).
Thoughts after first reading
“They Couldn’t Hit an Elephant” is written in a style that is similar to that of other rulesets from Too Fat Lardies – clear and logical at first glance, but with some ambivalences and omissions that can confuse players rather quickly in their first games.
Like all TFL games, TCHAE is card-driven – basic cards activate either a brigade or division commander (depending on unit scale in the game). Upon activation, units that are part of leader’s command may move, fire, change formations or attempt to improve their current morale state. Amount of possible activities is limited by number of command pips, decided by a roll of an average dice.
Period flavor is defined by additional cards, which influence leaders of different character. For example a random cautious leader may be restricted to firing, but no movement, while inspirational leaders can get an opportunity to rapidly rally a unit or lead it into a sudden assault.
Last, but not least, there is the ‘Coffee’ card. When it is turned, it automatically triggers end of turn sequence of activities, after which the turn ends, deck is reshuffled and new turn begins. 'Coffee' card introduces fair amount of friction and uncertainty into the game, as players never know who will be able to act in current turn. It is also one of the usual TFL game mechanics that create most controversy among the players – it is either beloved or despised.
As is common for most rulesets, both units and commanders may be of varying quality and character. Unit morale state during the game is covered by four states – normal state allows the units to obey all orders, units that are ‘fightin’’ are locked in combat and won’t advance, while ‘defeated’ units are on the brink of breaking and will try to extract from combat. Finally, units that break, enter rout state and will run away until they find cover or are rallied.
Both ranged and close combat causes single figure casualties and may influence unit morale. Effectivness of firepower is low, most of the time there is either no effect or a single figure is lost by a regiment. Loss of two figures is a rare occasion.
All main game mechanics – movement, firing, close combat and command&control - are quite simple, but cover all the bases. At first glance I couldn't spot any bottlenecks in regard of game speed (very few dice modifiers) and there is just enough period flavor without the 'chrome' overloading the ruleset. So far so good… now on to my game.
Hold the high ground
In my imaginary engagement, Confederates were to stop Union troops from exiting along the roads that run to the edge of terrain behind the Confederate position. I didn’t give much thought to the most correct setup of the defensive position, my main goal was to create a situation where a clash between two forces would give me an idea about game mechanics. With this in mind I’ve placed Confederate forces in blocking positions near the roads. Initial rounds saw Union troops advancing under Blinds, one of typical TFL game mechanics, which allow both rapid movement and a degree of fog of war. Confederate right flank...
 ...and the left
Union brigade on my left was quickly spotted by commander of the Confederate brigade on nearby high ground, forcing them to deploy while still in marching column. Confederate artillery opened fire on Union artillery battery while it was still limbered and drew first blood.
 Union brigade prematurely spotted
Last Union brigade swung through the open terrain in the middle and upon being spotted stacked its regiments in a single column. My intention was to throw those units against Confederate position on the hill and see what the result would be.
 Overall situation in the middle of the game
 Confederate view from the high ground
The assault column in the middle came under intensive artillery fire from the hill in front of them. Advance of the regiment in front of the very Napoleonic formation stalled, as it became ‘Fightin’’. Second regiment bypassed them, as they recovered, but that was all their commander could do with his allotment of pips.
On Union right flank, things became very precarious for the blue-clad troopers. Difficult terrain hindered that brigade from deploying into effective formation. Furthermore, some rather silly decisions on the part of the player (yes, that would be me) caused one of the regiments to advance much too far without adequate support. The result was devastating – two Confederate regiments and an artillery battery opened fire and in a blink of the eye shattered their reckless opponent. The routed Union regiment…
 Union right in peril
…at this point the ruleset stopped making any sense to me. You see, routed units perform mandatory flight movement as soon as the appropriate brigade card comes up. But for two rounds, the command card that would allow the broken regiment to run away didn’t come up. I refused to believe that this is how TCHAE was supposed to handle such situations, but the ruleset refused to give me an indication of how I was to proceed. Nevertheless, I came to the conclusion that I must have misunderstood some vital rule section. As it was 1.45AM, I've decided to call it a night, without achieving the goal of a close combat.
Afterthoughts
Even though this first test run was something of a failure, it confirmed my first impression of TCHAE as very quick ruleset with adequate feel of the period. After a couple of rounds I had pretty good understanding of the flow of the game, so the learning curve is low and even beginners should be able to grasp the basic concepts with relative ease.
At the same time, TCHAE also showed its weaknesses, which are quite typical for TFL rulesets. Some very fundamental concepts are either omitted or explained in convoluted manner that leaves them open for different interpretations. One of those omissions caused my confusion in test game above – as it turns out, status check for a unit that takes casualties is being done after ALL firing of ACTIVE enemy units is done. I on the other hand got the impression that status should be checked on every occasion a unit suffered casualties. My interpretation completely change the game - the unfortunate Union regiment that was shot to pieces made six test, but only two were required. Furthermore, some additional afterthought could have been given to placement of certain rules. For example, at the end of definition for 'Defeated' status there is a rather ingenious paragraph that effectively prohibits situation in which my Union regiment found itself in after being shattered. But as the situation was created as a result of firefight, I've primarily looked for the answers under sections dealing with combat and status checks.
Fortunately there is a very active Yahoo group that supports TFL games. After posting my questions there, I’ve had everything explained to me promptly and in very friendly manner. Next weekend I will run same scenario again and keep you updated about the outcome.
Subscribe to:
Posts (Atom)