Showing posts with label GHQ. Show all posts

May 02, 2016

Playing Iuka Scenario or how to bungle a perfectly good game

First 'home turf' game of the year took place previous Saturday. And indeed 'home turf' it was in double meaning of the word, since we run yet antoher ACW scenario from Partizan Press 'Hearthland' scenario book and with 'They couldn't hit an elephant' ruleset. The well-trodden path one could easily believe... which makes the events that took place so much more peculiar. But I'm getting ahead of myself.

The scenario I picked for our game is one of the most interesting in the 'Heartland' scenario book. It's based on first battle of Iuka and it’s actually something so rare as a true meeting engagement. A smaller, but qualitatively much better Southern force of eight regiments and assorted artillery tries to escape the clutches of a numerically superior, but rather green Northern force divided in two columns. Also, the terrain is something of a challenge in this one with all woods being difficult terrain, thus limiting possible advance avenues, but at the same time creating some opportunities for more 'adventurous' players.

The game objective of Rebels is to secure at least two thirds of the road stretch starting with their entry point and ending with the entry point the Union force meeting them head on. I marked the spot which I decided would be the ‘watershed mark’ with the red X on the topmost picture.

I run the game with my usual modifications to the rules – poker chits activated the leaders instead of cards and there was equal number of chits for both sides in the bag, with dummy chits balancing the number for the side with fewer number of leaders (in this case a single dummy chit was added for the Confederate side). As usual, I started the game with three coffee chits. That number was reduced to two coffee chits once first casualty was suffered by muskeet fire and finally to one coffee chit after first rout. This modification increases the friction slowly as the action heats up. Also, for some unexplainable reason I decided this time around to run the game without any blinds – all units would deploy in march columns from the start. Finally I decided we would run the game for 15 rounds with a possibility of extending the game based on a D6 dice throw before each round above 15. A 6 would end the game on round 15, 6 and 5 on round 16, and so on…

The game

Well, let’s move on to the pictures and see what we can make of them.
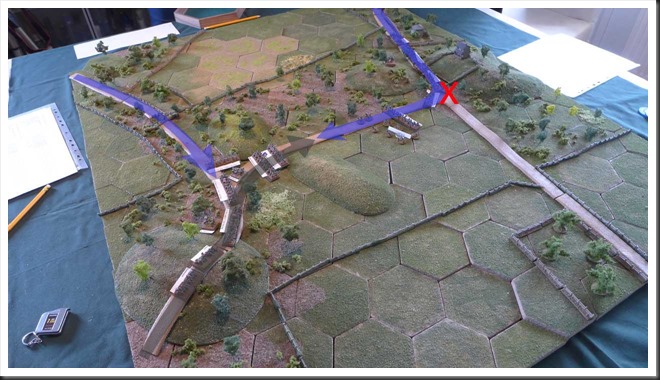
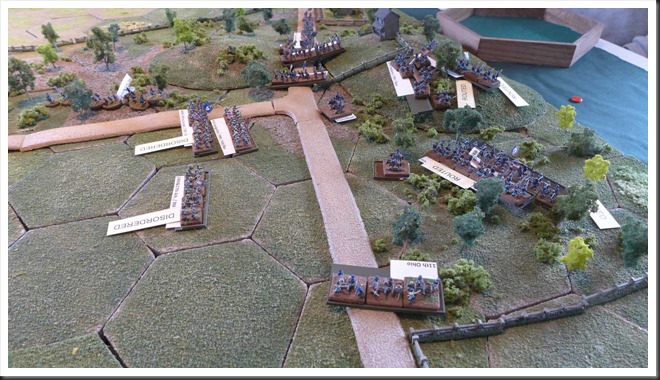
P1020756The initial eight or nine rounds were spent on sluggish march to contact – a consequence of me deciding not to use blinds and made worse by further mixups regarding the rules. More about that in final analysis of the game. Here we see the situation around round 5. The Northern force that is deployed on the board actually did start the game deployed in column of march on the road, with foremost unit standing close to the red ‘x’. Hå., acting cautiously and waiting for appearance of his second brigade, started deploying his regiments almost immediately into line. L., commanding the Confederates acted a bit more agressively, moving his foremost brigade quickly toward the enemy present on the battlefield. It became obvious rather quickly that he intended to use his second brigade to hold flanking Union column at bay. As things turned out, that brigade was severly delayed by bad chip draws.

P1020759More of the same. Hå. throws his skirmishers forward as L. deploys his front brigade into line. On the side road we can see avangarde troops of Union flanking force, a small cavalry regiment. Main force of that column is still to appear on the field.

P1020765L. is almost ready to strike, Federal brigade sets up to receive the expected assault.

P1020768Meanwhile, Hå’s reinforcements make their way forward, although they’re in no rush.

P1020771L.s frontal assault goes in and manages to push back entire Union brigade. Actually it was a pretty even fight, with superior numbers of Union regiments and well-ordered formation almost halting the Rebel advance. But in the end experience carried the day. L. had to repeat his agressive charges three times, final assault being carried out by a single regiment before…

P1020781…this happened. The final chage of a single Confederate regiment routed its Union opponents, and quite badly so. This sudden collapse of morale spread like a virus throughout the entire brigade, which promply skedaddled in total panic to the rear. I’ve never seen something like that in a TCHAE game and to be honest, it was quite fascinating to see how rout rules triggered one regimental collapse after another. For precious moment the road to escape was free for the Rebels.

P1020778In the meantime, to the rear of this intense action, the terrain made things very difficult for both sides. He.’s regiments moved very slowly toward the Confederate blocking force. When contact was finally made, everyone was hindered by miserable terrain, making effective troop deployment very difficult. The result was a typical, inconclusive engagement where both sides suffered casualties, but noone could achieve the upper hand.

P1020792For a short while, things hang in the balance at the focal point of the battle. Funnily, it was the rules that decided that no breakthrough would be achieved by the Rebels – at a critical moment in the game a situation occured where if the first leader to be activated was the commander of the Union brigade that routed, it would trigger mandatory rout move for all broken regiments.  That would remove entire brigade from the battlefield. On the other hand, if Union Commander in Chief were to be activated, the rout movement would not be triggered and he’d have time to restore order among his routed troops. Luckily for Hå., his commander in chief’s chit was the first to be drawn, followed promptly by chit activating commander of his second brigade. This gave him chance to not only recover his routed brigade but also to set up a stabilizing line of blue-clad troops between his broken brigade and the Rebels.

At that time we reached the end of round 15. With everyone somewhat exhausted and realizing that we would not be able to achieve conclusive result in remaining time (up to six extra rounds), we halted the game and called it a draw.

Musings after the battle
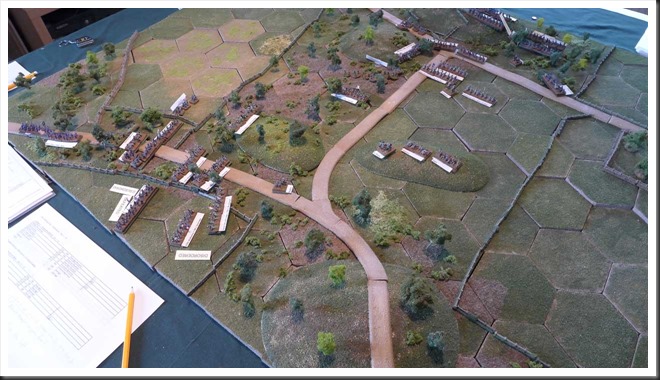
P1020808The fact is that the outcome of our game was pretty close to the historical events – Confederates pushed back Union line (which in the real battle took up position on the heights where Confederate artillery is set up in the final picture), but then run out of steam. However, the battle was then aborted by approach of the evening and in the darkness, the Union troops apparently panicked and abandoned their position, leaving the field and open escape route to the rebels.

This however is a very small and unimportant side note. The really important thing consists of a disclosure of a very significant aspect of this game - for some unexplainable reason, I managed to completely scramble ‘They Couldn’t Hit An Elephant’ in this game into something that can only be described as Frankensteinian hodgepodge of at least two, possibly three different rulesets. To begin with, I completely re-arranged the turn sequence, allowing troops to shoot when they shouldn’t have, move when they shoudn’t be allowed to and executed assaults at incorrect time. I also incorrectly limited allowed movement of troops by at least two thirds, slowing the events of the game to snail pace. Finally, I’ve gotten into my head that all troops that participate in an assault are automatically disrupted. This, I’m pretty sure was a ‘crossover’ from rules of a board game (‘This Accursed Civil War’ by GMT) which I haven’t played in ages!!! The result of this particular shortwiring of my brain resulted in L.’s charge never gaining the momentum it could have gained. Go figure…

Here’s the funny thing though! Despite me totally bungling my role as game master, we still managed to have a pretty good fun. Once I discovered my multiple fumbles somewhere in the middle of the game, the lads were totally understanding and we simply agreed to continue the game to its conclusion with all my unintentional ammendments ‘in play’. And this brings me to perhaps the only really important conclusion one can draw from this particular game – it’s not the rules applied with military precision, masterly painted miniatures or diorama quality terrain that make for a good game, but the friends you play it with.

That being said, the Iuka scenario has so much potential for an interesting and challenging game that L. and I decided to run it again this Saturday, this time around with correct rules. So stay tuned for Iuka Redux.

August 30, 2013

GHQ Terrain Part 4–Hills

Vacation – ironically, in wargaming context, this word means for me at least no games and very little painting. Thus, there is very little to write about… which in turn leads us to the next (and probably last) instalment of “filler” cycle of articles about my experiences with GHQ Terrain system.

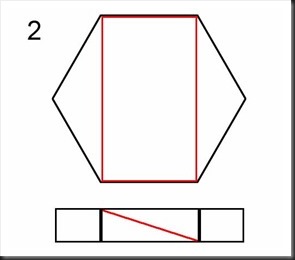
Since GHQ Terrain system is hexagon based, making hills are pretty straight forward – you take a hexagon and cut it up in two or more subsections. There are three basic cuts you can make, as shown in the pictures below, each variant giving two useable hill “pieces”.

Couple of things to keep in mind when making the cuts:

  • The initial alignment of the cut is the most important part of the cutting process. Once you progress “into” the hexagon, mistakes or messy cuts can be easily fixed, but a bad initial cut will result in hill pieces not aligning with each other. This in turn will result in sloppy visual effect.
  • In the images below, the cut line is marked with red lines. Keep however in mind that once the cut progresses into the hexagon, you can cut whatever shape you want, as long as the diagonal lines at the edges are consistently aligned.
  • Try to keep the cut on the horizontal surfaces of the hexagon at least one centimetre away from the red line in my pictures. This will give you a ridge with a horizontal surface, a very useful “feature” when trying to place miniatures on the top of the hill.

Hill_1Hill_2Hill_3
Let’s now take a look at different hill shapes and how useful they are. Figure 1 will give you one “short” hill edge and large one “indented” hill side. In my experience, you will need a whole bunch of those “short” pieces – try to make at least ten of those in your first batch. The other piece is far less useful. Observe however that with some care when cutting, it is possible to get two “short pieces out of single hexagon – something definitely worth considering when working with the initial batch of hill pieces.

Figure 2 is pretty straight forward – this cut will give you two  identical “linear” hill slopes. Those are very handy for creation of those long ridges, stretching over large parts of the battlefield, but are of limited usability when trying to make terrain with a lot of smaller elevations. For the initial batch, I would recommend for six, maybe eight such pieces.

Finally, the cut shown in figure 3 provides one hill piece necessary to “expand” the hill slope 60 degrees outward  and one hill piece that “retracts” it 60 degrees inward. Both variants are equally useful, but keep in mind that you will need the “retracting” pieces much more for terrain setups with many smaller elevations.

Personal experiences, troubleshooting and variations on the themes

The guide that follows with each pack of GHQ Terrain hexagons shows you different cut variants. Its illustrations are much more instructive than pictures I’ve included with this post, so take a moment and study them.

Guide’s suggestion to use a saw to make the cuts is however not so nice. I tried to follow this advice initially and found out very quickly that cutting styrofoam with a saw makes incredible mess. Furthermore, saw cuts give very rough surfaces and if I am to be perfectly honest, working with saw felt generally like a bit of a hassle. So no, I would not advise you to use saw for this job. Instead, invest in a proper wire foam cutter.

Now, cutting the hill pieces with foam cutter presents its own set of challenges. First and foremost, if you set the temperature of the wire too high, you may find it difficult to control the cut. Try to find a temperature that allows you to make the cut easily, but you should feel a bit of resistance while slicing through the hexagon. Biggest challenge for me personally was to keep correct alignment of the wire when “exiting” the hexagon, especially when making the tiny “corner” pieces shown in figure 1. After a while I decided to bypass this problem by making two “halfway” cuts instead of a single one – one cut from each side, meeting (hopefully) in the middle of the hexagon.

As with everything else, experience comes with practice, so don’t worry if you make a mess out of a couple of hexagons. Keep in mind though that even if you make a “bad” cut, don’t fret over it. Unless you manage to really butcher the hexagon, most mistakes are easily corrected with some filler; my personal favourite is smooth wall putty. It can be purchased in any DIY shop in plastic tubes – one of those will last you forever. Wall Filler is also quite useable for creation of variations in slope shapes – you can use it to make the slope gentler, more irregular or to create narrow “fingers” that extend from the main hill piece.

To mount or not to mount

Once you cut your first hillside piece, you will probably immediately notice one thing – the lower part of it is very fragile indeed. This is especially evident when working with the hexagons that are 1/4” thick. Now, you may of course be of different opinion, but my personal view is that hillside pieces cannot be used on their own and need to be mounted on another hexagon. Yes, this means that you will need to use two hexagons for single hill slope hex, thus doubling the price of the terrain piece.

White glue can be used to glue two pieces together, but personally I prefer to use contact glue specially made for styrofoam. Woodland Scenics sells such a glue, but see if you can’t find it (usually for significantly less money)  in your local DIY shop.

October 14, 2012

GHQ Terrain Part 3–ROADS

By pure coincidence, I saw that yesterday it was exactly one year since my last article regarding GHQ terrain hexes. In other words, it’s about time to add to the “series”.

OK, this time around, let’s talk about roads. Once again, it’s pretty basic stuff – unless you’re in need of some odd, scenario specific combination, what you’ll need are hexes with straight roads and turns of 60 degrees. Beyond those, you’ll usually need couple of forks and crossroads.My layouts vary between 10x10 and 16x14 hexagons and one pack of 1/2’ thick variant (24 hexes) covered comfortably most of my needs. I make odd pieces when I when I them for a scenario.

Now for a bit of bad news – to have a truly flexible road network, you’ll actually need to make hexes with straight sections in two different variants. The obvious variant is with roads running between two parallel vertices. The other one needs to have the road running between two diagonal vertices. You’ll won’t have to do this second variant immediately, but you’ll need when you’ll want your road network to have true 90 degrees crossroads.

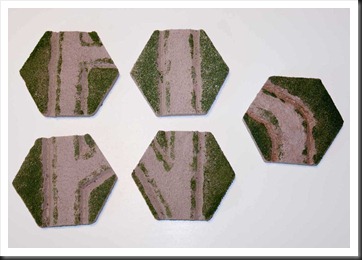
HexagonsII2220121014Couple of different road hexes I’ve been needing in my games so far

HexagonsII2320121014Here’s why you’ll need two types of straight road hexes

Things to consider beforehand

Couple of things need to be considered before making first batch of road hexes. First of all, how wide roads do you need? When I started out, I remembered what someone once wrote on TMP – that roads should be twice as wide as standard bases, so that two columns could pass each other without problems. My infantry bases are 15mm wide, thus based on the opinion above, my roads are 30mm wide, which is about half the width of a GHQ hexagon (about 60mm +/-3mm, depending on how well particular batch is cut). In hindsight, I wish I went with width of 20 mm or even less. But as always, it’s a question of personal taste.

Next, you need to decide whether or not to have ditches. This detail adds an additional step to making process and involves a sharp blade, with all possible consequences. Cutting a ditch is however quite straightforward – just mark the outline of the ditch and cut the styrofoam at about 40 degrees on both sides. Don’t worry about the resulting v-shape of the ditch – some additional white glue at the bottom will catch an extra about of sand and provide nice u-turned profile.

Different strokes for different folks

I make my road hexagons in exactly same way as basic hexes, which I already described in previous post about this topic. There are two main differences. As a first step, I cut out the drainage ditches, as already described above. Then it’s paint-sand-paint sandwich and finally flocking with one minor difference – I flock only the sides of the road and sprinkle a littile flock on the edges of the road. Process is finished by sealing the flock with mixture of white glue and water.

The main advantage of method above is that I user the painted sand texture for the roads, which is very convenient and quick. However, I must admit that it’s not the most appealing technique from the visual perspective. Another possibility is to cover the road surface with thin layer of wall filler to hide the unattractive texture of styrofoam and maybe even scribe wheel tracks and such. Yet another alternative is to not even bother with hiding the natural texture of the hex and simply use sand-coloured flock for road surfaces.

Is it worth the trouble?

Considering the fact that I have by now made over 100 of road hexes of all possible shapes and forms, it may be a bit odd question. Nonetheless, I have to say that there are times when I wonder if the end result is worth the bother.

The obvious advantage of roads recreated directly on the hexes lies in visual appeal. However, one also needs to consider all the extra work that is required to achieve this effect – I am constantly making new road hexes for elevations and different types of terrain. There are also limitations to this approach that are purely geometrical – hexagons allow a minimum 30 degree turns, unless one is willing to make one of bits. This in turn limits the flexibility in road network layout and forced me on more than one occasion to a compromise.

The fact is that the overhead in work effort required by ‘inherent’ road hexes is so big, that I am seriously considering moving over to some alternative system. More specifically, I am eying with curiosity those flexible roads made out of silicone that Total Battle Miniatures are making. If I decide to give them a try, I’ll tell you all about it.

April 30, 2012

Keep it simple, stupid

I don't know about you, but most of my wargaming projects have a tendency to stop to a grinding halt long before they even get their first test run on the tabletop. Even those few projects that have managed to get to playable state have taken insanely long time for me to complete - my one and only WAB army required more than two years before reaching playable state, while a little more than 20 6mm battalions intended for General de Brigade lingered on my painting table for... oh, let me see if I remember... six years?

These days I am rather painfully aware of the fact that my desire for starting new project is far greater than my ability to actually achieve tangible results. So when I decided to scratch my itch for company level WWII gaming (new version of 'I Ain't Been Shot, Mom' broke my resistance), I decided to take somewhat different approach than in my previous projects and try to stick to the KISS principle. You know, KISS - Keep It Simple, Stupid.

First of all, the scale. Yes, you guessed it - 6mm. Not only will it be quick and simple to build up necessary forces in this scale, but the fact that I already have a bunch of GHQ blisters made this choice rather practical. My first test base looks rather nifty, if I may say so myself.

German_Squad_Proto German_Squad_Proto2

Second, the terrain. Here I was in a bit of a quandary, because my ultimate goal is to use IABSM3 together with those excellent scenario booklets that Too Fat Lardies also provide. The thing is that those booklets have maps and they are historical. Why is it a problem, you ask? Well, here's where my obsessive compulsiveness raises its ugly head - if a scenario has a historical map, I just must depict it as precisely as possible on the wargaming table. Sorry, can't help it, it's just one of those things.

Fortunately, I do believe that I found a solution for my "problem" - I'll make terrain boards specifically for individual scenarios. This may seem counterintuitive, but it's not... if I keep things simple. Every board will be 80 x 60 centimeter, built from cheap kind of styrofoam and "flocked" with sand and latex wall paint. Test board in the picture took me three hours to make and the cost was about 85SEK (around $12).

Simple_Board

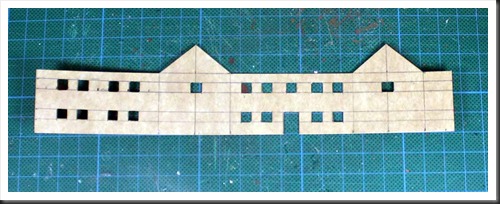
Next, the buildings. Simplest possible solution here - home-made stuff made from the cardboard boxes that frozen TV dinners are packed in. Sure, they won't look as nice or durable as those resin buildings from Timecast Models, but they are cheap, take the paint very well and most important of all, they are  easy to make.

Building_Prototype

Finally, the vegetation. Trees aren't much of a problem, since I already have a bunch of them. The main "obstacle" on my way to be able to play my first scenario is the boccage, which is featured prominently in the scenario pack that I will be using. I still haven't decided how to proceed here, but I toy with the idea of using paper mache and Woodland Scenics foliage.

October 13, 2011

GHQ Terrain PART 2 – Basic Hexes

Let me start by clarifying a couple of things. First of all, stuff I intend to cover here is pretty basic and familiar to anyone who's been wargaming for a while. Second, the way I handle GHQ hexes isn't the only way to do it, nor is it the right way to do it, it's just the way I do it. When I decided to use those hexes, my goal was to get functional and flexible terrain setup, quickly and with minimum fuss. Thus the techniques I use are really very simple. If you think that there are better ways or could give me some advice about how to improve my results, any comments are appreciated.

OK, with that out of the way, let's move on. Basic hexes are just that -basic plain, probably green terrain. 1/2 inch thick tiles are perfect for that type of hexes and you will need a whole bunch of those. I would say that two packs, total of 48 hexes, is pretty good amount for basic setup.
Besides the tiles, you'll need following materials:

  • Paint - don't bother with the expensive, artistic stuff. Find a DIY shop and grab a good sized jar of acrylic wall paint. It's much cheaper and it's thick, so it protects the hex pretty well.
  • Sand - in my opinion, texture of expanded polystyrene is pretty unattractive, so I prefer to cover my hexes with sand. I got mine from pet shop, 5 kg of sand intended for the bottom of an aquarium, which is enough to cover thousands of hexes.
  • Flock - since I wanted to have green, grassy hexes (standard for wargaming terrain), I needed flock and a lot of it. Stay clear from the stuff from Nine Force Gale and Warpainter, their small jars of flock are very nice, but they are insanely overpriced. GHQ provides its own brand of flock, but it's a bit hard to find in Europe, so the simplest solution is to find a model railroad shop and get as large bags of flock as possible from one of the major producers. Faller, Woodland Scenics or Noch will probably work equally well and big bags of flock from one of them is probably the cheapest alternative short of making flock from scratch (and who would want do that).
  • PVA glue - common white glue, commonly available in DIY shops. Grab a big bottle, you'll need it.
  • At least one medium sized flat brush - the kind with synthetic bristles, normally used for wall painting.

And here's how I do my basic tiles:

  1. Paint the tile with wall paint.
  2. Cover the hex with sand, wait for couple of seconds so that the sand sticks to the wet paint. Next, pour the excess sand back into its container. Leave for at least couple of hours for the paint to dry.
  3. Since the sand I use is orange-red, I have to paint the tile again to get more suitable base color. If you use more naturally colored sand, you may want to skip this step.
  4. Once the paint is dry (again), I next flock the top of the tile. Pour some PVA glue into a container, add some water (normally I go for 3 parts glue and 2 parts water) and mix it together. Cover the part of the hex that is to be flocked with the glue/water mix and cover it with flock. Wait for couple of seconds and pour excess flock back into its container. Let the glue dry completely.
  5. Paint over the flock with mixture of glue and water again. This will harden the flock and fix it to the surface of the tile. At that stage I also sprinkle the hex with another shade of flock in an irregular pattern to break up the monotony of same color, but it's a question of personal taste and can be skipped. Once again, leave the tiles to try.

Basic Hexes
Main stages of basic tile “production”

Some final thoughts... If I had to do it all over again, I would have painted sides of the hexes in color that is as close as possible to the color of the flock. Why? Well, for some unexplainable reason GHQ doesn't bother to cut their hexes precisely, with the end result being that the hexes don't align perfectly. This means that once the tiles are set up on the table, there are gaps between them. As can be seen in the pictures I've posted before, those gaps are quite visible when the paint on the sides is of different color than the flock. I believe that this rather unaesthetic visual effect can be reduced if the paint on the sides of the hexes is of same color as the flock.

Also, in case you haven't already figured it out on your own, working with one tile at a time isn't very efficient. I usually work with one pack of tiles at the time, one step at the time.

September 11, 2011

Preparing for assault on Fort Donelson or using GHQ Terrain – part 1

Over last couple of months, I've been toying with the idea of writing a couple of posts about GHQ Terrain system. I am not a master terrain maker nor do I claim to be an expert in GHQ Terrain "field", but I've been using it for a couple of years and I do believe that I have gained a bit of insight about advantages and disadvantages of this system, as seen from the point of view of average wargamer. Also, just like with most of things, there seems to be a right way and a wrong way to do stuff with GHQ Terrain. I think that by now I have made most of the common mistakes and figured out few things that could be of benefit for others, so why not share it with people for whom this information could be useful?

My plans about more in depth posts are for the moment hindered by real life obligations, but since I am in process of setting up terrain for an ACW scenario, it occurred to me that I could use that process as a background for an introduction to the topic. So... below is the picture of preliminary terrain setup I intend to use for Grant's assault on Fort Donelson. There is still some work left to do, but for a "first fitting" things don't look too shabby.

FortDonelson_final

Here is a couple of facts in connection with this setup, just to give you a general idea about GHQ Terrain system. It is about 140 cm by 95 cm (sorry guys, metric system is the way to go) and consists of about 250 hexes. mostly of 1/2 inch variety. In case you wonder why so many hexes are needed, the reason is the elevation that runs throughout the board and covers about 2/3 of it. After giving it a bit of a thougt about how to depict that terrain feature, I decided to try two 1/2 inch hexes on top of each other and it seems to work pretty fine. Reason why I’m mentioning it is that there is a couple of approaches to deal with elevations when using GHQ Terrain tiles – each of them has its own set of drawbacks and advantages.

Another thing that can be of interest is the fact that this board is built of five different basic tile types and four of those tile types have several variations. Basic plane hex is one of those tile types, obviously. Road hexes are of two different types - one with road running between straight vertices and one with roads running between diagonal vertices of the hex. Then there are elevation hexes - if I'm not mistaken, there are five possible shapes of those, although in this setup only three are used.

By now two things should be apparent - it is a work intensive system and it demands a bit of effort and dedication before a certain level of versatility is achieved. Furthermore, a bit of an financial inverstment is required even for basic setup. Those things need to be considered carefully before choosing GHQ as the terrain solution for wargames.