And so, after long period of thinking about it, I finally pulled the trigger and switched over to “Guns at Gettysburg”! Last weekend L. and I gave this ruleset a chance and used it with Peter’s Hill scenario from… well you guessed it, “Hearthland” scenario book by Caliver Books.
The scenario
At first glance, this particular scenario looks very interesting – not only is it a meeting engagement, but the entry time for vast majority of different brigades is decided by dice rolls at the beginning of each round. Majority of Union brigades enter on 5+, while Confederate brigades enter on 6+ once first Union reinforcements enter the field. Further caveat for the rebels consist of the fact that their cavalry removes itself from the battlefield on a subsequent roll of 4+. I found it a bit harsh and increased this condition to a 6 roll only.
Initial dispositions are as follows – Confederates have Liddell’s brigade on the table at the start of the game. One of its regiments is deployed on Peter’s Hill itself in skirmish order, while the rest camps at the opposite edge of the field, behind a dry river bed. Federal troops enter along the road from the opposite side of the field; McCook’s brigade enters on first round, with the rest of brigades appearing after rolling 5+ at the start of subsequent turns.
Confederates are heavily outnumbered, but compensate for it with their troop quality – Liddel brigade is elite, while Johnson’s are regular troops. Vast majority of Union units deployed in line are green, while their skirmisher screens and artillery are regular.
The game
Following the by now well-established tradition, I’m illustrating development of the game with pictures and complement with short descriptions.
Hardly surprisingly, L. ordered McCook’s brigade to take posession of the hill. In reaction, I moved skirmishers of 7th Arkansas to the crest and engaged blue-clad columns in an attempt to slow down their advance. I managed to draw first blood, but without any noticeable effect on their pace. At the same time, the remainder of my only brigade currently present on the field was quickly scrambled into columns before being directed toward the sound of guns.
Eager to slow down the Federal troops and unfamiliar with the rules, I made an early mistake in not taking full advantage of freedom of movement allowed to skirmishers in “Guns at Gettysburg”. Instead of keeping my distance, I allowed L. to get into effective small arms range and cause grevious casualties on 7th Arkansas. As result, the went to ground. In subsequent rounds, unable to retreat and exposed to fire of three regiments in line, they were quickly wiped out.
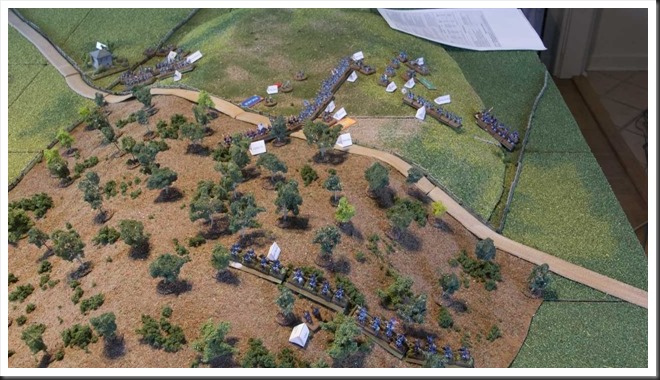
Situation around round six. McCook’s brigade is about finished with 7th Arkansas by this time and L.’s second brigade (under command of Laibolt) has also made its appearance. On rebel side, the remainder of Liddel’s brigade starts its climb up Peter’s Hill’s eastern slope while Johnson’s brigade enters the field. To the north-east, Confederate cavalry makes a very brief appearance – in very next round I managed to roll the dreaded six and they briskly rode back to wherever they came from.
In contrast to my useless cavalry, L’s troopers made a strong appearance with one huge regiment thundering into the woods that covered northern part of Peter’s Hills. They were accompanied by another cavalry regiment, dismounted and acting as skirmishers.
As Liddell’s brigade advanced over the crest of the hill, it was met by withering fire from compact Union line. 2nd&5th Arkansas on my left flank was especially hard hit. Lashed by extremly effective cannister fire from Barnett’s battery directly in front of it and infantry line to its left, it lost one fourth of its strength in two rounds. It didn’t break, but was forced to go to ground. Both sides suffered serious casualties in this intial clash, but it became clear to me that sticking my nose into this hornet’s nest was my second mistake of the day. Green or not, the Union line was just too strong to penetrate with just two regiments.
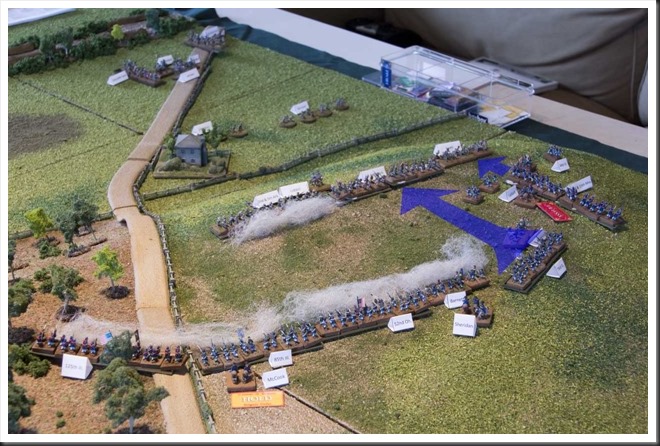
However, I wasn’t the only one who made mistakes in this game. After inital successes, L. apparently decided to deal me a knock-out blow. He pushed Laibolt’s brigade, coming into line established by McCooks troops, to the right of Barnett’s battery and ordered it to assault my line. Somehow he managed to manouvre 2nd&15th Missouri right in front of my only artillery battery engaged at this time… and still in march column nonetheless. Green 73rd Illinois was to accompany them and charge my hard-pressed 6th&8th Arkansas. Upon achieving this somewhat questionable deployment, L. decided it was enough excitement for one day (we’ve been at it for about four hours by then) and left for home. Before he left, he described his plan for me. Myself, unable to resist the temptation and unwilling to prematurely waste all the preparations for this game, I decided to continue the engagement on my own.
It took however until next weekend until I gathered enough enthusiasm to carry on. After my failed attempt to withdraw Liddell’s brigade to the foot of the hill, L.’s charge went in. The result was a perhaps predictable disaster. 2nd&15th Missouri was shreded by point blank range salvo from cannons of the battery they tried to overrun. Crossing the field turned also to be much of a challenge for inexperienced 73rd Illinois. The Missouri regiment routed decisevly. As a result, rest of Laibolt’s brigade failed their brigade morale test and was forced to hastily retreat from Peter’s Hill.
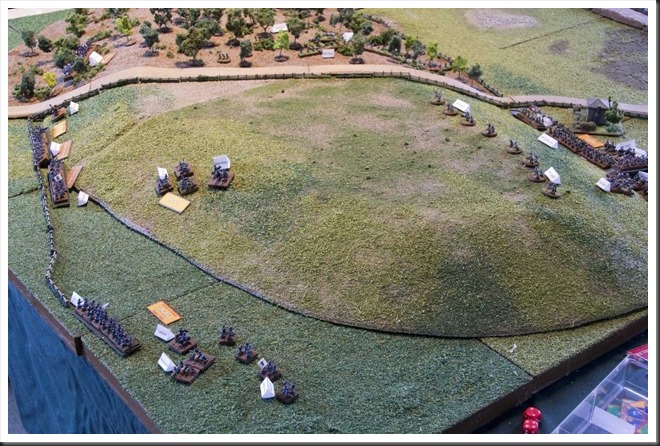
This is the situation on the top of Peter’s Hill after the failed Union assault. Immediate threat to Confederate line has disappeared, but my situation was still grave. The only logical move was to withdraw Liddel’s brigade, wait for Johnson’s troops and try again with combined forces.
I expected for next couple of rounds to be spent by both sides on reorganization and catching a breath. It was also a good opportunity for Union cavalry to improve their position. Knowing the plans for the rebells (after all, they were formed in my head), I decided to introduce a bit of uncertainty and exploit ‘solo’ aspect of this game. I came to the conclusion that there were two logical courses of action for Union cavalry regiment to take – a) move to the foot of the hill, possibly saddle up and attack Johnson’s column in the flank as it moved up to support Liddell, or b) deploy along the road, taking up enfilading position in preparation of Confederate attack. I rolled a dice – 1-3 would be alternative a), 4-6 would be alternative b. However, I waited with ‘uncovering’ this dice roll until I decided what order to issue to the rebells. In the end, I went with the do or die frontal assault on Union line occupying Peter’s Hill. Only then did I reveal to myself the die roll result dictating actions for Union cavalry – they were to move to the road!
Next, a strangest thing happened. As Johnson’s brigade came into vicinty of the hill, its numerous skirmisher screen run up the hill and started taking potshots at Barnett’s battery in front of them. Those potshots turned out to be quite effective, causing enough casualties to force the battery to take a morale test. This it failed, badly! I must admit that it was with certain glee that I placed ‘Routed’ marker beside it, as it was this very battery that cut my Arkansasians to pieces! But the freak event didn’t end with the rout of Barnett’s battery! In unexpected ripple effect, its sudden collapse caused a brigade check for McCook’s brigade. It too failed just as badly and in a blink of an eye, the southern part of Peter’s Hill was completely clear of Union troops!
Only now did I start reorganization of both sides. On rebel side, 2nd&5th Arkansas, with its casualties approaching 60 percent, was a spent force. I detached it to the farm at the foot of Peter’s Hill. Remainder of Liddell’s brigade would take on Union cavalry line, which was about to take up its extremly well-situated flanking position. Johnson’s brigade was ordered to make one final attempt to break main Union line.
Sheridan, acting as overall CinC for the federal troops, had his own problems. McCook’s brigade was relatively easy to sort out – it halted at the foot of Peter’s Hill and even Barnett’s battery managed to recover from its temporary stampede. Laibolt’s brigade however refused to move from its spot for a couple of turns. And the last brigade under Sheridan’s command, that under leadership of Fry, still hadn’t even turned up on the battlefield!
After about twenty turns, the time for final showdown has arrived. Once both sides reached the top of Peter’s Hill, salvo after salvo of musket fire and canister swept across the field in both directions. Severe casualties were suffered by both sides! On Union side, unlucky 73rd Illinois was pounded by close range fire from Sweet’s battery and went to ground. On the opposite side, both regiments of Johnson’s brigade suffered from the fact that they were equipped with smoothbores, while Union troops wielded rifled muskets. To add to their troubles, Barnett’s battery seemed to try its best to make up for its temporary panic and poured cannister shot into rebel line as fast as its crews could manage. With casualties mounting rapidly both rebel regiments were forced to ground, unable to close the distance.
Along the road, the fight was equally vicious, if not more so. 6th&8th Arkansas’ fire was extremly effective and swiftly reduced numbers of 9th Pennsylvania . Union troopers gave however as well as they received. Taking advantage of the fact that they were equipped with breach-loaders, I risked depleting their ammunition and gave order to really pour it into Confederate line as it reached the stockade. This sudden increase of rate of fire from the wood’s edge had however a perhaps unexpected outcome – realizing the deadliness of these breach-loaders, I ordered my Arkananians to charge Union position. With Union trooper’s position just across the road, once the charge started, the rebels were upon them in a blink of an eye!
Union troopers would not stand and broke away from onrushing rebels, trying desperately to get away. To no avail though! Rebels caught up with fleeing troopers in the wood and scattered the entire regiment in a couple of minutes!
While these dramatic events took place, Fry’s brigade finally decided to turn up and do its duty for the flag, Union and mamma’s apple pie. One can only speculate what words were said once this Johnny come late came eye to eye with Sheridan after the battle.
Fry needed not to bother appearing though, as the writing was already on the wall for the Rebels. Despite the somewhat unexpected success in smashing Union position in the woods, it was plain to see the the Confederate assault has stalled. There were simply too many soldiers clad in blue on that hill! With both regiments in Johnson’s brigade hugging the ground and taking a pounding, I’ve decided that the only logical course of action was to give order for general withdrawal before Confederates were completely overwhelmed. The battle for Peter’s Hill was over and the hill itself was firmly in posession by Union troops.
Musings after the battle
I intend to write a detailed review of ‘Guns at Gettysburg’ and about my initial impression of this ruleset in a separate post. My post-game comment will therefore be brief. In simple terms, it was a blast of a game. In fact, I would go as far as claiming that it was the most fun I’ve had with ACW wargame ever since I’ve decided to engage into this period.
The funny thing is that my opinion about ‘General de Brigade’, the Napoleonic ruleset from which ‘Guns at Gettysburg’ is derived, is that it’s quite traditional and maybe a bit boring ruleset. But for some odd reason though, this ACW rendition of the ruleset managed to tick off all the boxes for me. It seems to provide a fun, fast-flowing and easily manageable game. And while it may be to early to draw any definitive conclusions, the ruleset has at least on this occasion managed to deliver ebbs and flows in the game which I never experienced with TCHAE.
Needless to say, I am quite impressed by this initial tryout of ‘Guns at Gettysburg’ and really look forward to next game.


No comments:
Post a Comment