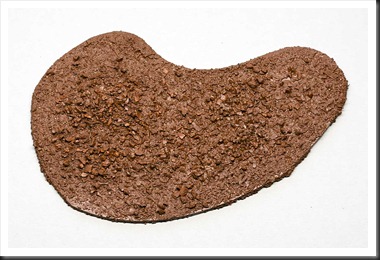
June 29, 2013

In case you wonder…

…how my Vietnam project is progressing, the answer is ‘It doesn’t’ and here’s the reason why. Now that I’m done with it, I have every intention to spend some more time with those Flashpoint minis.

I must however admit that I’m not sorry for being distracted – this little Zero from Airfix turned out to be a lovely little kit and I enjoyed working on it quite a lot. And I dare say that it may very well be my best build since I’ve started making model kits again.


IMG_1493

IMG_1496

IMG_1499

IMG_1501

IMG_1505

June 22, 2013

Flashpoint US Infantry–work in progress

Allright, time to show the trial batch of those Flashpoint Miniatures US infantry minis I’ve been working with for last couple of days. The paint choice is shamelessly ripped off from Head Under The Bed blog – the minis that come from under this guy’s brush are really something and one of my principles is never to re-invent the wheel unless I absolutely have to.

However, certain modifications had to be done, mostly to replace the colours that I didn’t have in my paint box, but also to adjust the palette to (dare I say this?) my ‘painting style’. I prefer to stack the shades, main color and highlights in that very order. Therefore here the first step was an overall coat of a mix equal parts of Russian Uniform 924 and USA Olive Drab 889. Next, Russian Uniform straight out of the bottle is applied to all major surfaces. Highlights consisting of watered down Green Grey 886 were added as last step in paint job for uniforms. Equipment and webbing were painted with Green Brown 879 and highlighted with Khaki 893. For helmet covers I decided to go with Green Grey as my primary paint, with patches of thinned Reflective Green 890, Russian Uniform, Beige Brown 875 and Vallejo Game Color Yellow Olive used for  camouflage pattern. In retrospect maybe I thinned them down too much, since the camo pattern is barely visible.

At the moment I don’t think all that much about the skin colors or the right shades for the shoes, I just want to get the feel for the minis and how they’re sculpted and what works/doesn’t work in regard of the uniform colors. I’m actually quite happy with this initial selection, but as I'll continue working with those minis, I will try to add some variation. As far as I understand, there could be a rather dramatic difference in color intensity of uniforms, mainly caused by exposure to light and elements. It would be nice to be able to show that effect and see which of my minis are 'short' and which are FNG's.

Couple of words regarding the miniatures. My first impression was rather ‘meeeh’, but I have to say that I’m slowly changing my mind. The detail is crisp, which makes them easy to paint and they certainly have their own ‘character’. I’m still wrinkling my nose at the sculpts of some minis and I don’t care about the number of figures with LAW included in this blister pack, but all that being said, there is no denying that they’re growing on me.

IMG_1490IMG_1492

June 06, 2013

This is a robbery!

Well, just as I was ready to chalk up May as another month without any wargaming activity, Tony came to the rescue and not only invited me to push some lead and roll some dice but also gave me an opportunity to try a new western ruleset called ‘Dead Man’s Hand’.
For our game, Tony put together a bank robbery scenario with a twist – five robbers ride into town with bad intentions, but what they don’t know is that a bunch of Pinkerton men is waiting for them in an ambush. Luck is initially on the side of the bad guys and they manage to grab the cash without being noticed, but as they exit the bank, the teller runs after them screaming his head off. Anyone familiar with the western movies knows what happens next – a single shot rings out, the obnoxious teller drops dead, silenced forever by a bullet in the head… and then all hell breaks loose!

IMG_7384

Quick overview of the ruleset is in order. ‘Dead Man’s Hand’, just like most of the rulesets in this genre it’s intended for skirmish games with a single miniature representing one character. The activation sequence is decided by a card deck – each character gets a card, the lowest cards act first. Each character gets to perform three actions of out of following selection – move, shoot, aim,  reload and rally. It is also possible to duck back one movement length or take a snapshot out of the turn sequence if the character hadn’t acted yet in the turn. Shooting is done with a D20, the result can be a miss, a ‘hit’ in form of suppression, a serious hit causing a ‘hit’ and an additional morale check causing additional ‘hits’ if it fails and finally a killing shot. Chances for a hit are affected by type of weapon/range and can be improved (marginally) by one or multiple ‘aim’ actions. A character is out of action if number of ‘hits’ exceeds his toughness, which usually is between 3 and 5. Lucky ‘kill shots’ put the character down with immediate effect.

IMG_7389

To add a little spice to this vanilla mix, each side also has a set of cards with different events making life easier for your side or more difficult for the opponents. Players can play as many of those cards as they wish during the game turn, but they only get to pick one new card per turn – consequences for over-eager use of the card hand are obvious.

IMG_7391

I won’t go into details of the game, but it took us about two hours (including the explanation of the rules) to get two of the robbers and all the money out of the town. The remaining three were mercilessly gunned down by the Pinkerton men. All four players, including me, had a pretty good time – ‘Dead Man’s Hand’ provides a fun game of beer and pretzels variety with proper western feeling. If you’re into type of light-hearted games with emphasis on the ‘game’ rather than ‘simulation, I would recommend without reservations that you give it a try.

IMG_7383
IMG_7387

Finally, a quick note about the buildings in the pictures below – they are all scratch-built by Tony. Yes, he’s one of those odd characters who’d much rather spend his time on making buildings or scenery than painting figures. And don’t even mention ‘painting horses’ to the guy! Ler
The reason why I mention all this is that Tony let me know that if you like his stuff, he’s willing to take requests… for a reasonable fee, of course. So if you like what you see and would like to get some of your own, drop me a line.

IMG_7388
IMG_7386

May 26, 2013

Flashpoint Miniatures US Platoon Blister–First Impression

Time for another update about the Vietnam project. The initial batch of minis has arrived from Australia at the beginning of this week – in other words, a bit over a week for a delivery to Europe. Quite impressive in its own right.

The figures… well, to be honest, I am less than impressed. Maybe it’s because I’ve been spending whatever time I could find for painting on excellent Xyston Spartan hoplites, but those Flashpoint minis seem awfully small. Also, not the most detailed 15mm minis I ever held in my hands.

As picture below illustrates, there are 35 minis in a US platoon blisters. Standard grunts are presented by 16 miniatures with M16, 3 with M79 Thumper and two with what I assume is a LAW launcher (although if that’s the case, then the tube is awfully short). Heavy firepower is added by two M60 gunners and one ammo carrier (a bit strange distribution). Then there is a total of eight minis for your lieutenant, non-coms, a medic and the poor guy who, judging from his state, has earned his Purple Heart the hard way.  I am totally clueless about three minis to the right in second lower row – they seem to be holding some sort of short tube, but your guess is as good as mine about what it’s supposed to represent.

I am rather pleased with the variation among the figures in the blister. The choice of sculpts should allow a bit of the ‘dynamics’ to the bases. At the same time, I am a tad disappointed that there aren’t any machine gunners in deployed (lying down) position and the fact that only a single MG assistant is somewhat baffling. Guess I’ll have to make a supplementary purchase from Peter Pig or Quick Reaction Force.

But overall it’s a pretty decent blister. Now, time for some painting.


US_Infantry_Blister

US_Infantr_Out_Of_The_Blister

May 20, 2013

Review of “Tank Tactics–From Normandy To Lorraine”

jarymowycz-roman-tank-tactics

Well, since it looks like May will be another barren month in respect of gaming and I haven’t done one of these in a while, here’s another filler… eh, I mean book review.

I picked up this book based solely on its title and who published it. Based on that, I expected a volume dedicated to “real” tank tactics, perhaps in a form of some sort of comparative analysis of low level tactics, equipment, training and real world experience of opposing sides. As it turns out, this book is a completely different animal and author of this book could not have chosen a more misleading title for this book if he tried to. Precious few pages (in my opinion, maybe five or six) deal with the actual tactics of armoured warfare on western front during 1944.

The real topic of this book is the implementation of armour on battlefields of World War Two at operational level, or more precisely during Normandy breakout attempts and subsequent allied race across France. Books dealing with this aspect of art of war are few and far between - it is a vast topic, encompassing a multitude of aspects, some of them quite mundane, other rather diffuse and difficult to define in clear and definite manner. Uniqueness of this book's topic makes it a valuable contribution to a library of any WWII buff all on its own.

Author deals with the subject matter by splitting it into three logical parts. In first section, Jarymowicz analyses the post-World War I development of armoured forces in armies of what would be major 'players' during the conflict. Theories of the time and how they translated in practical implementation in England, France, Germany, Soviet Union, United States and (oddly enough) Canada are dissected in detail. The author attempts here to compare and contrast different ideas and resulting doctrines. While a bit heavy on internal politics, this part of the book is something of an eye-opener, which answers a lot of questions reader may have about choice of the equipment used in World War II as well as about the rather varied quality of the leadership of armed forces during the conflict.

Next, the author, proceeds with an account of the actual events that took place during the period specified by the title of this book. It needs to be repeated - the narrative deals with the events on operational level, so those looking for exciting tank vs. tank combat descriptions are bound to be disappointed. Goodwood, Spring, Cobra and Totalize are picked apart and analysed in a search of explanation of failures and successes. I won't go into the details of Jarymowycz' analysis, but limit myself to observing that I don't believe I have ever had the pleasure of reading another book where Montgomery is so soundly and consistently trashed and belittled. If you're a fan of Monthy, you better stay away from this book. Of course other allied leaders are dealt with in similar harsh manner – Jarymowycz doesn’t have much good to say about the allied commanders, with the possible exception of Patton and some his lieutenants. To be honest though, it is hard to argue against author's ruthless and at times devastating critique.

In last part of his book Jarymowicz gives us his final analysis of deployment of armoured forces by Western allies during second part of 1944. In this section, besides the 'traditional' examination and comparison, the author does something rather unique and compares the doctrine and usage of armour by Western nations with that of Soviet Union. For me personally (after reading Glantz and Ericson) his conclusions weren't much of a surprise. I do however suspect that many, if not most readers from Western Europe and United States will find this part of the book as rather controversial, maybe even 'heretical'.

Personally, I find the topic of this book absolutely fascinating and was very pleasantly surprised when I realised what “Tank Tactics” was really about. It is therefore a great shame that I have now to say that this volume suffers from a couple of rather severe problems, all of them related to the writing style of Jarymowycz. To put it bluntly, the author doesn't strike me as a very talented writer. I found his style choppy, almost bullet-point-like. The flow of information felt disjointed, with abrupt, unannounced jumps between often unrelated topics every couple of paragraphs. This choppy impression was deepened by author's rather annoying tendency of using 'naked' personal quotes to emphasize the point he's trying to impress on the reader. I was a bit surprised over how disrupting this approach to quotations was for me - if I wanted to find out who said those words, I had to look up the reference at the end of the chapter, thus breaking the flow of often rather complex reasoning. Not a technique I would recommend for frequent usage in a book with this level of complexity.

Finally – how useable is this book from wargamer’s perspective? Well… if one disregards its obvious value as a source of information about otherwise often ignored aspect of modern warfare, its usability is probably limited to being an inspiration for ruleset and army list designers wishing to incorporate operational facets into their creations.

'Tank Tactics: From Normandy to Lorraine' is a solid, in some respects maybe even ground-breaking contribution to literature about World War II. Its main merit consists of the fact that it is solely dedicated to a topic that is almost totally overlooked by “popular” authors writing about that conflict. The effort is however somewhat spoiled by a writing style that fails to engage and makes it difficult to absorb the information contained in this volume. Thus, not the easiest read, but nevertheless worth the effort if you're interested in something else than battle depictions and personal recollections.

May 10, 2013

Jungle terrain–test piece

If there is one thing I’ve learned from my work with GHQ’s terrain hexagons (or rather from the mistakes I’ve made while working with them), then it is this – if you’re about to make a large number of similar terrain pieces, make a test piece first. There is nothing worse than finishing 20-30 elements and realising that they don’t look so good.

All right, that was the sermon of the month, let’s now move on and get some new terrain on the table.

Preparation

Things I needed before getting started:

a) Base plates – I cheated here and ordered a bunch of laser-cut 3mm MDF bases from Warbases, a British company I’m buying all my bases from. Since they didn’t have bases with irregular shapes I was needing, I drew rough sketches of six different shapes in a graphics program and sent the pictures (with dimensions) with a request for a quota. A prompt response informed me that five bases of each type, including p&p, would cost me about 400SEK. Maybe a bit pricey, but considering how much time, sweat and quite possibly blood I would have to spend if I was to cut thirty such bases on my own, it was actually a bargain.

b) Trees and palms – one word here – Ebay! Gone are the good old days when you could find sweet bargains from fellow wargamers, but those Chinese shops using Ebay as outlet for all possible kind of crap are sometimes godsend. In this particular case, I’ve got some 100 trees and 40 palms for another 400SEK. Sure, they’re not as nice as those from Faller or Heki, but on the other hand I didn’t have to mortgage my flat to afford them.

c) Sand, cat litter and herbs – pet shops, DIY shops, or even your own backyard are all great sources.

d) Flock, turf, scatter materials – every wargamer should have a bunch of this stuff, but if you don’t, pleaaase find a well-sorted miniature railroad shop and get what you need from them. A single bag from Noch, Faller or Woodland Scenics will last you a lifetime and costs about the same as those laboratory petri dishes GF9 is trying to push.

e) Paint – all DIY shops usually sell acrylic wall paint, which is perfect for ground work. An added bonus lies in the fact that the colors usually come in at least five or six different tones – perfect for shade, midtone and highlight. Finally, a 0.5 litre sample can usually costs the same as two GW paint jars.

f) Plastic plants – see previous post.

h) Hot glue pistol – new experience for me, more about it below.

Think before doing

Now, let’s stop for a second and think one last time one last time about what I’m trying to achieve with this project. “Douugh… jungle terrain!” – you say? Sure, that’s the most obvious part. Couple more things need however to be considered, before cutting and gluing ensues. First of all, the scale. The terrain is intended for 15mm, so the plants can’t be too high. Second, is the terrain piece to be impassable or would I like to be able to put the miniatures on it? If I wanted the second option, then sticking all the plants onto the base perhaps isn’t the best option. For this test piece, I wanted to see how many plants would be needed for dense coverage, so I decided to stick everything permanently into place.

Making the piece

Once again, let’s clarify couple of things before we proceed. I am not a professional terrain maker, just a guy who needs a bunch of terrain for a new project. The faster I’m done with it, the better. I use basic techniques familiar to anyone who’s been working with terrain before. If the finished piece looks adequate for the task and doesn’t fall apart, then my task is done. If it looks good, then it’s great news. If it looks great, then it was pure damn luck and I’m probably more surprised over the final result than you are. Ler


IMG_1288

1. Texturing the base – the usual procedure – paint the base, cover it with sand, remove the excess sand. Once the paint is dry, paint a second layer of paint to seal the sand. Since I wanted an extra rough texture, I put some cat litter and dried basilica onto the second paint layer. Once the second paint layer was dry, I sealed everything in with a final paint coat.

As a final step, I drybrushed the base in two steps – first a heavy pass with a lighter shade of same brown colour and finally a lighter one with cream-coloured paint.


IMG_1291

2. Cut the plants – when cutting the plants, I tried to think about the scale the piece was intended for. It became rather obvious that the plant with long, wide leafs would perhaps not be as suitable for this project as I first though.
 

IMG_1325

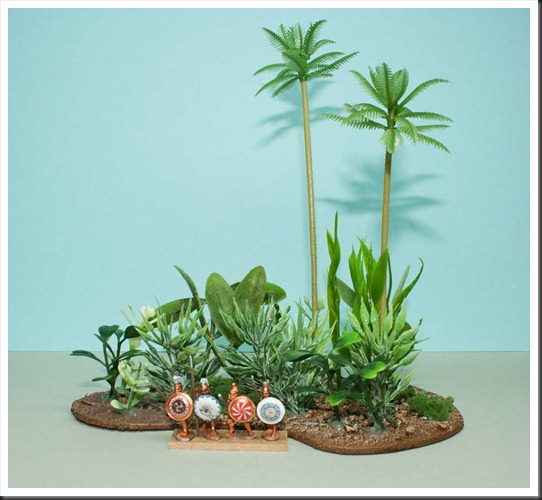
3. Gluing – well, I won’t bore you with the details. Using hot glue gun was a bit of a new experience for me, but there really isn’t much to it – heat the glue up, put a blob of glue onto the base, stick the plant in, wait until the glue cools down. Hot glue tends to leave thin strings of glue all over the base, but those can easily be removed  with pliers once the plants are in place.

As can be seen in the picture, I didn’t use any trees. The reason is simple – larger plastic plants were the same height as the trees and things just didn’t look right. I have some thinking to do – do I make the plants a good bit shorter or do I leave the trees out of this project altogether?


IMG_1332

IMG_1341


4. Final steps – I was a bit surprised over how unseemly and protruding hot glue looked once it dried. It was positively ugly and I had to do something about it. At first I tried to cover those blobs up with some sponge flock (from Heki, I believe) stuck into… more hot glue. This method worked pretty good and actually added some variety to the vegetation. However, some of the glue blobs “inside” the base were hard to get to with the hot glue gun. Those were hidden with good old-fashioned combination of white glue and flock.

Musings “after the battle”

IMG_1337

Well, here is the final result. Purely by the gut feeling, it looks to me more like something you’d find in Africa or on an alien world than in Vietnam. Some further experimentation will be needed – shorter plants, maybe a bit of clump foliage and stones. Still, considering that it’s the first effort, I’m quite happy with it.

April 27, 2013

When in doubt, start a new project

To say that my wargaming has for a while now been placed in low priority department would be something of an understatement. Between rather hectic tempo at work, my re-kindled interest in proper model kit making and plain lack of enthusiasm, so far during 2013 I’ve barley managed to pick up a brush, much less to participate in a game.

I’m pretty sure that we all have those ‘low intensity’ spells. The question is what to do to get out of them. In this particular case, I’ve decided to give “new project”-method a go. After all, whatever I have on my plate at the moment (surprisingly short list, now that I think about it – some 6mm Napoleonics, couple of 1/600 airplanes for my flagging Check Your Six Battle of Britain project and couple of terrain hexagons for a Shiloh scenario setup that was supposed to be ready last year) obviously fails to attract my attention. And that’s why I’ve decided to take the plunge into Vietnam era.

Vietnam has always been a war that was very interesting to me and ever since Too Fat Lardies released ‘Charlie Don’t Surf’, the call of the sirens was almost irresistible. There was however one huge speedbump that until now always managed managed to stave my enthusiasm – jungle terrain. I’m a decent figure painter, but when it comes to terrain I’m not only quite inexperienced, I also don’t enjoy that part of the hobby all that much. Thus, jungle terrain always seemed beyond my skill as well as my attention span.

Nonetheless, over last couple of weeks I did a bit of research and convinced myself that I should give it a try. Getting the ruleset was the fist step. Next, I’ve ordered a bunch of palms and trees from some Chinese outfit on Ebay. They arrived at my doorstep couple of days ago and considering the price, they’re excellent. Today it was time to take the next step and find some additional vegetation – in other words a trip to IKEA was in order. Yepp, you read correctly, whenever you need something for your wargaming table, IKEA is the place to visit. After a bit of recon I found three types of fake plants that fit the bill. An added bonus consisted of the fact that just a stone throw from my local IKEA there is a huge shop with all sorts of garden plants, including fake ones. A quick visit there resulted in a great find - two rather odd looking balls of grass which look rather useful for my purpose. In total, five different types of shrubs and plants for less than 200SEK.

Now all I need to do is to figure out how to turn them into Ia Drang valley.


IMG_1196Today’s loot. Completely confused Spartan hoplites
are present for the sake of scale perception.