Showing posts with label 28mm. Show all posts

March 04, 2018

Painting for leisure

Some time at the end of last year I’ve grown seriously fed up with having to constantly deal with some sort of terrain projects. Trees, hedges, walls, houses – it felt like it was all that I was doing and I wanted to paint some minis again. What’s more, I also felt like painting something “different”… And I wanted to have a chance to play around with those new Scale 75 acrylics I’ve aquired at last year’s C4 exhibition.

And then I remembered… long, long time ago, I’ve bought a dozen or so miniatures from Hasslefree Miniatures. For those unfamiliar with the company, it’s a ‘one man band’ that produces some wonderful minis of wide variety. If there’s one thing they have in common, it’s not the theme, but rather the humor (often sarcastic) and wickedness of the sculpt. At least in my opinion, they are as much gaming miniatures as they are little works of art. Well worth checking out, if you’re unfamilar with the company!

Anyway… at the time I bought those minis, they were intended for a zombie project of some sort. And maybe, if I ever get there, they will be cracking some zombie sculls on the gaming table. But for now, I’m just painting them for fun. And here’s the first batch. Hope you like what you see!

2018_Blog_023
Jess

2018_Blog_022
Tony

2018_Blog_024
Ashlee Campbell

2018_Blog_027

Ray

February 14, 2018

They’re bringing carts now!???

Well, it would seem so, Saxons have finally figured out that carts and loot fit together as hand in a glove! Smile

Seriously though… one of generic raid scenarios in ‘Dux Britaniarum’ requires three carts of some sort. With this in mind, I’ve had a quick look around for something suitable. Offering from 4Ground was very much to my liking – their cart is made from laser-cut MDF, thus cheap as dirt and shipping it over the pond wouldn’t cost me my shirt neither. Also, those guys at 4Ground seem to be clever chaps and realize that something must pull those carts around. And so, they are kind enough to offer suitable draft oxen minis, sold in pairs.

Don’t remember how long it took for the envelope (yes, envelope, apparently 4Ground took the page from IKEA’s operations manual), but it didn’t take many days before my carts arrived to me. Here’s what I’ve got, in three sets.

2018_Blog_009

2018_Blog_015

First a couple of words about oxen minis. They were all ‘business’, but required some serious cleaning up and putty to cover up some serious holes in the casts. Also, as can be seen in the pictures, heads are separate and the fit isn’t the best I’ve ever seen. Once the heads and bodies were glued together, it became apparent that something had to be done about the gaps around the neck. Lucklily that’s what green stuff is made for.

2018_Blog_020

Carts, on the other hand, could be assembled without any problems. In fact, I glued them together while watching a movie and was done before it was finished. Really simple assembly was made even easier by a nice, easy to understand manual.

The paint job was also a pretty straightforward job. With carts, I started with couple of base coats of burnt umber. Then I proceeded with successively lighter coats of burnt umber and white. I finished with couple of black, brown and green washes.

With oxen, I first found couple of reference pictures of the real things – I was a bit surprised over variety of “cammos” that oxen come in. In the end, I went with dark brown/cream white “ambush scheme”. Open-mouthed smileI’ve also decided to play around with paints and made a very first attempt at wet blending. Not sure how successful I was, but I think I managed “game table” quality. But what do I know, judge for yourselves.

Anyway… I must say that I am quite happy with my first experience of laser-cut MDF and 4Ground. If you need a couple of carts to move your loot quicker around the table, I can recommend this stuff as affordable option.

2018_Blog_028

2018_Blog_031

2018_Blog_033

August 19, 2017

Timecast latex rubber rivers

Since this article is a ‘pure’ review of a commercial product, let’s start with the mandatory declaration of independence – I am in no way associated nor sponsored by Timecast Models. Thus, this review is an expression of my personal opinion as private consumer and wargamer.

Allright, with these rather official preliminaries completed, let’s get on with it.

Couple of years ago I’ve decided to ‘migrate’ my terrain from GHQ-s styrofoam hexagons to ‘conventional’ DIY terrain boards. Major reason for this move was my wish to simplify the setup and keep as much of it (hills, woods, rivers, ditches, hedhes and so on) as removable, flexible stand-alone pieces.

At the same time, Timecast Models released their roads and rivers system, made out of silicone rubber. That in itself wasn’t anything spectacular, many companies make similar terrain pieces. But two things caught my attention in regard of this particular product range. First, Timecast Models made rivers came in four different widths that could be connected together with dedicated ‘connector’ bits into integrated waterway system. Second, Timecast complemented their product with variety of resin bridges and fords. In other words, their product line struck me immediately as a complete and expandable solution for waterways. And that, ladies and gents, isn’t something one can often say when it comes to wargaming terrain.

My first (and so far only) order included enough straight and meandering river sections of smallest width to provide continous river of about 2 meters. I’ve also ordered all available sets of fords, connecting bits and river bends. Samples of what came in the box are shown below.

Timecast_Small_Rivers_009Timecast_Small_Rivers_004

As can be seen in the pictures, the rivers and fords are made of brown, flexible rubber-like material. You can easily cut and trim individual pieces with a pair of scissors.

Before painting and flocking, I washed the whole lot in lukewarm water with some dishwasher detergent. Every bit was gently scrubbed with a toothbrush, rinsed in cold water and left to dry. It was probably a bit of an overkill, but better be overly cautious than running into problems later on with some chemical residues left-over from mouldning process messing with the paint.

On with the painting then… I kept things extremly simple here and started with painting the riverbanks with dark-brown acrylic wall paint from Flügger. Water surface was painted with dark-blue acrylic artist’s paint from Amsterdam. I know, I know, not very realistic, but I like my rivers and ponds blue. Next, I tried to add some shine to the water surface with help of blank acrylic varnish, but I can’t say this step had a lot of effect. Finally, I’ve stuck some flock on top of river banks with thinned PVA glue. And that was that.

Timecast_Small_Rivers_011Timecast_Small_Rivers_012Timecast_Small_Rivers_013

Couple of comments about painting process. First and foremost – the paint seems to stick to the rubber material used for these terrain pieces… and stays there! This is more than I can say about my silicon roads from Total Battle Miniatures. Yes, you can peel it of if you scratch it forcefully with fingernail or something sharp, but the paint doesn’t peel of on its own if you bend the ‘bands’. That’s a good thing. Second, the flock I’ve glued on with the PVA will probably rub off with time. But that’s no biggie, I’ll just reflock if I feel it’s necessary. Finally, I feel it’s a good ocassion to repeat the advice I keep hammering on this blog – if you value your money, do not use modelling paints for your terrain pieces. Vallejo, Army Painter, Games Workshop, it doesn’t matter which brand you use, their pricing is insane and wasting their product on terrain pieces will cost you a pretty penny. For large terrain pieces, use artist’s paints that come in huge tubes, or better yet, take a trip to your DIY market and find their paint section. They usually sell half litre sample jars that will last you forever, for price of two GW paint pots and carry color ranges that will make all modelling paint ‘systems’ look puny.

Oh yes, one last thing. I’ve included couple of resin bridges that were suitable for those rivers. I still haven’t painted them, but I think it’s only fair to included couple of snapshots of how they fit together with the rest of  the ‘system’.

Timecast_Small_Rivers_015Timecast_Small_Rivers_017Timecast_Small_Rivers_018

Overall, my initial impression of Timecast’s river system is very positive. They’re made of what seems to be durable, flexible material. Acrylic paint and varnish sticks well on them and they look the part once painted. Addition of dedicated bridges and possibility to integrate different river widths into single ‘system’ is in my opinion a stroke of genius and was the factor that convinced me to go with this product. So, for the moment at least, I can’t but enthusiastically recommend it to anyone in need of simple but effective representation of rivers on wargaming table.

June 24, 2017

Proving the theory

And so, finally, the day of the first outing for my newly painted Saxons have arrived.

With H.’s offensive on kingdom of Rhegis having slowed down to snail pace, L. decided to see if his tribe wouldn’t have better luck a bit further south, in kingdom of Caer Gynntguic. With his bunch being freshly painted and this being his outing with Dux Britaniarum rules, I decided to keep things simple and let him lead a basic raid on a village. The Saxon goal in this scenario is quite simple – run into individual the village, search the houses, find the loot on a roll of a six, grab the loot, run back home. Oh yes… try not to get killed in the process, but that’s optional. For Britons the objective is also pretty straightforward – kill’em all.

The plans

Dux_20170621_004

L.’s entry point in this scenario was from the far edge of the table. He was lucky enough to get three rounds of movement before my troops arrived on the table, unlucky to find out once I got there, I had all of my troops with me. This fact must have influenced his thinking, as only one group of warriors and a leader was sent into the village in search of the ‘treasure’, potentially slowing down his ‘search for treasure’ rate. Remainder of his raiding party – two units of hearthguard, two units of warriors and the bowmen – set course straight for my guys.

Dux_20170621_005

Just a couple of rounds into the game, the lines were drawn in the sand, traditional greetings in form of insults about relatives and personal hygene were exchanged… and a bit of a crisis materialized for my Britons. As can be seen in the picture, I was a bit too eager to get into contact with L.s hearthguard and exposed my flank to his other group of warriors. L. didn’t fail to notice my predicament and did actually try to smash into my exposed flank, but his dice roll for movement turned out to be inadequate for the task. His failure with the movement dice roll allowed me to bring up my peasant levies, grouped in a single large formation. By pure luck, I managed to avoid a potential disaster.

A quick clarification is necessary at this point – as it turns out, I had a truely crappy ‘photo day’ during this game and vast majority of pictures taken during the game have turned out to be unuseable. Because of that fact, the most vital part of this game has to be narrated without any visual aids.

Basically, what happened was this – L., tempted by a good set of Fate cards, smashed his hearthguard into the shieldwall in front of them. He ignored my commanipulares on the left flank and focused his effort on my warriors in center and the right. It was a pretty even and prolonged fight in which L. managed to break my warrior group on the right flank. In the end though, the Shock points mounted up for him and his front rank broke rank and fled. Remainder of his hearthguard gave it one more try, but it wasn’t enough. Once his chief was wounded, they followed the example of their comrades and withdrew in orderly fashion.

His two units of warriors engaged my other shieldwall, consisting entirely of peasant levies. Surprisingly, here the fight was rather onesided – both sides suffered some casualties, but the Shock caused the Saxons to break contact almost instantly after first clash of arms.

Dux_20170621_017

The picture above shows the situation after these dramatic events. L., unwilling to give up, charged the British warrior group that broke rank in fight with his hearthguard with what remained of his own warriors and actually managed to put them to flight. This success exposed them however to an assault by my peasants, who managed to maul them rather badly.

Dux_20170621_007

Meanwhile, L’s raiders in the village searched freneticaly for anything worth bringing back home. House after house was ransacked, but nothing even remotely shiney could be found.
Dux_20170621_021

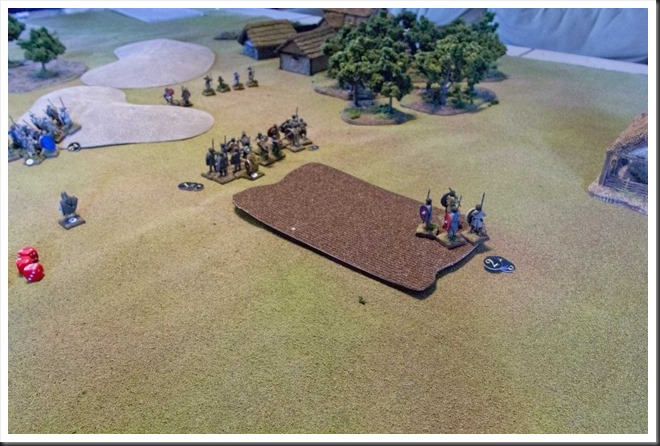
With his hearthguard catching a breath at safe distance from what remained of my ‘main’ shieldwall and his search in the village turning up nothing of value, L. made a rather surprising decision to make one final attempt to break my levies. With just four warriors, he smashed in the middle of their shieldwall and actually managed to split it in two. This was however the high watermark of his effort – what remained of my peasants turned onto his warriors like mad dogs, or, at least they did so in my imagination. To be truthfull though, they didn’t manage to do much damage. They did however manage to convince L. about general unhealthiness of his current situation. His Saxons came to sensible conclusion it was best to break contact.

Dux_20170621_023

At this time the game was at a rather peculiar stage. Both L. and I did loose a formation of warriors. L’s hearthguard had a shedload of Shock points to deal with, but was otherwise still combat-worthy (one of his groups lost three men, the other was untouched). L. also had one completely fresh Warrior group in the village. From my perspective, the situation wasn’t that rosy neither. My peasant levy was still alive, but pretty much in shambles. My commanipulares didn’t suffer any casualties, but they were now supported only by a single group of four warriors; these guys would not stand for long if L. decided to attack. In other words, this fight was far from over!

But… as so often is the case in our hobby, real life clock and exhaustion took over. We’ve been at it for almost five hours and L. made the sensible decision to call it a day despite the fact that he didn’t manage to find anything of value in the village.

Musings after the battle

Let’s start with the obvious – the Saxons, newly painted as they were, never really had a chance in this game. The old wargaming truism has been proven yet again! Smile

If I am to be serious though, this game of ours was quite fascinating for me for two reasons. First of all, it was rather entertaining to see how different playing styles of H. and L. shaped the course of the game in very different ways. With H., I can usually assume that the Saxons will act cautiously and, for the lack of better word, rationally. L. explained to me later that he wanted to explore the ruleset and therefore acted consciously much more aggresively, seaching for a fight wherever it could be found. Thus, he took risks I’ve never experienced in my games with H. It has to be said that these risks did pay dividents, most important of them being the fact that he managed to split my levy shield wall with just four warriors accompanied by a leader.

Which brings me to the second reason this game was also a valuable learning experience. In Dux Britaniarum, a formation can be created by groups of warriors being formed either side by side or in two ranks, one behind the other. If a formation consists of two groups, they can be formed like this:

XXXOOO or XXXXXX
XXXOOO    OOOOOO

The difference between these two setups is that side by side groups always take equal shares of potential hits, while in ‘one rank behind the other’ setup the front rank absorbs all hits until their number dwindles to less than half of their comrades in rear rank. Then they shift place.

In our game, I played with groups side by side, L. set up his formations in two ranks. This was new experience, because H. usually preferred same setup as I did.

Why do I mention this? Well, for the first time, I had the opportunity to see the real differences in these two formation variants and they do add some surprising complexity to the ruleset. The advantage of the ‘side by side’ formations is that all involved groups support each other by division of possible hits. But this also means that all groups accumulate the Shock points, not necessarily at equal rate. It seems that one of the groups will always be ‘unlucky’ and accumulate more shock points than everybody else. In the end this will result in their rout, which in turn will split the formation into smaller components.

‘Two ranks’ formation seems to have their own set of pros and cons. As only the front rank absorbs all the hits, their comrades at the back are ‘protected’, at least at the beginning of an engagement. But the almost ‘manipular’ possibility to switch positions once casualties start to mount up seems to me rather unlikely – rather, the front rank wil suffer casualties and shock points and at critical point they just as likely break instantly, leaving their buddies to face the opponent all on their own. This is what happened in case of L’s hearthguard’s attack – his front rank took all shock points and by the time they lost half of their numbers, it was too much for them and they run away.

My point with this rather too long ‘analysis’ is that there are hidden depths in this deceptively simple set of alternatives for formation setup and I’m not sure how to deal with them. Further games seem to be necessary to explore this topic further! Smile

May 26, 2017

When Wargamer’s Magpie Syndrome pays off

Let’s face it, we all suffer from it to some degree – new period catches our interest, a new range of minis is released, a book or a movie gives us ideas for a cool scenario or campaign. When this happens, small parcels start being delivered by postal service to our doors. I’m sure that vast majority of wargamers is far more disciplined than I am and manages to put contents of those parcels onto wargaming table within a couple of weeks… In my case though, these newly acquired ‘treasures’ are as often as not inspected, admired, put in some box and then doomed to linger, half-forgotten, in my basement storage room. Sometimes for years, sometimes for decades.

Every once in a while though, a small miracle happens and my interest in the period or theme awakens again. As for example, with the WWII skirmish due to ‘Chain of Command’ ruleset. As I started to seriously consider putting together last week’s test scenario, I realized that I really didn’t have much terrain suitable for such game. And then I remembered… sometime in late ninties I’ve bought a shedload of bits and pieces from Gamecraft Miniatures. It took some effort, but after a small archeological excavation I’ve managed to dig up a bag of resin walls and stones. I am pretty sure that a dozen or so resin buildings are hiding somewhere, so the search is not yet complete!

Anyway… getting these walls and stone formations ready for a game seemed like a plausible goal over a period of two weeks I had for preparation of the game. In ‘raw’ form, the terrain pieces are made of off-white resin. So the first step was to wash them in luke-warm water with some detergent. An old-fashioned toothbrush is quite useful for this task.

Gamecraft_Miniatures_Bits_n_Pieces_005

Gamecraft_Miniatures_Bits_n_Pieces_009

While the resin lumps were put aside to dry, I started to wonder how to approach this particular painting job. Normally, I start with a coat of Vallejo (or these days Plasticoat) grey primer and then get to work with acrylics. But in this case we’re were talking about stone. In nature, both stone walls and outcrops have a lot of subtle tonal variation, but in a limited color range. Browns or greys shift in saturation due to varied exposure to elements – to get a realistic effect, I would have to do a lot of blending and washes. And I have to admit, after all these years blending with acrylics is still a challenge for me. And so, I arrived to a somewhat surprising decision – this time around I would go ‘old school’ and dust off my old Humbrol enamel pots!

Gamecraft_Miniatures_Bits_n_Pieces_014

Enamels may be an unfamiliar medium for ‘younger’ wargamers, but they were pretty much all we had before acrylic ‘revolution’ of early ninties. They are not water-solvable and need either white spirits or terpentine to thin (and wash the brushes). They stink (especially some of the older Humbrols can make your nose hair curl in panic as soon as the lid is off) and they take forever to dry. So when acrylics arrived on the scene, enamels didn’t stand a chance. But… this last drawback – long drying time (and I speak about several hours) is under certain circumstances a blessing in disguise. It allows for blending and lifting off techniques (that’s what I call painting and then ‘taking off’ paint from painted surface) that one only can dream of with acrylics.

I started the painting process with an uniform coat of Humbrol 98 for the stone formations and Humbrol 118 for the stone walls. Once this was done, I let the pieces dry over night.

For stone formations I next proceeded with building up several thin layers of 72 and 187 mixed in different ratios. Darker shades were applied all over the stones. I did however try to let the dark base color to get through here and there. That’s where ability to pick off the paint with the brush was very useful. As I successively lightened my mix, I blended it with underlying layers in the areas that would be exposed to sunlight and elements. For final highlights I added some light grey Humbrol 64. Addition of light neutral grey desaturated the mix. It was added to the sharp edges and surfaces that were visibly raised. Normally this step would be done with drybrushing technique. However, since enamels don’t dry in a blink of an eye, I had plenty of time to do proper blending.

I did however switch over to drybrushing once I started working on the walls. Blending of individual stones would simply take too much time. So a heavy drybrush of Humbrol 26 was applied to the raised stone areas with a flat brush, followed by lighter passes of Humbrol 187 and 72 in irregular patterns.

Next, I returned back to the stone formations. I dilutted heavily the dark brown Humbrol 98 with white spirits and used it as a wash, applying it to lower parts and around crevices of stone formation. Once done, I left everything to dry over night.

Last painting step consisted of a wash with Vallejo’s acrylic washes, which I applied on the walls in an attempt to bring out the detail of the walls. I mixed together Black and Oily Earth and applied it all over the walls. Not entirely happy with how this step turned out, but it did add a bit of variation in color tonality.

Once everything was dry, I flocked the terrain bits with turf and foam clumps from Noch/Woodland Scenics.

Overall, I am not entirely happy with how the walls turned out – the reddish tone of Humbrol 118 that I used as base color looks a bit unnatural to me. But from a couple of meters away the walls look perfectly serviceable. On the other hand I am totally delighted over the visual effect of stone formations. The stones have subtle but clearly visible shifts in color, which is exactly what I was after and the dark brown wash that was added in spur of the moment did a lot for creation of ‘natural’ look.

It was a very happy return to an old medium of enamels, which I’ve neglected almost completely over last two decades. For the future, I will have to remember about their special characteristics and positive properties.

Gamecraft_Miniatures_Bits_n_Pieces_018

Gamecraft_Miniatures_Bits_n_Pieces_022

Gamecraft_Miniatures_Bits_n_Pieces_023

Gamecraft_Miniatures_Bits_n_Pieces_026

Gamecraft_Miniatures_Bits_n_Pieces_027

Gamecraft_Miniatures_Bits_n_Pieces_034

Gamecraft_Miniatures_Bits_n_Pieces_037

March 22, 2017

Canvas, Caulk, paint, Flock

Allright… so while the battle for Peter’s Hill is still ongoing (will explain later), I want to take the opportunity to talk a bit about the bits and pieces of terrain that I had to provide for this scenario.

Beside the hill itself, perhaps the most prominent terrain feature of this particular board is a large wooden area that covers the entirety northern half of that hill. There are different ways to represent wooden areas, but in this particular case I decided to try the technique I’ve already shown in one of previous posts – caulk mixed with paint, spread on canvas and then covered with flock.

I used exactly the same technique that I’ve tested here. The difference between the test piece I did on that occasion this time around was the size. I started by cutting off suitable piece of painting canvas and pinning it to the table. Next I outlined the shape of the wooden area. This helped me to keep track of the shape of the terrain piece as I spread thin layer of caulk and paint mix on the canvas. Finally the ‘painted’ canvas was covered with liberal amount of ‘Nadelwald boden’ ground cover mix from Buch. Once this was done, I left everything to dry for two days.

After two days I unpinned the mat and cut out the covered piece. Despite it being pinned to a table, the edges of the mat curled upward during the drying process. This was expected, but caused a bit of concern.

Wood_Canvas_Mat_003

On a whim I decided to try to fix this problem by simply painting the edges of the mat with same acrylic paint I used of ‘original’ mixture. This turned out to fix the curling problem and at the same time resolved the issue with the rather unseemly white edges, which would otherwise disturb the visual effect on the gaming table.

Wood_Canvas_Mat_005

Another thing that I wondered about was how well the ground scatter material would actually stick to the caulk/paint layer. In the much smaller test piece I did earlier, the adhesion as well as flexibility of the finished piece was really very good, but this piece was much larger. I didn’t have to worry though, size of the mat didn’t make any difference at all and the flock sticks to the caulk as if it were glued there.

Wood_Canvas_Mat_006

Since this piece of terrain is really rather large (about 60 x 60 cm), the question of how to store it became a bit of an issue. Obvious solution here is rolling the piece together. I was however a bit worried about friction agains flocked side. To give it a bit of protection I simply picked out four pieces of baking paper, taped them together with duct tape and used them as top cover for the mat.

Wood_Canvas_Mat_009

Overall, I am quite happy with both the mat itself as well as with how useful this techinque is turning out to be. I am quite sure that I will be using it in the future for different types of area terrain that need to be flexible. Roads, rivers and other linear obstacles is another area where this technique could turn out to be quite useful after a bit of experimenting.

October 30, 2016

Unexpected treat

Last Sunday I had the pleasure of enjoying an unexpected treat – a huge (by our local standards) game of General de Brigade. And no tiny 6mm midgets on that occasion, my dearies!We would be running that game the way wargaming magazines and Warlord Games have learned us over the years is the propper manner – 28mm plastics as long as the eye could reach, and a lot of them too!

GdeB_20161023_008

GdeB_20161023_016

Having the pleasure of seeing somewhere near 1500 28mm Napoleonic miniatures may be a common thing for those of you who are lucky enough to live in the land of the Queen and huge wargaming clubs, but let me tell you – here in southern Sweden it’s a rare sight indeed. My hat is definitely off for D., whos collection provided lion share of the figures on the table – very well done indeed, mate!

GdeB_20161023_017

GdeB_20161023_020

The game

Allright, so what about the game then? Well… I’m actually still trying to wrap my head around it. If I understand things correctly we run one of scenarios from Caliver Books’ latest scenario book for General de Brigade, dealing with 1813. The one we picked had rather traditional format – two long lines of infantry and artillery opposing each other, the village in the middle provided the major objective. Prussians apparently had some beer in local beer house and Frenchies, for whatever reason, didn’t seem to appreciate the idea of Germans having good time and and decided to crash the party. And yes, it would be one of those ‘hammer to the teeth’ affairs where attackers would rush into defenders along entire line and hope of the best.

GdeB_20161023_023

GdeB_20161023_025

Over next four or so hours, we managed to play grand total of five, maybe six rounds. I must admit that being busy trying to shove in as many Frenchmen into the village in the middle, I didn’t pay much attention to what happened on my flanks. Things seemed to go rather well on my left. On my right, I did manage to observe that my fellow comrade in arms had rather dismal luck with his dice rolls and failed to make any impression on Prussian defensive line.

GdeB_20161023_029

GdeB_20161023_032

Yours truly tried his best to keep some sort of order among French columns marching toward the village. These columns, consisting of mainly second line troops constantly blasted by artillery batteries supporting two German Jaeger battalions parked in the village and having no intention sharing that beer, had a devil of a time. By round three I managed to reach the edge of the village, but once there, my assault pretty much stalled. By round five one of my battalion routed of the table, while the two battalions that managed to reach the objective intact were repulsed, with some losses. Prussians simply refused to be dislodged from their position. With just under an hour remaining of the playing time, I did the thing I hate being done to myself – I declared that since we wouldn’t be making any headway in remaining time, we may just as well quit for the day.

GdeB_20161023_039

GdeB_20161023_047

GdeB_20161023_070

Musings after the battle

First of all, thanks again to the guys based in Lund for letting me participate in their game! Visual aspect of well-painted 28mm Napoleonic miniatures deployed en massé on a large table is something every wargamer should experience at least once.

GdeB_20161023_077

GdeB_20161023_084

Having said that… Damn, General de Brigade is reaaaaaly slow and ponderous game system. In our game, we had three players a side and things should have moved along at a decent speed, but the average time to complete one turn was still somewhere around 30 minutes. I honestly fail to see how, using this ruleset, one can complete a scenario of decent size in a single gaming session. This in itself doesn’t mean that BdeB is a bad ruleset, but I’m starting to wonder if I can use it for purely practical reasons. Say whatever you want about ‘Black Powder’, but that thing at least moves along at decent pace.

GdeB_20161023_085

GdeB_20161023_086

GdeB_20161023_088