There is this old wargaming saying that claims that there is no better motivation for painting more minis than actually playing games. There may be something to this, because after recent test run of Chain of Command which disclosed how limited my collection of minis really was, I decided to do something about it.
And so, after yet another archeological excavation in my basement, I found what I was looking for – 1/72 sets of German and US infantry from Plastic Soldier Company. For those unfamiliar with this company, it’s been around for a better part of a decade by now. Their goal is simple – to provide affordable hard plastic figures and vehicle models in 15, 20 and (I believe) 28mm scale, mostly for WWII.
First off, as I am in urgent need of getting some .30 cal Brownings on the table, I decided to get cracking with the US Heavy Weapons set. Just to clarify yet again, I use 20mm or 1/72minis, so review is of the box in that scale. The box contains three identical sprues. Each sprue has following contents:
- 19 miniatures, all of which are sculpted as crew personel for weapons listed below.
- M1917 water-cooled MMG on a tripode, crew in sitting stance
- M1919 aircooled MMG on a tripode, crew lying down
- M2 HMG (aka 50cal or ‘Big Deuce’) on a tripode, crew in sitting stance
- 60mm mortar
- 81mm mortar
- 4.2’’ chemical mortar
- Bazooka
As I hope can be seen in picture of the sprue, some cleanup, assembly and gluing, both of weapons and figures, is required. For gluing I recommend the glues intended for plastic model kits, such as Revell’s Contacta glue or Tamiya’s Extra Fluid Cement. Superglue will also work, but personally I prefer the kind of glue that melts and fuses plastic together.
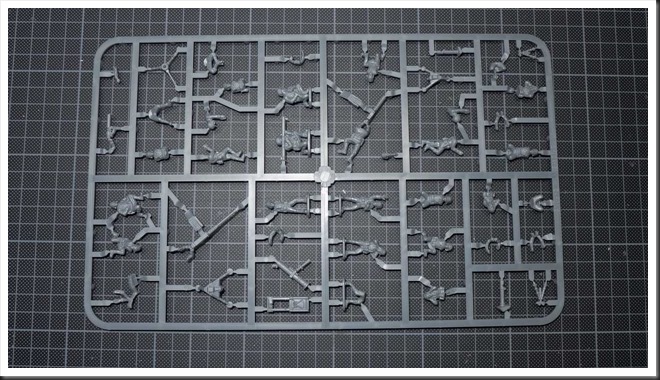
The assembly of minis isn’t complicated, but it does takes a bit of time – this single sprue required about two hours of my time. If you don’t bother with scraping and filing away all tiny mould lines (which are not much of a problem, really), you could probably cut away an hour or so from preparation time.
It has to be said that these little suckers weren’t the easiest ‘build’ I’ve ever worked with. The parts are a tad fiddly and I managed to snap off one leg of the .50 cal tripod, but that’s not really much of an issue. What gave me most problems were the minis with arms separate from the torso – .50 cal gunner, M1917 gunner and the guys with binoculars. The .50 cal gunner is especially tricky, as his arms are fused to the machine gun. If you don’t attach these arms ‘just so’, the entire gun ends up floating in the air. In the end, I had to use some filler for the joints between the arms and torso on a couple of figures and I’m still not 100 percent happy with the result.
Perhaps I make it all sound too dramatic – the minis go together pretty well and I’m sure that with a bit of practice things will move along for you without any hickups. And once you’re done with a sprue, here’s what you get…
The good


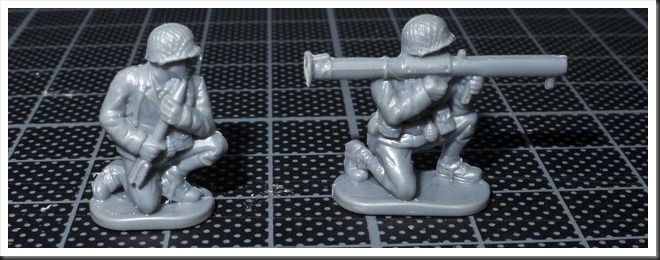
The bazooka team and both medium machine guns are pretty nifty figures. The .30 cal is slightly overdimensioned and bazooka’s details aren’t 100 percent historically accurate, but I don’t think anyone but a true button-counter will have any problems with deploying those minis on the table.
The bad
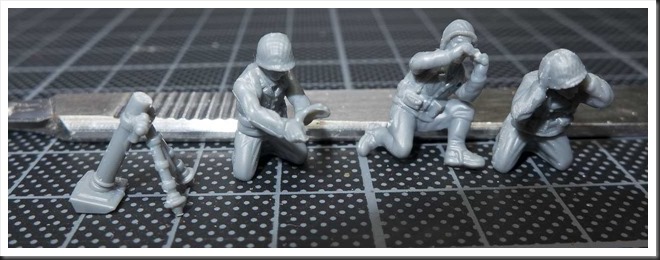
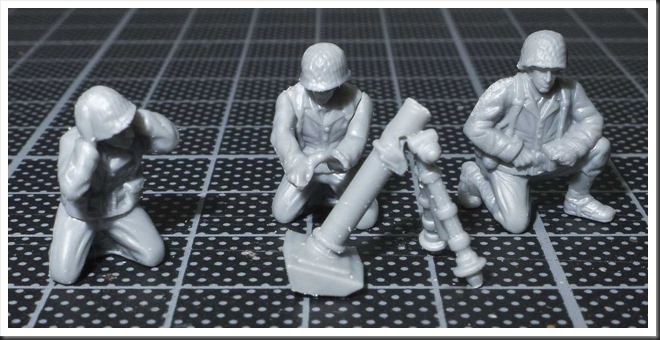

With this group, I unfortunately have some issues. Let’s start with the ‘elephant in the room’, and I do mean it quite literally. Seriously, who the heck sculpted this M2? While it is instantly recognizable as what it’s supposed to be representing, it is simply huge. Its length is 3,2 cm, i.e. about 230cm in 1:1 scale. The real thing is about 165cm long. So the overdimensioning in this case is very hard to ignore.
Next the 60mm and 81mm mortars. Both are sensible additions to this set, but… once again, the 60mm tube is grossly oversized, so much so that at one meter’s distance it is really quite hard to distinguish it from its bigger brethren. The real M2 60mm mortar was a tiny thing (relatively speaking), with a barrel just a bit over 72cm long. M1 81mm mortar’s tube was 119cm long. Sadly, this difference in size and heft of the two mortar types is unfortunately hard to observe in this set.
The questionable

Finally, we arrive to my ‘huh’ moment. Opinions may of course differ, but to me the addition of this heavy piece of equipment in a 1/72 scale set is a bit of a mystery. 20mm minis are most often used in skirmish games. On the other hand, 4.2 inch mortars were deployed as battalion level assets and had minimum range of over 500 meters – not likely the equipment you’d encouncer at the edge of front line. Addition of some troops with sachel charges, bangalore tubes or flamethrowes would in my opinion be much more useful. But here it is, in three ‘copies’.
Luckily, the minis that follow with it are generic sculpts and will certainly come in handy as artillery crews for all kinds of equipment.
Conclusion
In the somewhat underrated WWII movie ‘The Monuments Men’, there is this scene where Matt Damon steps on a German anti-personel mine. He hears the click and freezes. Then Clooney comes along and wonders what happen. Damon tells him and Clooney asks ‘Why did you do something like that?’. Personally, after putting together these figures, my reaction is a bit like that of George Clooney in that movie. The guys running Plastic Soldier Company know their stuff and they certainly know what a whiney bunch we wargamers can be. So why would they decide to give us an .50 Browning looking like a bolt gun from Space Marines set and a 60mm mortar on steroids? Honestly, I don’t know. Maybe it’s something about the design process (I think PCS designs in CAD and then scales minis accordingly), maybe it was a concious decision to make the pieces less prone to breakage. I can only speculate, but regardless… overall, I can’t help but think that this set is a bit of a missed opportunity.
Having said that, I must allow my sensible side to have it’s say – despite my criticism, I claim that this box it is most definitely a good purchase. The crew minis look good and you get 47 figures for peanuts when compared with prices of metal figures. And if you’re after a cheap, quick way to flesh out out your U.S. infantry force, I doubt that you’ll find better ‘value for money’ option that this set. I won’t lie to you, in due time I will maybe be replacing these 60mm mortars and .50 cal HMG’s with figures from AB Miniatures (with gritted teeth over their abhorent prices, I may add), but for now I will happily be fielding these minis in my Chain of Command games.




 I’ve also decided to play around with paints and made a very first attempt at wet blending. Not sure how successful I was, but I think I managed “game table” quality. But what do I know, judge for yourselves.


