December 29, 2014

First look at Flashpoint Miniatures Vietnamese Farmers blister

Flashpoint Miniatures has two blisters of civilians in their range – Villagers and Farmers. Both packs seemed interesting, so I grabbed both of them at the time I’ve placed my order. Now that both U.S. and Local VC minis are painted, it’s time to paint some VC locals.

First up, the blister called Vietnamese Farmers – a very nice and useful set indeed. It consists of eleven minis in very useful poses as well as two-wheel wheelbarrow, a buffalo and a little piglet. Sculpts are simple, but clean. I am quite pleased with this set, it will be very useful for ‘Charlie Don’t Surf’ ruleset I intend to use in my games and which uses civilians as an inherent part of scenarios.

FlashPointFarmers001

December 13, 2014

And yet another distraction

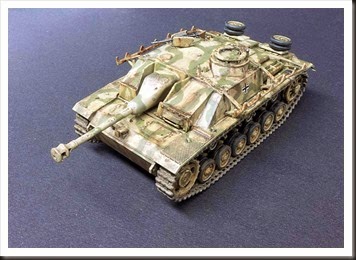
Oh, while I’m already here, I may just as well admit that some time during November was committed to another distraction in 1/72 scale – a late StuG III from Revell. This one was literally made in spare time between jungle plates and work with the huts. One of these days it will hopefully make an appearance in a Bolt Action game, once I get that project of the ground.

 Stug3G40-276Stug3G40-278Stug3G40-279Stug3G40-280Stug3G40-281Stug3G40-277

Jungle Terrain–Vietnam huts from Timecast Models

I'm one of those wargamers who really don't like working with terrain. I love painting minis, but terrain has always been the 'necessary evil' part of this hobby. It is therefore a bit ironic that at the moment there are no minis on my work table. Instead I'm knee-deep in two terrain projects for Vietnam and have revived what I'd like to call a 'sleeper' project that is also terrain-centric (more about it later this month!).

Anyway... the first of those Vietnam projects is obviously the jungle terrain bit. It chugs along at rather slow pace and I must say that the old platitude 'practice makes perfect' isn't entirely off the mark. The other terrain segment for Vietnam consists of huts - after all, no table will be complete without some hutches to defend, storm or burn.

When it comes to Vietnam buildings, there is some choice on the market, but I didn't find the selection overwhelming. JR Miniatures has some pretty cool-looking, but rather expensive huts on stilts. Flashpoint Miniatures sells a set of rather miserably looking straw huts. Also, Battlefront sold a set of two very basic, prepainted huts during their brief engagement in Vietnam, but they seem pretty hard to find now that the company lost interest in that particular conflict. And finally, there is stuff from good old trusty Timecast Models, my go-to place as soon as I need anything that includes words 'resin' and 'building'.

Now, the peculiar thing with Timecast for me is that they always seem to have enough stuff in their range to make a good start, but not enough to provide real variety. Their 15mm Vietnam buildings range is great and to my knowledge the most extensive in this scale on the market - hutches, shacks and town/colonial buildings. Still, there is just a couple of each type of building, leaving you craving for more!

All right, that's enough of introduction to the fascinating topic of resin buildings in 15 mm for Vietnam conflict; let's move on to what I've actually finished so far.  The logical starting point were the hutches... of course. Timecast sells two sets of two buildings of that type - straw hutches and clay hutches. All buildings are of similar size and layout and are made of brownish resin-like stuff with some heft - they will certainly stay in place once you put them on the table. Unfortunately, the material also seems prone to chipping while in transit. Also, they're one piece models - there is room for miniatures inside, but the roofs are not removable.

My paint job is pretty basic; not a fan of terrain making, remember? First off I washed the kits in warm, soapy water and let them dry overnight. Next, I primed them with cheap primer for plastics from one of local DIY shops, which turned out to be pretty bad idea - the paint run and pooled, making general mess. After another emergency scrubbing session in cold water (apparently, warm water makes acrylic paints harden), I gave priming another shot, this time with Vallejo's grey acrylic primer. The result was much more satisfactory.

VietnamHuts285

All straw sections (two hutches and the roofs on the other two) were based with GW Steel Legion Drab and then drybrushed in two steps with GW Tallarn Sand and Karak Stone. A short side note - GW:s current paint system strikes me as ridiculously overworked and unnecessarily complicated, but I'm pleased with the paints from 'base' and 'layer' ranges. Good coverage, flat finish, hopefully they won't dry out 15 minutes after I popped opened the jar lids.

I deliberated a bit over the choice of color for the mud huts. From pictures available on the net one draws must draw the conclusion that they were mostly either brown (natural color) or white-washed. In the end I choose to base the walls in light grey and then give them a heavy drybrush Vallejo Off White. Once that was done, I took care of bare wood parts (always a bit of a problem for me) and that was it. They seem to look the part and personally I'm quite pleased with them.

IMG_0847IMG_0850IMG_0851

November 20, 2014

Jungle Terrain–the saga continues

I was a little taken aback as I’ve just looked up the publication date of my post about that very first jungle terrain piece – May 2013, where the heck does the time go? In any case, when I was finally finished with first batches of opposing forces for my Vietnam project, there was no more excuses; it was time for jungle ‘mass production’. And now, with 10+ pieces under my belt, I thought it would be nice to post some additional thoughts about that part of the project.

So first things first… I think I will need somewhere between 25 and 40 pieces of terrain to be able to cover playing area available to me (a square 1.5 x 1.5 meters). Since I really dislike making terrain (simply not my cup of tea), trying to make all of them at once would with all probability end up with me walking away. Fully aware of it, I decided to split the job into more manageable batches of 5-6 pieces at a time.

The process for each batch became obvious for me while working with the test piece. First, painting and texturing of the bases. As already described, a mix of rough gravel, sand, cat litter and dried herbs give me the rough texture  I imagine is suitable for jungle pieces. It is spread onto a thick coat of brown paint and sealed with another once dry. Next a bit of drybrushing with lighter tone of base coat colour and we’re ready to proceed to step two.

By the way, ‘imagine’ is the operative word for this project, because I am most certainly not trying to re-create realistic Vietnam bush here.

IMG_0831

Next, it’s time for hot glue gun, plastic palms and whole bunch of different plastic aquarium plants. Couple of words about plastic plants – in my opinion the bigger variation, the better. My personal collection (mainly from Chinese E-bay shops, although IKEA was also helpful) consists by now of 10+ different plants and grasses and I wouldn’t hesitate to get even more of that stuff. Another thing one quickly realizes and needs to accept – most plastic plans are ‘too big’ for 15mm. Leafs are too long, too wide and too thick. So forget about realism if you’re going plastic plants route with that scale.

Last but not least… it is quite tempting to just squeeze in as much stuff on those bases as possible. That’s what I did with that test piece and it sure looks nice; it is also a bad idea, for two reasons. First and foremost, remember that you will need to have place for your miniatures somewhere on these pieces. Second, there really is no need for ‘thick vegetation’ unless you want some impassable terrain pieces; the visual impact of the jungle is created quite handily by multitude of bases and variety of plants.

IMG_0839

Once the plants are glued onto bases, the final step consists of cleanup/flocking. Why cleanup you ask? Well, because these hot glue blobs look bloody awful and need to be hidden somehow. Sponge flock works fine for that purpose, but my personal favourite is brown fine turf. I have several bags of that stuff (made by Woodland Scenics/Noch) and by pure coincidence their earth brown flock is almost the same colour as the paint I use for the bases. So all I need to do to hide those hot glue blobs is to paint them with diluted white glue and then sprinkle turf powder over the ‘wet spot’.

Flocking is done to my personal taste with help of a bunch of railroad modelling stuff – mainly Noch sponge flock and bush clump foliage as well as ‘normal’ foliage from Woodland Scenics. That last one is however anything but ‘normal’, at least not for me. It comes in form of thin sheets of flock stuck to a very thin web-like net and can be cut and teased into different shapes. Pretty useful stuff , both for ground-work as well as for tree foliage!

IMG_0844

I’ve already said it before and am repeating it now – when it comes to groundwork materials such as flock, turf, clump foliage and similar, the railroad modelling stuff is the best and most cost effective. When compared with companies like Noch, Faller, Bush and Woodland scenics, prices demanded by most popular ‘wargaming terrain’ companies are simply ridiculous. Here in Sweden, the internet-based companies that sell whatever terrain modelling stuff your heart desire (except for decent palm trees) that I’d recommend based on personal experience are Modelljärnvägsspecialisten, Eurohobby and MJ Hobby.

November 01, 2014

C4 Open 2014 - Part IV

OK, this is the last batch of pictures from this year’s local modelling exhibition. Next post will be wargames-related, I promise. Ler


October 27, 2014

C4 Open 2014–Part III

Third instalment of pictures from this year’s C4 Open model exhibition.


October 26, 2014

C4 OPEN 2014–PART II

Second instalment of pictures from C4 Open 2014. Hope you enjoy them.


October 25, 2014

C4 Open 2014–Part I

It’s the last weekend of October, which only means one thing – it’s time for yet another visit to C4 Open exhibition, the biggest (by default, since it’s the only one) modelling exhibition in my area.

This year’s event was a bit disappointing and I really hope that it’s not an indication of development in the hobby in general. Far fewer displays almost no large scale dioramas. On the other hand, there were unusually many miniatures (including some 28mm Napoleonic minis from Perry Brothers!), so that was good news.

Anyway… managed to take a bunch of pictures and fall in love all over again with my tiny Lumix LX7; by gods, what a brilliant little camera it is! Here’s the first instalment, mostly miniatures and a bunch of ‘big cats’ in 1/35 scale.


October 15, 2014

FlashPoint Miniatures VC Local Force Unit review

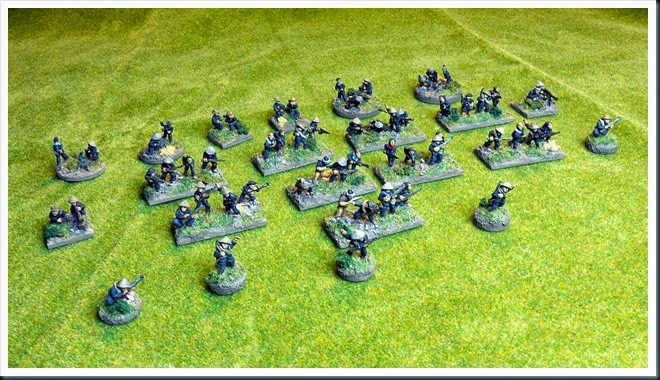
Seems to me like it took forever, but I’m finally done with the VC Local Force and VC Local Force HQ blisters. The final ‘product’ is presented in pictures below.

The main reason why it took me such a long time to get those minis ready for the gaming table is that I don’t like them all that much. They fulfil the function, but they’re not very exciting to work with. There is one fun figure – the old guy, the rest of the sculpts are serviceable, but oh so bland.

Next up, jungle terrain and buildings.

Local_VC101Local_VC105Local_VC107Local_VC112Local_VC115Local_VC122Local_VC124Local_VC127

September 06, 2014

Review of “Crimson Sky” by John R. Bruning

CrimsonSkyCoverAs stated at the beginning of this small volume (a tad over 200 pages), the air conflict in the skies of Korea isn't very well covered, especially when compared with WWII or Vietnam conflict. 'Crimson Sky' tries to remedy this situation in interesting fashion - author focuses on pilot's experiences in a number of detailed descriptions of missions typical to that conflict. These stories are put in proper context with help of a rather generic overview of the war as it developed between 1950 and 1953.

This approach renders a very interesting book that catches reader's attention from the first page. After all, if you picked up this book, you will probably be fascinated by first hand accounts of dogfights in Mig Alley or the very first, improvised on the fly, SAR missions. At the same time I must say that I've picked this book up because I thought it would be a good starting point for a closer study of Korean conflict in the air and as it turns out, it didn't really meet that criteria.

It is however unfair to blame a book for not being what you want it to be and I did learn a lot from it. So even if it's not the best choice for a 'primer', in every other respect it is an excellent book and probably a 'must have' for anyone interested in that particular topic.

Now to the really interesting question – is this book of any interest to a wargamer? The answer is an resounding yes. In fact, I’d go so far as saying that “Crimson Sky” was written with wargamer in mind. Every single chapter dealing with particular mission provides material for one or more scenarios of wide variety – bridge busting, dam busting with torpedoes (!!!), ground interdiction missions, escort/attack on B-29s or Tu-2s and finally dogfights between Sabres and MiG’s. I already have ‘Jet Age’ ruleset from Skirmish Campaigns sitting on my bookshelf and this book could very well be considered its companion book.

Review of “Roman Conquests–Italy” by Ross Cowan

RomanConquestItalyWell… if you’ve by judging the frequency of new posts on this blog came to the conclusion that wargaming hobby has fallen on hard times at Casa Marcus, you'd be absolutely correct. Between rather intensive period at work, summer vacation and rekindled interest in building airplane kits for the sake of pure pleasure, not much time is left over for painting minis or making terrain.

However, I am regarding current state as a temporary lull on the battlefield that most wargamers experience from time to time. The interest is still there and hardly a day passes by without me thinking about this or that wargaming project. Also, the hobby still dictates my choice of books I pick up from the shelf, which brings me to the real topic of this post.

During my vacation I had time to read 'Roman Conquests - Italy' by Ross Cowan. Early history of Rome has always fascinated me; after all, how the heck did they transform from a backwater village in the middle of nowhere into an empire spanning over three continents?

'Roman Conquests - Italy' won't give you the answer to this question, but it does provide a very nice albeit brief and compact introduction to the very earliest period in Roman road to the giant it eventually became. Its narrative spans from Celtic sack of Rome in 390BC to conquest of Calabria in 266BC. In a space of little more than 240 pages, author retells the story of almost petty squabbles between Rome and its immediate neighbour city-states, its slow expansion into central Italy, clashes with Etruscans and Celts in the north and monumental struggle against Samnites in the south. The story is rounded off with the story of Rome's encounter with Pyrrhus during the campaigns of conquest of Greco-Italian city-states in southern parts of Italian peninsula.

As already mentioned, this is a small book and out of necessity the writer confines himself to bare essentials in his narrative. Large sections of the book are almost lexicon-like and can feel like a long list of names of consuls for a given year and short description of the path they (probably) took in that particular annual excursion of the legions. Also, you won't find much information about the legions, strategy, tactics or soldiers who participated in that gigantic struggle; that information needs to be found in other places. Key events such as decisive battles or important political events are given more space, but don't expect detailed orders of battle, exciting battle descriptions or in depth analysis of political situations. Thus, it is safe to say that 'Roman Conquests; Italy' is a bit of a dry read.
Nonetheless, it is a fascinating little book that gives the reader a seed of an answer to the question how Rome became Rome. Out of the seemingly endless litany of yearly campaigns, battles lost and won, sieges that sometimes took a city and on other occasions ended in spectacular disasters for the Romans, treaties and alliances broken as often as they were held, one can clearly see the huge ambition, relentless drive and boundless aggression of both the individuals and the city itself. It also shows that Rome's ascendancy was far from certain and could indeed be regarded as a 'freak of nature'.

From historical wargamer's perspective this book is a bit of a mixed bag of goodies. It will not provide you with army lists or detailed orders of battle. Also, if you're unfamiliar with organization of early Roman legions or the opposition they faced during their initial expansion, you'll have to find that information somewhere else. However, it works very well as a sourcebook for scenarios and perhaps especially for that wargamer Holy Grail - the campaigns. Considering that the book is available for £5 in electronic format from Pen&Sword's website, it is really a bargain and if you've got even the slightest interest in this period, I'd say that picking up this book is a no-brainer.

August 29, 2014

Warsaw Military Museum Redux

Last time I visited Warsaw Military Museum, I had a rather crappy camera. This time around I brought with me my beloved Lumix LX7, which just shrugs its shoulders at even the shittiest lighting conditions and then proceeds with taking perfect pictures. So, this time around I was able to take some decent snapshots of, among other things, museum’s lovely knight/winged hussar armour.

Here are the pics for your viewing pleasure and perhaps for reference.


July 17, 2014

Even more distractions

Well, at this rate I’ll soon be able to put together a 20mm skirmish game or two. Wait, wasn’t that exactly the idea when I kept buying these 1/72 tank kits over all these years? Oh, whatever…

Anyway, not much painting or gaming done, but I managed to put together another plastic kit. This time around it’s a Sherman M4A1 76mm. One could almost suspect that I picked this one on purpose, so that that fancy shmancy Kingstiger wouldn’t feel toooo secure, wouldn’t you think? But no, pure coincidence folks, the Sherman just happened to be in easy reach at the time when I felt like building another tank.

Pretty decent, albeit a bit fiddly kit, this one. Truth to be said, I am a little worried about how well it will hold up to rough handling on the tabletop.

20140717_215215_8_bestshot20140717_215308_7_bestshot20140717_21552120140717_215559_5_bestshot

June 26, 2014

VC Local Force Combined Weapons Platoon from Flashpoint Miniatures

After a couple of diversions it’s time to return to the Vietnam project. Below you can see the content of Flashpoint Miniatures’ VC Local Force combined weapons platoon. Not much to say really about this blister, you get what it says on the package – two each of what looks like Browning heavy machine gun, a generic looking recoilless rifle and medium mortar, along with crews and couple of other miniatures I’m already familiar with from rifle platoon blister.

The sculpt quality is adequate, but far from superb. There is some flash and they need to be cleaned up, but I can’t see any immediate ‘duds’ in this batch. As with previous batches, I expect for those minis to look much better once painted.

IMG_1284

June 17, 2014

Those pesky victor formations

One thing in Check Your Six that I have noticed players have notoriously problems with is formation flying. V- or Vick-formations seem to be especially difficult to master. This post is intended to give couple of pointers that will hopefully make this task a bit easier.

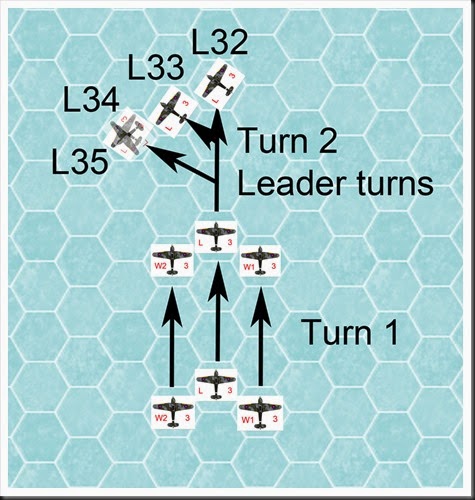
First, let’s start with the rule itself. In CY6, airplanes can fly in formations and usually start in formations at the beginning of the game. The rule is actually quite simple – every formation has a formation leader and one or more wingmen. When in formation, only the move for the leader needs to be plotted. Once the leader is moved, the wingmen can use any turn manoeuvre turn available for their speed to move into the area defined as formation area. It’s starts at the hex where flight leader ends up and stretches in a diamond shape area six hexes deep and thirteen hexes wide (see quick reference sheet available at Check Your Six Yahoo user group for picture).

The difficulty of keeping a vic formation occurs when the leader makes a turn and especially if it’s a sharp turn. This means almost inevitably that one of the wingmen falls out of formation. The reason for it is quite simple – in the turn when leader makes the turn, all airplanes are flying at the same speed.

Same speed

Picture above shows a formation of Hurricanes. In Turn 1 all airplanes fly straight forward with speed 3. In turn 2, the leader makes a left turn. There are four possible manoeuvres and all of them will force wingman W2 to select a manoeuvre that, while keeping it in formation, will place it in very difficult position if he’s to keep formation in turn 3. The wingman W1, while mostly being able to stick in formation for at least another turn, will also have no choice but to get out of it’s assigned position in turn 2.

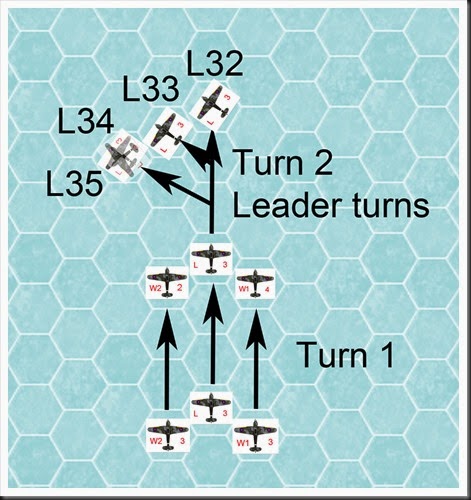
In real life, keeping the V formation was a difficult task in itself and because of that the formation was abandoned in favour of much more flexible rote formation. The difficulty with V formation is well represented in CY6, but it is not impossible to keep it within the constraints of this ruleset. To be able to do that you need however to plan one turn ahead and take advantage of the rule that allows wingmen to fly with speed one factor higher or lower than that of formation leader.

Adjusted speed speed

The situation in this picture is pretty much the same as in the first one. The only difference is that wingman W2 reduced his speed to 2 after first turn, while wingman W1 increased his speed to 4. The effect of this is apparent for anyone with manoeuvre chart for Hurricanes. For example, if the flight leader chooses to make turn L33, both of his wingmen will be able to stay in position. L32 and L34 will be a bit more difficult, but both wingmen will be able to keep up and get back into position in next turn. L35 is still problematic and if it’s necessary I’d consider announcing breaking formation at the start of turn 2.

Variations are also possible. For example if leader chooses L34, then probably the most optimal speed adjustment for wingmen is an increase to 4 for W2, while W1 stays at 3. This will give you a possibility for making an ‘overlap’ resulting in a switch of positions between W1 and W2, which in itself is historically incorrect, but which makes restoring proper V-formation in turn 3 quite easy to achieve.

Over skies of Britain, yet again

Check Your Six is such a delightful ruleset and it’s really a shame that my wargaming group is now depleted to such a degree that it’s becoming difficult to run a decent-sized game.

The scenario

Luckily, I was able to scrap together four of my mates and run a scaled down version of scenario “Tally Ho” from Skirmish Campaigns’ scenario book ‘Over the Channel’. The setup in this one is classic – a formation of Ju88’s, protected by a couple of Me109’s is attacked by Hurricanes trying to do as much damage as possible before the bombers reach opposite edge of the table. The twist is that players controlling the Hurricanes are unaware of the fact that  they will be bounced by Me110’s immediately after they fire their first shots.

Due to lack of players, I had to remove one vic formation of Hurricanes and a rote of Me110s, but even with these modifications, the essence of the scenario was still there. As it’s been a while since me and my mates played CY6, everybody was a bit ‘rusty’. Thus, I also refrained from deploying clouds, which make the scenario more interesting but also complicate the plotting of airplane movements.

After the modifications, six Ju88’s and two 109’s confronted six Hurricanes. Two Me110’s would appear after the Brits fired their first shots.

The game

The game developed in what I, after participating in a 15+ CY6 games, can only describe as ‘familiar pattern’. Random deployment placed that starting positions for both vic formations of Hurricanes would be in same sector, but separated by several altitude levels. They entered the board in very close proximity and to the left of the bomber formation, not giving the escorting Me109’s much time to react before getting in range.

Ha. and He., who had the control of British fighters, headed straight for the bombers in hope for immediate results. Knowing what was coming and taking advantage of the fact that the Brits were so close to me (yepp, yet again I was in control of the bombers, that’s the lot of GM), I adjusted the path of the bombers slightly, moving them closer to the enemy. Counterintuitive perhaps, but quite effective against an opponent who expects you to fly straight forward – Ha.’s Hurricanes overshot my bombers in next move, not able to shot at all. He.’s first bursts of machine gun fire were also ineffective due to being deflection shots.

After initial couple of turns the game developed in, for me at least, familiar pattern. Ha.’s Hurricanes, made a series of sharp left turn immediately after overshooting the bombers, in an attempt to quickly gain firing position yet again. Unfortunately, that manoeuvre also exposed them to the ‘hunter’ pair of Me110’s which now appeared behind and above Ha.’s Hurricanes. Lead Me110, under control of L., promptly disposed a Hurricane that slightly lagged behind his comrades. Another Hurricane was shot down by head on fire of T.’s Me109’s, which stuck behind the bomber formation, in wait for exactly the move that Ha. tried. Sole surviving Hurricane managed to get in the middle of bomber formation and damage one Ju88 at point blank range before having it’s engine shot up by T.’s Me109’s and diving for home. It failed to return home.

CY6_20140615

He.’s Hurricanes split immediately after first pass, one of the Hurricanes challenging T.’s Me109’s, while the remaining two fighters headed for the rear of the bombers. As already mentioned, T.’s Me109’s didn’t bodge from their position at the rear of German formation and the Hurricane tangling with them managed to sneak on their tails. Dice luck wasn’t however on He.’s side that day and despite valiant efforts he failed to score any hits. The two Hurricanes that headed for the bombers were more successful. Once in position, they finished off the bomber already damaged by Ha.’s sole survivor and damaged another one. The success came with a price tag – one of the attacking British fighters became the final victim of T.’s Me109’s before He. decided that enough was enough and headed for home, thus finishing the game.

Final tally – four Hurricanes shot down, another one damaged for one Ju88 shot down and one damaged. Good fun all around… but for me as game master, also another case of a slight anti-climax. Why, you say? Keep on reading and I’ll explain.

Musings after the battle

So here’s the thing – I find CY6 to be a quite brilliant ruleset which, if correct tactics are applied, is able to provide nail-biting and for the lack of better word, subtle games. What’s even more important, CY6 enables “historically correct behaviour” both in regard of tactics as well as manoeuvres. However, for those things to happen, a bit of afterthought and care is required on the part of the players. And yet, in the 15+ games I have by now participated in, pretty much same pattern develops in every game. First of all, the bombers act as magnets, with all fighters ‘lumping together’ around them. Chaos inevitably ensues. Also, choice of manoeuvres consists predominantly of sharp horizontal turns, especially on the part of fighters attacking the bombers. Players controlling them usually try desperately to get in yet another burst after the first pass through bomber formation. This makes the attackers bleed speed, consequently making them sitting ducks for the escorts and quite rightly so! This last issue is compounded by fact that if the attackers succeed in getting their fighters in position, more often than not they try to stay there until their targets are shot down. Usually though, it’s they that fall victim of escorting fighters.

The most fascinating aspect of this behaviour is that it seems to be universal – I have now played CY6 with three distinctly separate crowds of players and most of them tend to play in that manner.

On one hand, I understand this behaviour all too well. After all, we all like to ‘shoot and score’. Also, if one thinks about it, the phenomenon I describe isn’t unique – wargames in general have a tendency for becoming a chaotic tavern brawl, with everybody trying to kill everybody else. I must be honest and admit that I find this type of games to be slightly tedious. In case of CY6 in particular, games played with this ruleset can so easily be so much more than a gigantic dogfight and I can’t help but see these chaotic free-for-all engagements as lost opportunities.

Right, you think, and now he’ll probably tell us how to play CY6 ‘the correct way’! Well, maybe not the ‘correct way’, but I will dispense a couple of free of charge advices/observation that may very well provide you a better CY6 game.

Let’s start with the goal of the game. In my opinion, shooting down the enemy airplanes is a secondary objective. Player’s primary goal should be to get his airplanes safely home. After all, most real pilots wanted to survive first, shoot down airplanes second. Keep this in mind and you’ll see how differently the tabletop will look to you as you plan your next move.

While on that topic, nowhere in the ruleset is it stated that you can’t leave the game before you run out of ammunition. You don’t have to stick around if your side becomes disadvantaged or if you’re hopelessly out of position where you can influence the game any further. An added advantage of such attitude is that it also helps keeping the games at sensible length.

Now, regarding the technical aspects of the game, there is one simple rule that should be kept in mind at all times – energy is life! It comes in two shapes in CY6 – speed and altitude. Thus, use sharp horizontal turns only when you absolutely have to. In four cases out of five, vertical manoeuvre is the better alternative, because they automatically provide you with either increased height or possibility to increase speed.

Finally, regarding fighters vs. bombers – you don’t have to glue your fighter to a bomber’s arse and blast at it ‘til it goes down. In fact, it’s the worst thing you can do, especially if enemy fighters are nearby. Quick passes with goal of damaging bombers and forcing them out of formation is a much preferred alternative. Just look at the archive films, do you see the fighters sticking around in the middle of bomber formation? And no, you don’t have to immediately turn into the bomber formation after you made your pass. Take your time, gain speed or altitude and catch the bombers again in five, six or even seven rounds. After all, they’re slow and usually you know where they’re going. So take your time, avoid the escorts with your speed/altitude superiority and don’t stick around for  too long!

OK, hope I gave you some food for thought, that’s it from me for this time around.

June 04, 2014

Distractions

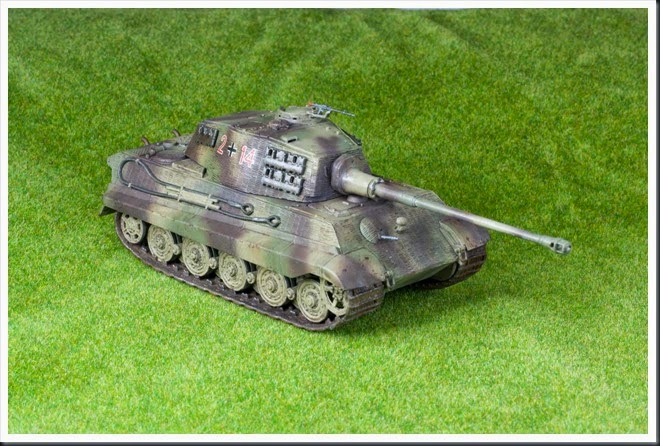
Well, yet again a month without any entries. There is no denying that May was an absolutely ‘dry’ month in regard of wargaming. Many reasons for this sad state of things, but the main culprits can be seen below. Majority of my ‘hobby’ time seems so far to be committed to my ‘original’ hobby – plastic models. Below are the fruits of last couple of month’s effort. The Junkers Ju88 in 1/72 will in all probability never see any service in wargaming setting unless I’ll go completely bonkers and start some sort of insane CY6 project), but the Königstiger could very well appear in one or two future games.

IMG_1428IMG_1429IMG_1430IMG_1432

IMG_1267IMG_1270IMG_1273IMG_1278

April 27, 2014

Another outing to the town with no name

Today I had opportunity to participate in a test run of T.’s modified version off ‘Rules with no name’ and it was very enjoyable experience indeed. I won’t go deep into the ruleset itself, as I am almost totally unfamiliar with it, but the game run smooth and there was plenty of opportunities for a laugh. All in all, there are worse ways to spend a spring Sunday.

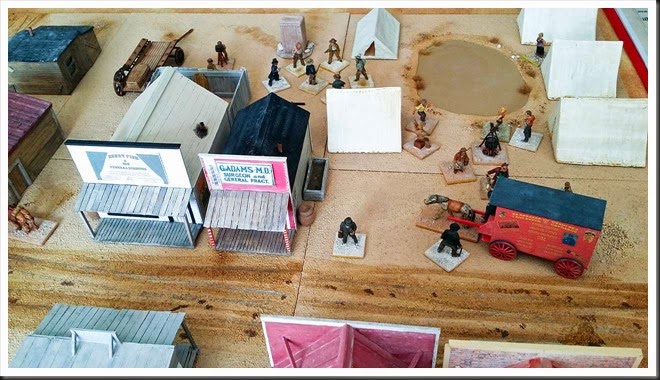
The scenario itself was a basic shootout between a gang of bandits and equal number of lawmen, mainly consisting of Texas Rangers. The game I participated in will be foremost remembered by a number of weapon malfunctions at the most inopportune moments. Unsurprisingly, with guns falling apart or jamming for everybody, the results were inconclusive, with one man seriously wounded on each side and the rest planning having a rather frank chat with the local gun peddler once the dust had the chance settle.

Anyway… here is a couple of pictures, just to show off T.’s hard work.

001002003004empty_town_sepia

April 08, 2014

Yippie, the Saxons are Back!

Wait, what did I just say? The Saxons are back? Oh, shit!!!

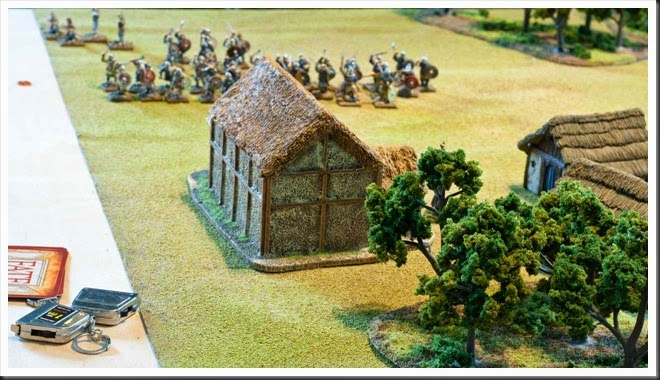
Yes, almost exactly a year after last Saxon raid, H. apparently run out of cow meat and decided to return to the British coast to have another go at it. This time around his goal was a church conveniently located near the coast. Even more conveniently, the church in question was fully stocked with enough loot to justify the travel expenses for H.’s merry Saxon band.

The initial setup

Gods certainly smiled at H. during the generation of the field and initial dispositions. The church was placed in the middle of the board, while entry point of my brave Britons was decided by a dice roll to be on the exactly opposite side of that of Saxon entry point. If that wasn’t enough, the raiding Saxon party obviously arrived without being noticed and was given three movement rounds before I was allowed to make an appearance with my vanguard force.

All said and done, this one seemed like a Saxon cakewalk.

The game

H. didn’t waste any time and rushed in the direction of the church at full speed. Two of his units accompanied by a leader barged into the church, giving the resident priest barely enough time to grab the crucifix of the wall and make his getaway. The rest of H.’s band decided to wait outside and keep watch for the inevitable arrival of local Briton response team.

IMG_1206

IMG_1207

IMG_1212

In my first turn I was allowed to deploy only three out of six of my bands and opted for leaving the peasants behind. Thus, my hearthguard and warrior bands became the first wave, while the levy brought up the rear. The warriors moved very quickly… as it turned out, some of them were too quick for their own good. Unwisely, my two warrior groups rushed ahead of the hearthguard elites (not very odd if you think about it, chainmail isn’t made by Nike!) and had barely time to set up a shieldwall (very nice card!) before they were jumped by H.’s horde of elite troopers. The fight was brief, but decisive nonetheless – five out of my twelve warriors were unceremoniously butchered before the rest broke rank and scurried away, followed by scornful Saxon yells. Round one of the contest went without a shadow of a doubt to H.

IMG_1219

IMG_1223

IMG_1224

Things were about to get worse as my peasants froze in their tracks by the sight of a single group of Saxon warriors appearing in front of them. I had the advantage of numbers, but peasant levies are really like lambs being led to the slaughter when confronted by better troops. Having already suffered five casualties, I was unwilling to take any chances and a confidence-busting shieldwall was promptly set up. This act gave my peeps decent protection, but also effectively immobilized them as levies in sheldwall can only move 1D6 inches and only straight forward. In other words, my force was now split in two!

By the same time my decimated warriors found their way back to my hearthguard group and formed another shieldwall. This formation then proceeded advancing toward the Saxon horde in front of them, me fully intending to charge the enemy as soon as I was close enough. H. would however have none of it. With peasants cowering behind their shields, he swiftly moved the group that threatened them into perfect position for a flanking attack in case I would engage his main host. In response, I broke up my formation and rushed toward the H.’s flanking group with my hearthguard warriors. Imagine what… the sneaky git played a card of his own, allowing his exposed rabble to scurry away all the way back to his main group of warriors!

IMG_1228

In next turn the starring match was resumed – H.’s force consisting of his chief, another leader and fifteen warriors vs. my host of chief, another leader and eleven warriors. Numerical advantage was at H.’s side. Furthermore, I had blown my card hand in previous rush. On the other hand, my guys were protected by their shieldwall. Saxon standoff, anyone?

While the events above took place, the Saxons in the church frenetically looked for the loot and apparently couldn’t find anything even remotely shiny!  The condition for finding the loot were two rolls of six on three dices they had available to them (one dice each for two groups and one for the leader. Five rounds into the search… not a single six was rolled. Then… boom… first one, then another result of six and the Saxons were good to go back home.

IMG_1216

Personally I was more than ready to say ‘Good riddance and may your boat leak like a sieve’ at that point – the cost of breaking through the mass of warriors in front of me seemed to high. H. could have made clean getaway, but the temptation of superior numbers must have been too much for him. Even as his looting party run away with the booty, he charged my formation… and was soundly repulsed. Strength of the shieldwall proved its superiority yet again and the Saxons bounced back, leaving three of their comrades dead on the field.

IMG_1230

IMG_1233

This proved to be enough excitement even for H. and we agreed to call it a day.

And so, the Saxons won again, giving H. enough hard cash to pay off his boss and advance on Saxon social ladder if he chooses to do so. Perhaps even more importantly, the bastard is becoming famous and will have two additional warriors in his next visit to Britain.

I should have slaughtered his host when I had a chance. Luckily there is always the ‘next time’!

Musings after the battle

Two note-worthy observations; First of all, this game was perhaps the most smooth-flowing and ‘logical’ I have ever played in all my wargaming years. The rules are rock-solid, simple to understand, easy to remember and very clear in most circumstances. This in turn allowed us to play in extremely rational manner. Both H. and I constantly evaluated pros and cons before committing to violence, which is a phenomenon I haven’t seen in many games.

Second, and I guess it’s a repetition of my previous opinion – the campaign setting makes all the difference. Both H. and I agreed in the opinion that if it weren’t for the possible future consequences, we would not hesitate to try to beat each other into pulp. But since the consequences of a defeat carry a potentially disastrous penalties, both of us acted much more carefully than we’d do in a ‘one off’ scenario.