Showing posts with label World War 2. Show all posts

July 26, 2018

US Mine Clearing Team and US Engineers from AB Miniatures

Oh yes, AB Miniatures… pretty much everyone into Napoleonics and WWII has probably heard about them and if so, had a bit of a shock after realizing how much they ask for their minis. Personally, I’ve been lured by their Napoleonic sculpts on several occasions, but luckily choose the 6mm path in that department. When it comes to WWII… 20mm is my scale of choice and now that I’ve decided to commit myself to Chain of Command, the siren call of those AB minis was too hard to resist.

Now, my first AB minis are ready for gaming table. The price is still making me grind my teeth, but I won’t lie, I find those sculpts absolutely lovely! Crisp molds, very dynamic and useful poses, faces with character despite the tiny scale! As a consequence, painting them was pure joy and I probably spent a lot more time on them than I should.

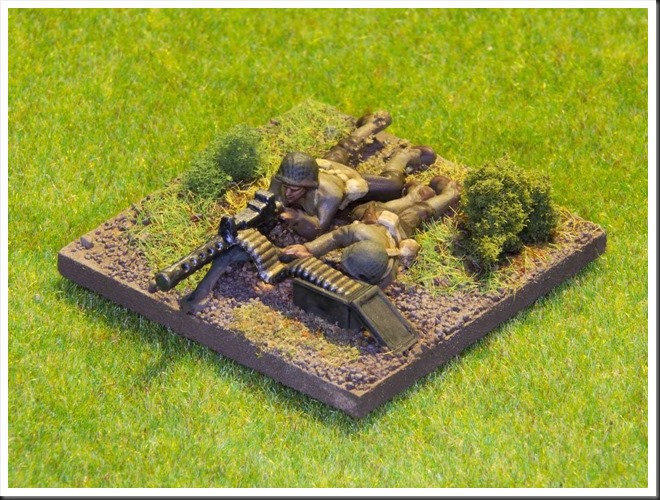
So far, I’ve finished two sets. First of them is US Mine Clearing Team, consisting of six figures.

Blog_2018_08_27_011Blog_2018_08_27_019

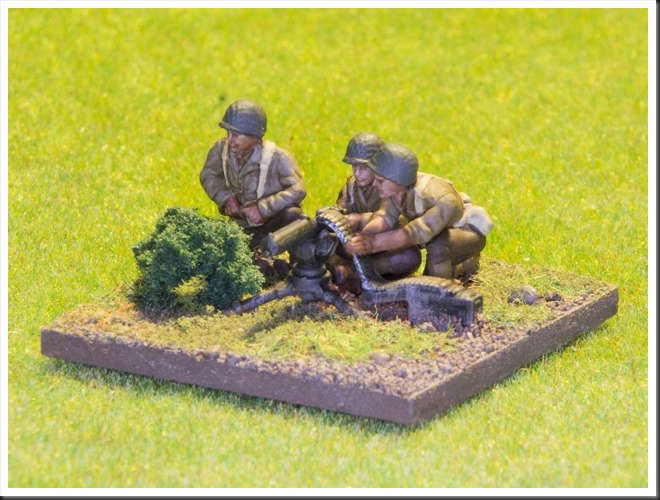
The other set is US Engineers, consisting of eight miniatures.

Blog_2018_08_27_013Blog_2018_08_27_015

Paint job is a mix of recommendations from net, painting guides and my own ‘best guesses’. All paints are Vallejo Model Color unless otherwise specified.

  • Jacket and leggings – 60/40 mix of 884 Stone Grey and 821 German Cammo Beige
  • Webbing – 819 Iraqui Sand
  • Sachels and other engineering equipment – 821 German Cammo Beige
  • Helmets, flamethrower, bangalores – Game Color 64 Yellow Olive
  • Trousers – 873 US Field Drab slightly tinted with 941 Burnt Umber
  • Boots – 846 Mahogany Sand
  • Rifle belts – 940 Saddle Brown

August 01, 2017

1/72 US Heavy Weapons set from Plastic Soldier Company– painted

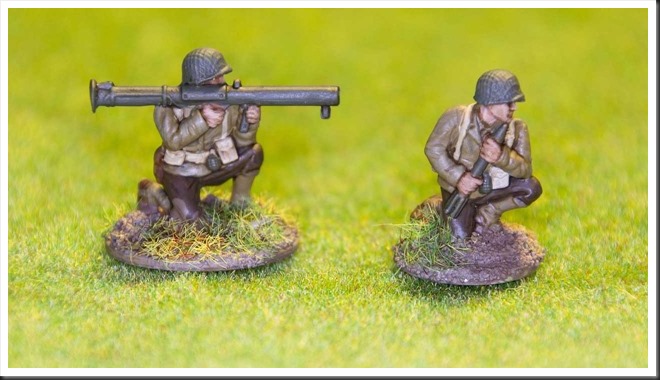
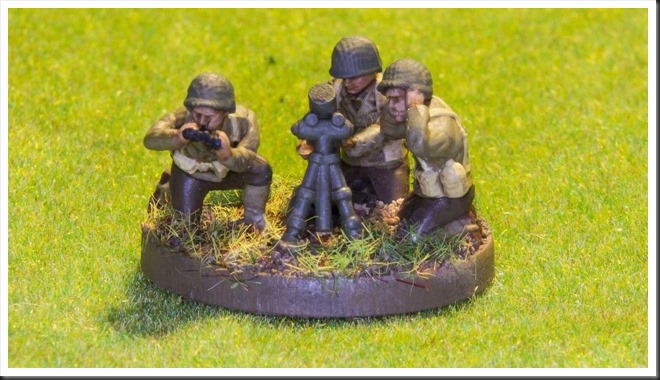
Took me just two months, but they’re now done. Final impression after putting some paints on them? Neeeaaah… my initial impression hadn’t changed that much – they are cheap and they are adequately detailed for a wargaming table. It should be enough and yet, somehow, it isn’t.

Oh well! Judge for yourself, what do you think?

PSC_Painted_US_Heavy_Infantry_001PSC_Painted_US_Heavy_Infantry_003PSC_Painted_US_Heavy_Infantry_005PSC_Painted_US_Heavy_Infantry_006PSC_Painted_US_Heavy_Infantry_007PSC_Painted_US_Heavy_Infantry_008PSC_Painted_US_Heavy_Infantry_009PSC_Painted_US_Heavy_Infantry_010_1

May 31, 2017

Quick look at 1/72 US Heavy Weapons set from Plastic Soldier Company

There is this old wargaming saying that claims that there is no better motivation for painting more minis than actually playing games. There may be something to this, because after recent test run of Chain of Command which disclosed how limited my collection of minis really was, I decided to do something about it.

And so, after yet another archeological excavation in my basement, I found what I was looking for – 1/72 sets of German and US infantry from Plastic Soldier Company. For those unfamiliar with this company, it’s been around for a better part of a decade by now. Their goal is simple – to provide affordable hard plastic figures and vehicle models in 15, 20 and (I believe) 28mm scale, mostly for WWII.

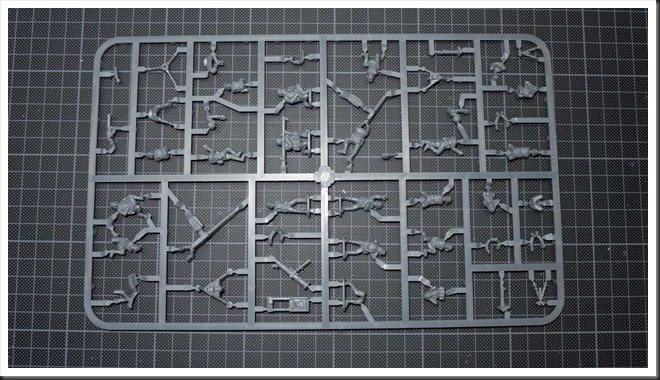
First off, as I am in urgent need of getting some .30 cal Brownings on the table, I decided to get cracking with the US Heavy Weapons set. Just to clarify yet again, I use 20mm or 1/72minis, so review is of the box in that scale. The box contains three identical sprues. Each sprue has following contents:

  • 19 miniatures, all of which are sculpted as crew personel for weapons listed below.
  • M1917 water-cooled MMG on a tripode, crew in sitting stance
  • M1919 aircooled MMG on a tripode, crew lying down
  • M2 HMG (aka 50cal or ‘Big Deuce’) on a tripode, crew in sitting stance
  • 60mm mortar
  • 81mm mortar
  • 4.2’’ chemical mortar
  • Bazooka

As I hope can be seen in picture of the sprue, some cleanup, assembly and gluing, both of weapons and figures, is required. For gluing I recommend the glues intended for plastic model kits, such as Revell’s Contacta glue or Tamiya’s Extra Fluid Cement. Superglue will also work, but personally I prefer the kind of glue that melts and fuses plastic together.
PSC_US_Heavy_Weapons_002

The assembly of minis isn’t complicated, but it does takes a bit of time – this single sprue required about two hours of my time. If you don’t bother with scraping and filing away all tiny mould lines (which are not much of a problem, really), you could probably cut away an hour or so from preparation time.

It has to be said that these little suckers weren’t the easiest ‘build’ I’ve ever worked with. The parts are a tad fiddly and I managed to snap off one leg of the .50 cal tripod, but that’s not really much of an issue. What gave me most problems were the minis with arms separate from the torso – .50 cal gunner, M1917 gunner and the guys with binoculars. The .50 cal gunner is especially tricky, as his arms are fused to the machine gun. If you don’t attach these arms ‘just so’, the entire gun ends up floating in the air. In the end, I had to use some filler for the joints between the arms and torso on a couple of figures and I’m still not 100 percent happy with the result.

Perhaps I make it all sound too dramatic – the minis go together pretty well and I’m sure that with a bit of practice things will move along for you without any hickups. And once you’re done with a sprue, here’s what you get…

The good

PSC_US_Heavy_Weapons_015

PSC_US_Heavy_Weapons_016

PSC_US_Heavy_Weapons_011

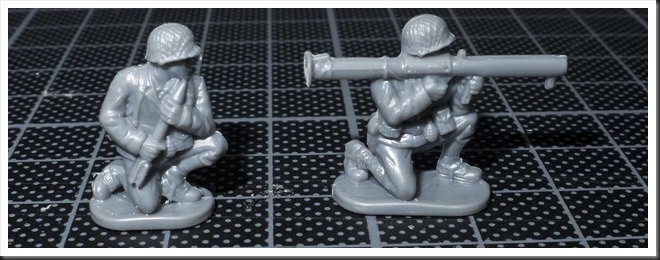
The bazooka team and both medium machine guns are pretty nifty figures. The .30 cal is slightly overdimensioned and bazooka’s details aren’t 100 percent historically accurate, but I don’t think anyone but a true button-counter will have any problems with deploying those minis on the table.

The bad
PSC_US_Heavy_Weapons_006

PSC_US_Heavy_Weapons_013

PSC_US_Heavy_Weapons_014

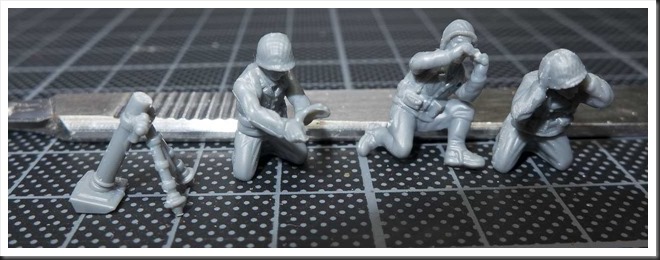
With this group, I unfortunately have some issues. Let’s start with the ‘elephant in the room’, and I do mean it quite literally. Seriously, who the heck sculpted this M2? While it is instantly recognizable as what it’s supposed to be representing, it is simply huge. Its length is 3,2 cm, i.e. about 230cm in 1:1 scale. The real thing is about 165cm long. So the overdimensioning in this case is very hard to ignore.

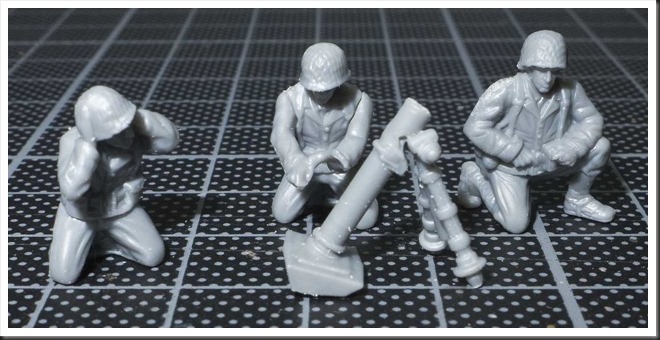
Next the 60mm and 81mm mortars. Both are sensible additions to this set, but… once again, the 60mm tube is grossly oversized, so much so that at one meter’s distance it is really quite hard to distinguish it from its bigger brethren. The real M2 60mm mortar was a tiny thing (relatively speaking), with a barrel just a bit over 72cm long. M1 81mm mortar’s tube was 119cm long. Sadly, this difference in size and heft of the two mortar types is unfortunately hard to observe in this set.

The questionable

PSC_US_Heavy_Weapons_003

Finally, we arrive to my ‘huh’ moment. Opinions may of course differ, but to me the addition of this heavy piece of equipment in a 1/72 scale set is a bit of a mystery. 20mm minis are most often used in skirmish games. On the other hand, 4.2 inch mortars were deployed as battalion level assets and had minimum range of over 500 meters – not likely the equipment you’d encouncer at the edge of front line. Addition of some troops with sachel charges, bangalore tubes or flamethrowes would in my opinion be much more useful. But here it is, in three ‘copies’.

Luckily, the minis that follow with it are generic sculpts and will certainly come in handy as artillery crews for all kinds of equipment.

Conclusion

In the somewhat underrated WWII movie ‘The Monuments Men’, there is this scene where Matt Damon steps on a German anti-personel mine. He hears the click and freezes. Then Clooney comes along and wonders what happen. Damon tells him and Clooney asks ‘Why did you do something like that?’. Personally, after putting together these figures, my reaction is a bit like that of George Clooney in that movie. The guys running Plastic Soldier Company know their stuff and they certainly know what a whiney bunch we wargamers can be. So why would they decide to give us an .50 Browning looking like a bolt gun from Space Marines set and a 60mm mortar on steroids? Honestly, I don’t know. Maybe it’s something about the design process (I think PCS designs in CAD and then scales minis accordingly), maybe it was a concious decision to make the pieces less prone to breakage. I can only speculate, but regardless… overall, I can’t help but think that this set is a bit of a missed opportunity.

Having said that, I must allow my sensible side to have it’s say – despite my criticism, I claim that this box it is most definitely a good purchase. The crew minis look good and you get 47 figures for peanuts when compared with prices of metal figures. And if you’re after a cheap, quick way to flesh out out your U.S. infantry force, I doubt that you’ll find better ‘value for money’ option that this set. I won’t lie to you, in due time I will maybe be replacing these 60mm mortars and .50 cal HMG’s with figures from AB Miniatures (with gritted teeth over their abhorent prices, I may add), but for now I will happily be fielding these minis in my Chain of Command games.

May 21, 2017

First impressions of “Chain of Command”

For the wargamers who just arrived from outer space, let’s start with a short introduction to “Chain of Command”. It’s one of the “newest” rulesets from Too Fat Lardies and it’s a WWII skirmish ruleset. One miniature represents one man and one vehicle or artillery piece model represents a corresponding single real world piece of equipment. The ruleset focuses on combat between forces of platoon size with some reinforcements. While it allows the player to directly control every individual figure, the basic manouver and fire units are squads of 8-12 men. Those can be further split into (usually) two teams, which is how most units of that size operated in real life. Specialized weapon teams, such as bazooka or medium machine gun teams provide additional firepower. Command and control is performed by ‘leaders’ of two types; junior leaders usually lead individual squads and weapon teams, while senior leaders provide control at platoon comman level, allowing coordination between individual sub-units of the platoon. Ruleset caters for support units in all forms and shapes – tanks, mortars, artillery (both on the table as well as off-board), engineers, etc are all handled. D6 dice is used throughout the ruleset.

“Chain of Command” has been around for a while now (about three or four years, I believe) and many reviews have allready been written about it, both in printed publications and online. So I will not try to reinvent the wheel by writing yet another lengthy review that will hardly add anything new to what’s already been said and written. If you’re interested in a detailed analysis, I recommend for you to listen to episode 106 of Meeples&Miniatures podcast or read an excellent review posted on Anatoli’s Game Room blog. Both of them provide a very good overview of this ruleset.

So what’s the point of this post of mine then? Well, I hope to provide a ‘rookie’ gamer’s initial impression based on two games I’ve run yesterday. In the first one I acted as Game Master, in the other one (enriched by my impressions of the first game) I took over one of the gaming seats.

The setup

Since it would be a first experience of the ruleset for all involved sides, I’ve picked up the most basic generic scenario that is included in the ruleset – an encounter between two patrols in no-man’s land. In this setup, the players start by establishing their initial zones of control with help of simple meta-game. Basically a bunch of markers are moved over the board until they come into 12’’ of one of enemy marker. Once this is done, players select their jump-off points in territory they control – computer game players can think of those as spawning points. These define where individual squads, teams and leaders can be deployed on the table.

To further simplify the task of ‘first game’, I decided to play on smaller area than recommended 6x4’ table. The game would be played on my kitchen table, which is only 5x3’. The terrain setup was my own creation – i basically threw whatever terrain I had available on the table with hope that this random arrangement would provide for a good game.

Finally, I decided to limit order of battle to a single basic platoon and no support units. So both sides (German and American) had their three squads consisting of an LMG team and rifle team to play with. Each of the squads was led by a junior leader. Furthermore, Americans had at their disposal two platoon leaders and a bazooka team, while Germans had a single platoon leader and a panzerschreck team.

CoC_First_Game_003

Game one

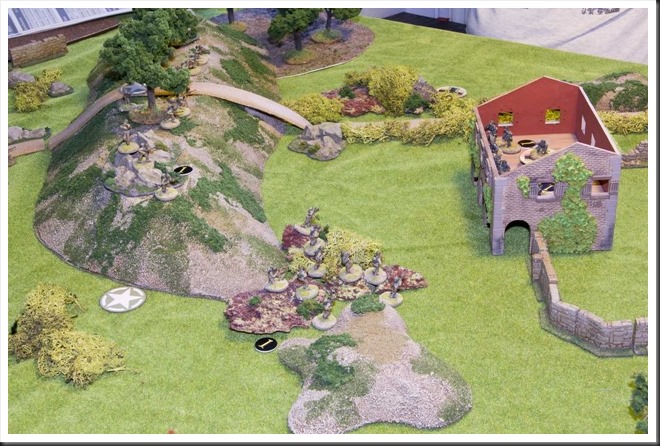
In our first game the Americans, played by T., managed to gain control both of the hill and the house in the initial phase. This gave him a huge advantage from the start and set the tone for the game. He deployed one squad in the house and the other two along the ridge of the hill. L. responded by deploying one of his squads in the hedges by the crossroad and the other one in the woods by the ‘northern’ foot of the hill (by the chairs in the picture above Smile). The MG team of that squad gained a foothold on the hill, deploying in the rock outcrops in its northern end. And that was it… both sides started to hammer each other, with Germans clearly getting the worst of it. After a fire-fight lasting over several phases, L. suffered eight casualties to two of T, the  machine gun teams of both of his deployed teams were wiped out and the remainder of the squad in the hedges by the road was pinned by T.s fire from the house. To put it plainly, he was screwed and he knew it. Thus, we ended that game.

CoC_First_Game_007

Game two

T. left our company by that time and L. and I gave it another go. Wiser by the experience, L. managed to claim the posession of the house in the initial phase of the game, while I grabbed the hill and the high ground to the south of it.

L. then proceeded by deploying a squad on second floor of the house and another by the wall outside the walled house court. I responded by establishing the line of fire along the ridge with one squad, deploying the second in the rough ground at the southern foot of the hill. I deployed my third squad behind the hill, out of sight. My plan was to move it around the hill and hit the house from the north. Once again, L. never bothered to deploy his third squad, probably waiting with it until he found out my intentions for the squad behind the hill.

CoC_First_Game_009

In some respects our game developed in similar manner to the previous. L. blasted at my guys in the rough ground, while I tried to hit him hard with fire from the hill. The pressure mounted on units on both sides, but yet again an impass seemed to occur almost instantly. After a couple of phases I grew tired of this static character of the game and decided to take a risk. I ordered the squad on the hill to fire suppressive fire at the Germans in the house – this is a temporary state where the incoming fire won’t cause any damage, but automatically reduces fire effectivness of any enemy units that are in the sector where suppressive fire is ‘applied’. This was a preparation step for my next action, which was a mad dash across open field toward the house by the rifle team of the squad in the rough ground.

CoC_First_Game_008

As Germans hunkered down under suppressive fire, the advancement was completed without any casualties. L. reacted by dropping a couple of grenades on my guys who were now huddling directly below, hiding behind the arcade walls of the house. My luck held and noone was hurt by the explosions. Naturally, as soon as I had the opportunity, I pushed on into the house. A vicious close combat for control of the house now took place… with disastrous consequences for the my side. Once the dust settled, six out of my soldiers were dead, with the sole unhurt man trying to patch up his wounded leader. Normally, such outcome would rout the survivors, but considering the enclosed surroundings we agreed that my survivors were now POW;s.

L.s triumph came however at a cost of three casualties and a wounded squad leader. Another round of whittling fire from the hill completed the grim job, breaking the German squad and forcing them to flee the house.

At this time we were at it for five hours and were more than satisified with the entertainment of the day. Thus, the second game also ended inconclusively.

Musings after the battle

After a single evening, it is far too early to say anything definite about this ruleset. But there is a couple of things I can say with conviction even after this brief exposure.

  • First and foremost, I am not at all surprised that so many people have been raving about ‘Chain of Command’ over last couple of years. It is a cracking ruleset and I will definitely invest much more time and effort into it.
  • In one rather important respect, ‘Chain of Command’ seems to be a very different beast when compared with other similar rulesets (‘Arc of Fire’ and ‘Bolt Action’ comes to mind). Let me explain.

    Over the years, I have learned to identify (and also exhibited myself) in gamers a phenomenon that I believe can be called ‘a stress cone’ – once a player sets his mind on a ‘target’, be it an enemy unit or a specific location, its destruction must be accomplished. And as the game progresses, this target increasingly becomes the sole focus of gamer’s attention. When this happens, a certain blindness to alternative solutions seems to occur. Flanking manouvers, an often valid option of breaking of contact and re-deployment or employment of less obvious assets is no longer considered – the initial goal must be accomplished. What’s even more important, it must be accomplished by direct assault and destruction by fire or close combat. To an unengaged observer, such behavior may seem odd, sometimes even bisarre. But if you think about it, we all occasionally exhibit it and many of us much more often than not!

    So what does this have to do with ‘Chain of Command’? Well, in most wargame ruleset, the initial phase of the game consists of manouvering the units into contact with the enemy. As this takes time, it also allows players to logially consider their options. Once the units come into contact and ‘combat’ starts to happen, player’s attention shifts to the actual action. He may then enter further and further into this ‘stress cone’ I’ve mentioned above. What seems to be special about ‘Chain of command’ is the fact that with this ruleset, the opposing units can be deployed pretty much on top of each other directly at the start of the game. And indeed, this is exactly what the designer of the ruleset states – a game of ‘Chain of command’ starts with opponents already in contact with each other! In other words, players are placed immediately at the small end of the ‘stress cone’ with consequence of ‘shootout’ games being a very tangible possibility if one is not careful and remains cool-headed. But if a player manages to keep his cool and remembers the simple fact that you don’t have to shoot at an enemy as soon as he’s visible, this ruleset has a possibility to provide a damn realistic experience of low level combat in WWII setting.

Allright, enough of ‘deep thoughts’ for this time around. Let me round this post up with repeating the sentiment that ‘Chain of Command’ seems to be an excellent ruleset. If you haven’t yet, you should definitely give it a shot (pun intended). Smile

May 09, 2017

Price of more than one hobby

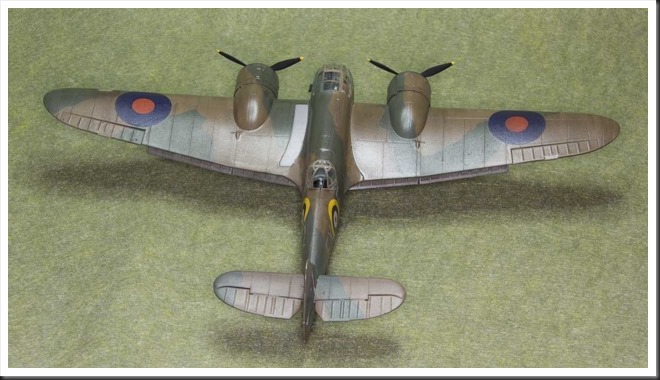
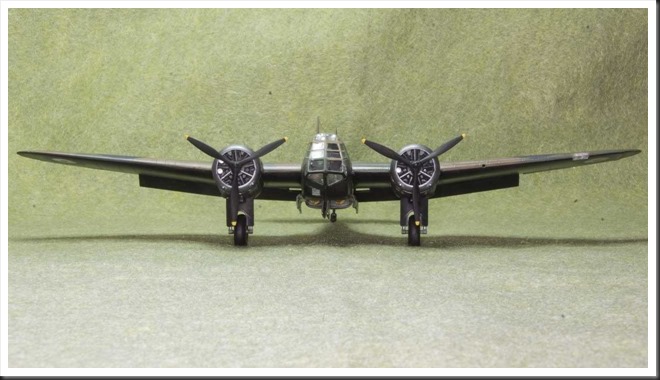
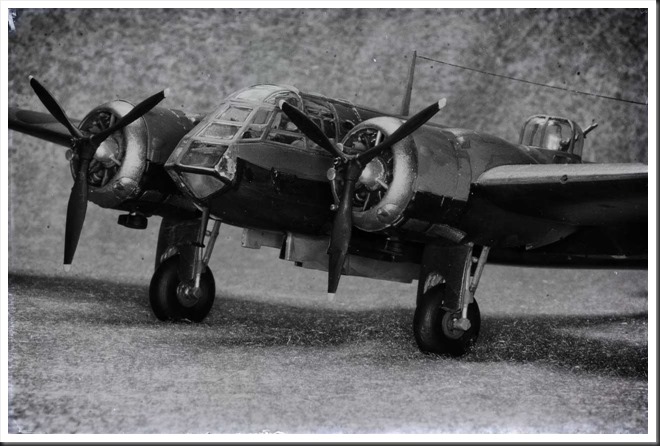
No point denying it, the goal of having one game per month is pretty much a pipe dream by now, largely due to the fact that my focus has mostly been on ‘that other hobby’. Well, at least I have something to show for time spent on model buildning… This time around I’m proud to present Bristol Blenheim Mk I from Airfix. A truly splendid kit that builds like a dream.

Airfix_Blenheim_I_001Airfix_Blenheim_I_002Airfix_Blenheim_I_004Airfix_Blenheim_I_006Airfix_Blenheim_I_009Airfix_Blenheim_I_011Airfix_Blenheim_I_017

April 01, 2017

Part two in my ‘Soviet Period’–Mig 3 from Zvezda

Allright, just as an interruption in ongoing series about my latest ACW game and ‘Guns at Gettysburg’, here’s my latest modelling effort – Mig-3 from Zvezda. I could claim that it was a quick and dirty build, without much effort put into it… except it took me more than six week to glue on the antenna and put the canopy in place. Anyway, here’s a couple of pictures of what turned out to be a basic, but nifty little kit.

Zvezda_Mig_3_001Zvezda_Mig_3_004Zvezda_Mig_3_005Zvezda_Mig_3_006Zvezda_Mig_3_007Zvezda_Mig_3_008Zvezda_Mig_3_009

January 07, 2017

Double trouble

Time for yet another distraction – this time around an early Mustang P51-B (Revell) and Il2m3 Sturmovik (Eduard). Both kits are quite simple, quick builds… which didn’t stop me from making several mistakes with each of them. Still, they turned out well enough and here they are.

Revell_Mustang_P51B003Revell_Mustang_P51B004Revell_Mustang_P51B005Revell_Mustang_P51B006Revell_Mustang_P51B008Revell_Mustang_P51B009


Eduard_Sturmovik002Eduard_Sturmovik003Eduard_Sturmovik004Eduard_Sturmovik005Eduard_Sturmovik007