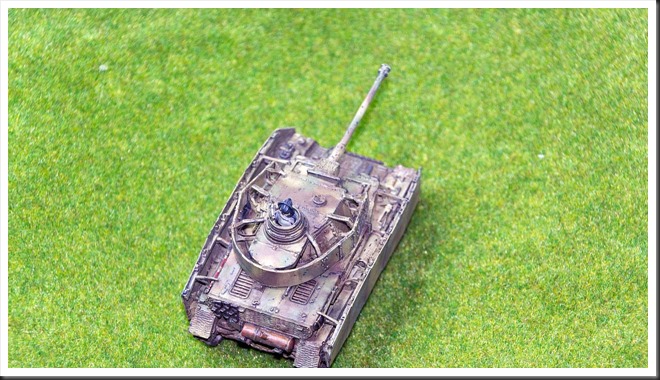
December 30, 2015

Charlie Don’t Surf Auto-Generated Scenario

Yesterday, H. dropped by and that gave me opportunity to have another go at ‘Charlie Don’t Surf’. This time around I’ve decided to give scenario generator a limited try, so a couple of words about how it works is probably suitable. In CDS, each side is provided with a selection of four different types of generic scenarios. When scenario generator is used in full, players are supposed to roll for the scenario type first, next for variables in scenario type assigned for their side and finally for the forces that will participate in the game (usually a company with some support). I’ve decided to simplify things a bit and, lazy as I am, I’ve reused the OOB-s from the previous game. Next I’ve assigned a ‘Sweep’ scenario for U.S. side and ‘Evade’ for VC.

Scenario

‘Sweep’ scenario type requires for the Allied side to make… well… a sweep, from point A to point B. While doing that, the troops are assigned up to three objectives. In this case, U.S. side had a search of the village as its primary goal, recon of the heights as secondary and interogation of locals as triary.

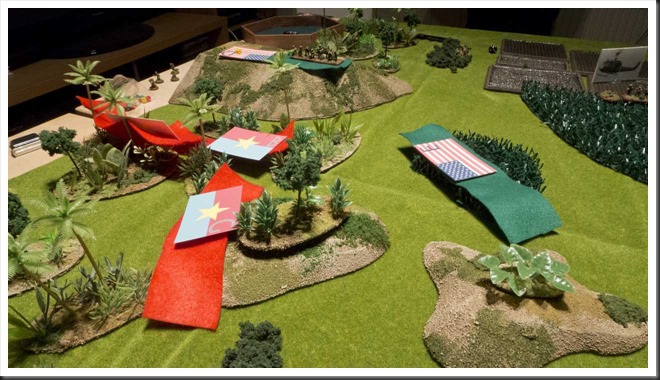
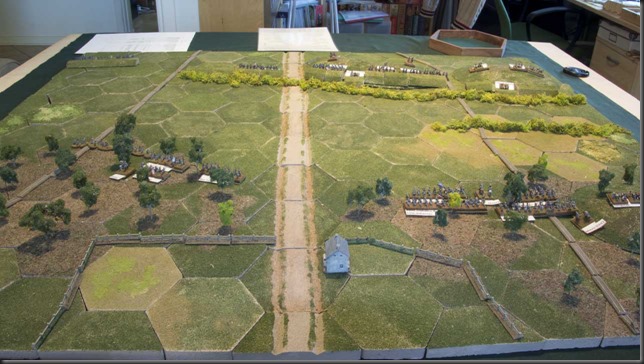
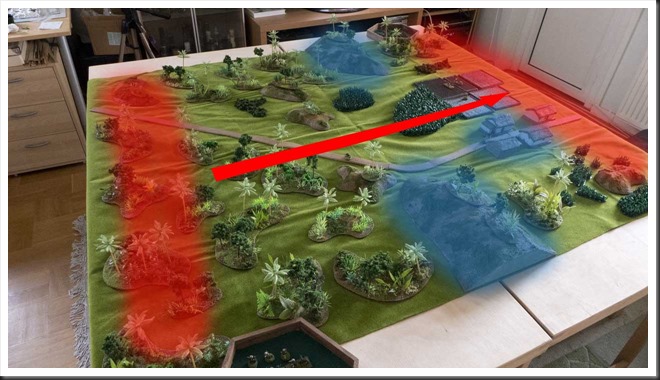
In ‘Evasion’ scenario, Viet Cong had to get out of Dodge. An exit edge is randomly decided before start of the game and the troops were then placed on the opposite side. The main goal is to get out with as many troops as possible. Picture below shows the scenario overview before start of the game.

CDS_20151229_002

Random card draw assigned VC side to yours truely. H. was kind enough to take upon himself the task of U.S. commander.

My plan was rather simple. Since I had a bunch of local guys under my command, I didn’t want any extended shootous with the enemy. Thanks to the same fact (control of local force units), I also had a whole bunch of dummy blinds at my disposal. They would come in handy as a massive decoy on one flank, while I sneaked of the board on the other.

H. decided to take care of buisness as quickly as possible and selected the edge closest to the village as his entry point. Two platoons immediately headed of toward the village, obviously with the goal of ransacking the huts and intimidating the villagers into giving up any info on Charlie they may have. One of the hills would be the initial destination of the remaining platoon and MG platoon.

The game

Why abandon the winning concept? Let’s have a look at the pictures?

CDS_20151229_008

First phase of the game was a true sleeping pill. H. moved over open terrain and rapidly occupied the village and high ground on the opposite side of the road. I on the other hand had a much worse time getting my troops going. Not only did I manage to roll an amazing amount of ones and twos, but the jungle terrain sapped about half of whatever movement allotment I managed to scrap together.

A somewhat bizzare situation occured during that phase of the game. Since none of my units/blinds could spot H.s blinds and they in turn had no targets to shoot at, H. could not deploy his troops. On the fly, we decided that his blind in the village could search two hootches per round, while the officer was allowed to interrogate one villager per round withouth having to deploy. My slow approach gave H. plenty of time to find the two rice stores hidden in the huts, thereby achieving his main objective. The force sent up the hill climbed it, found nothing and decided to take a rest.

CDS_20151229_017

When my dummy blinds finally reached the position occupied by H., another odd situation occured. H. was apparently unwilling to abandon the high ground, while I wasn’t very interested in pushing on and disclosing my bluff. And so, for most of the game, we just sat there, starring at… nothing. In the end, H. broke the impass by pushing his dummy blind into my ‘troop concentration’, revealing a lot of empty space.

CDS_20151229_012

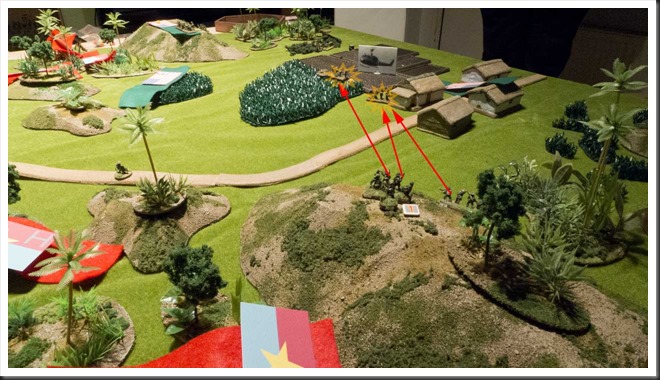
On the other side, things finally heated up as my least letargic platoon scrambled up the high ground. U.S. platoon in the village was still in the hoots, but the one supporting it was in the rice paddies, giving me a perfect opportunity to blast them. One of the americans fell, critically wounded, the rest took cover wherever they could. However, a medevac helicopter arrived swiftly, fetching the wounded soldier to field hospital (no, no helicopters are painted yet, thus improvised marker).

CDS_20151229_021

A nasty little firefight followed. I brought up my second platoon to the edge of the jungle, hoping on suppressing yanks in the village with their firepower. At the same time I intended on leap-frogging the platoon on the hill toward my exit edge. Ideally, my heavy weapons elements (recoiless gun and an MG) would be able to reach the low hill facing the flank of the village and keep the yanks pinned, allowing the rest to exit.

Plans are one thing, reality (or dice) allow for something very different. Fire from my platoon in the jungle was completely innefectual, while the heavy weapons group continued to take its sweet time getting into position. This forced the platoon on the hill into an exchange of fire with H.s units around the village. My fire had some effect – one american soldier fell dead, while yet another was critically wounded. Another medivac was called and responded as quickly as its predecessor. The rest of americans blasted into the jungle line, killing one of my soldiers and severly surpressing one of my squads.

CDS_20151229_019

H.’s MG platoon on the far hill also opened up, taking my rear platoon under fire. This caused me some concern. MG-s are effective at much longer range than normal infantry small arms, so the two ‘Pigs’ on that hill reached comfortably edge of the jungle on the opposite side of the road. Given time they would hurt me. It was time to get back into the jungle, after all my goal was to get out, not to engage the enemy.

It was at that time that H. announced that he would now be pulling back from the village area. After all, his primary action was accomplished and his casualties were a bit alarming. Also, by now we’ve been at it for four hours and were a bit tired. And so, we called it quits. Picture below shows an overview of the situation at the end of the game, as seen from the hill occupied by the Americans.

CDS_20151229_024

Musings after the battle

Yesterday’s game was one of those slightly odd occasions where the scenario ‘starved’ the enthusiasm out of the players by couple of mistakes in its design. To begin with, my movement into contact took far too long. As it turns out, this was mainly caused by me forgetting the fact that units on blinds can ignore first –1 in movement penalties in difficult terrain – a valuable lesson for the future. This –1 may not sound as much, but it is applied on every dice, meaning a reduction of movement by 4’’ per turn if a blind uses all its dice for that purpose.

Another thing that I think would make improve this setup immensly would be by moving the village into the center of the table. This would force U.S. side into more agressive movement, speeding up moment of contact. Funnily enough, a very similar scenario can be found in the Too Fat Lardies scenario book for ‘Charlie Don’t Surf’ – there, the village is placed smack in the middle of the table. I think I now know why that is. Smile

And what about ‘Charlie Don’t Surf’ itself? Well, I still haven’t used rules for artillery, helicopters, air support and a whole bunch of other stuff, but in general terms it is what it is – ‘I Ain’t Been Shot, Mum’ with Vietnam flavour. If you like IABSM, you’ll like CDS. With two ‘Tea Break’ cards, chaos of the card driven game engine is managable and I really do like the fact that Big Men have action points that can be used to activate either platoons or squads.

However, the Blinds mechanism in ‘out of the box’ format still seems to suffer from same issue that I’ve first observed in ‘They Couldn’t Hit an Elephant’. If deployment of troops is restricted to the two situations specified in the rules, which is either when unit wishes to fire or is spotted by enemy, then situations such as this which occured at the start of our game are bound to happen! Naturally, most of them can be resolved by application of common sense and couple of ad hoc rules. At the same time, when they occur, they will at the very least put extra strain on game master or players. Furthermore, as we all know, supply of common sense can sometimes run out in heat of battle. Smile Therefore I think that in the future games I will re-instate the rule I’ve already used in TCHAE games and allow players to voluntarily deploy their own troops from blinds at the end of each turn.
December 22, 2015

Review of “Hitler’s great panzer Heist” by Anthony Tucker-Jones

Heist“Hitler’s great panzer heist” attempts to provide an insight in Nazi Germany’s use of foreign armored vehicles which were acquired either through occupation of countries which were their original owners or captured in combat. Fate of armored vehicles of Czechoslovakia, Poland, Belgium, France and the vast loot of British equipment abandoned during evacuation at Dunkirk is described in first couple of chapters. Next, the author moves on to Africa, Eastern Front and use of Western Allied equipment, mainly during the Ardennes offensive.

Somewhat surprisingly, intermingled with narrative of Germany’s direct use of its opponents’ equipment are chapters dedicated to armor of its allies and satellites – Italy, Romania, Finland, Hungary and Vichy France. Whether or not this equipment should be counted as ‘Hitler’s heist’ is questionable, but they provide filler material and several of those amusing anecdotes that students of military history are so delighted over.

Last couple of chapters provides an overall perspective on industrial aspects of war and the impact of Nazi Germany’s ability to acquire vast amounts of foreign war materials and perhaps even more importantly foreign manufacturing complexes, on its ability to conduct war.

Personally I am far from being impressed by this book. Author diverts consistently from the supposed topic of the book into side-stories and generic retelling of Germany’s fortunes during the war which in all probability are already memorized by most readers of this rather specialized book. In fact, I would go as far as saying that perhaps half of this book’s 153 pages (remainder being appendixes, comments and references) is something of a filler only mariginally having anything to do with supposed subject matter.

Perhaps even worse, the writing style of the author leaves in my opinion a lot to be wished for. Narrative of individual chapters and quite often even in single paragraph can switch not only between different nations and theatres of war, but also chronological order of events, causing temporary confusion and providing an overall choppy reading experience.

Finally, I can’t help but question the value of this book as historical work of reference. An analysis of reference section discloses that material used for this book consists of same old ‘usual suspects’ used in English books about World War II 'since times immemorial'. Memoirs of Guderian, Speer, Mellenthin, von Mainstein and couple of other German officers, written in fifties and sixties and which since then have managed to be translated into English seem to provide backbone of author's German perspective. They’re supported by a selection of English reference works written on the subject between sixties and nineties. Thus, the reader should not expect to find in this book much new material or insights. He may however count on finding couple of old tired myths which orginated from above-mentioned 'primary' sources and apparently were still not debunked in Great Britain in 2007. Ghasp...

Overall, I feel mostly disappointed and a little bit cheated by this book, content of which falls far short from expectations raised by its impressive title. The topic is quite fascinating and deserves a much better effort than what’s provided in this volume.

But what about wargamer’s perspective, is this book of any use in our hobby? I’d say mariginally. On one hand it will certainly provide a lot of ideas for ‘odd’ bits and pieces of material for Axis side. T34 vs. T34, anyone? But if you want detailed information for scenario design, you’ll have to look for other sources because of the ‘general overview’ character of this book.

December 19, 2015

We interrupt your regularly scheduled program…

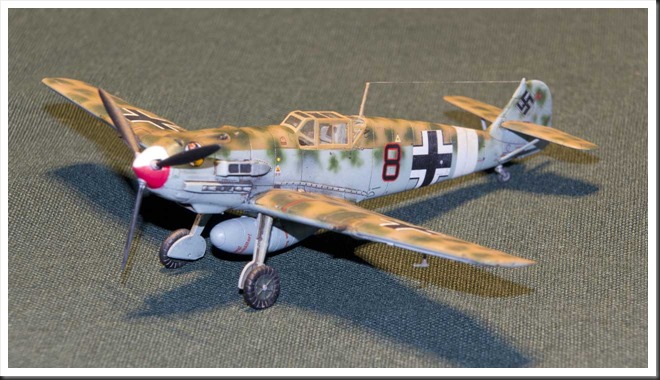
Real life hadn’t given me much allowance for wargaming activities over last month or so, but somehow I did manage to crank out another model kit. And so, as it is tradition at this blog, I’m taking the opportunity to side-step into the realm of our sister hobby and bore you with pictures om my latest build.

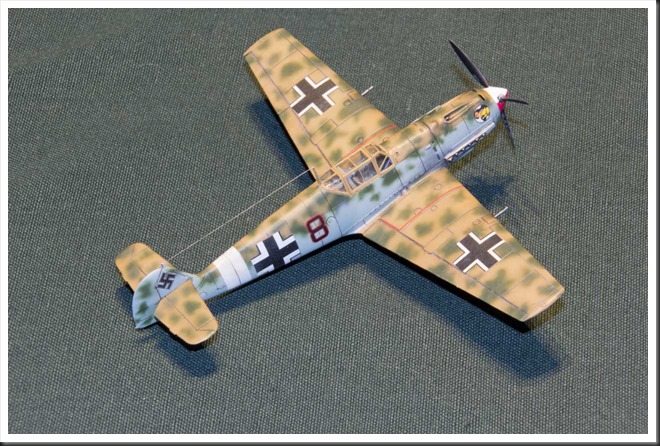
This time around it’s another one of those delightful little kits from Airfix – a Messerschmitt Bf 109E-7/Trop, in its ‘proper’ African livery. I’m quite spiffed with this kit, especially since it’s the first time I worked on a freehand mottled camo with an airbrush and things worked out rather well. Sure, the spots should have been smaller, but I invoke artistic freedom to excuse this slight oversight!

Airfix_ME109E_Trop001Airfix_ME109E_Trop002Airfix_ME109E_Trop003Airfix_ME109E_Trop004Airfix_ME109E_Trop006Airfix_ME109E_Trop007Airfix_ME109E_Trop008

November 23, 2015

Once more into the breach… this time with Black Powder

Yesterday L. struggled his way to my place through the first snow storm of the winter. As a reward, he was given opportunity to repeat his achievement of taking Battery Robinett, this time around with ‘Black Powder’ rules. As it turned out, this game was quite different from the previous one and the outcome gave both of us something to think about.

The scenario and setup

For details about the scenarion, have a look at my after action report of our first attempt at ‘Battery Robinett’ scenario, played with ‘They Couldn’t Hit an Elephant’. In brief, it’s an assault/defence scenario, with Union side hunkering down in rather well fortified position, while Confederates try to charge the short distance from a wood’s edge toward a big siege gun that they attempt to capture.

Worried about the fact that Black Powder allows for quite rapid movement, I modified the terrain setup slightly and added another 15 centimeters between Confederate jumpoff point and Union line. Otherwise there were no changes whatsoever – two confederate, rather experienced, brigades were to charge pretty green Federal force of similar strength, but enjoying powerful artillery support and an entrenched position.

The game

The game was yet another short and sweet affair, with the whole thing being decided in three turns and requiring less than two hours to complete! And that time includes at least half an hour of rules discussions and clarifications!

Yet again, let’s have a look at pictures and supporting narrative.

Robinett_With_BP003

As the purpose of the game was to compare and contrast Black Powder with TCHAE, L. declared that he would use same plan as in previous game – concentrated assault at the center of Union line with both brigades formed in two regiment wide formations. One slight deviation consisted of his placing the skirmishers on his extreme left flank; in first game, T. used them to screen the front of his brigade.

Following L.s suit, I distributed my forces in similar fashion as in previous engagement.


Robinett_With_BP005

In first round the exact thing that I feared did take place – L. rolled extremly well on initiative for his left brigade, allowing him to move two of its regiments and skirmishers all the way toward abattis in front of Federal entrenchments. This in itself was also the biggest ‘rule failure’ of the game, as he shouldn’t have been allowed to that, since all units moving on brigade order need to end within 6’’ (or cm in our game) from each other and the rearmost brigade couldn’t advance as far as the units in front of it.

At that time however we were blissfully unaware of our blunder and I immediately had reason to fear that the game would end in rapid collapse of Union line similar to that which I experienced in TCHAE game.

L.s right brigade managed to pull off a ‘two orders’ roll for the other brigade commander, allowing it to briskly cover one third of the distance to Union entrenchments.

Confederate fire that followed was pretty ineffective, which was hardly surprising considering strength of the Union position.

Then it was my turn. In pure desperation, I sent my CinC to the right, hoping to quickly activate my two regiments that guarded that flank. The fact that both of them were low on ammo (“minus one dice to shoot with” house rule) wasn’t very encouraging, but desperate times and all that…
The effects of my fire during first phase were much more telling than L.’s, with both artillery and infantry scoring several hits on L.s lead regiments. Two of them were also disrupted, which stopped them from moving in next round and buying me some additional time before inevitable close combat.


Robinett_With_BP011Robinett_With_BP010

Second round started with a ‘lucky’ two order activation roll for L.s brigade on the left. This allowed him to charge my lone regiment on that flank and just barely managing in throwing it back. Yet again, a flashback of previous game appeared in front of my eyes. This time around though, the regiment that was forced to retreat was still very much in the game.

On the right, L.s luck run out and his roll for brigade order failed. This effectively meant that his advance on that side stalled in the middle of nowhere, with dire consequences.

My second round was a mixed affair. My CinC failed with his first activation roll, leaving the regiments on my right flank in limbo. However, the results of my shooting phase were fearsome – the regiment that managed to charge beyond Union entrenchments suffered enough hits to force it to take a morale check. It stood its ground, but was now shaken. The front regiments of L.s right brigade took a fearful pounding, mainly from the entrenched siege guns, with yet another regiment becoming shaken.


Robinett_With_BP012

In final round of the game, L. found himself under a lot of pressure. His right side brigade was in a lot of trouble. One regiment was shaken, the other was one hit from reaching that state. This was very significant for reasons described below and forced L.’s hand. He really only had one option here - try for brigade order and hope for two orders. This would allow him to bring forward the two rear regiments and mask their stricken comrades from even more fire. He managed to roll an activation with single order, which wasn’t enough to pull of that manouver and left his damaged regiments exposed to further punishment.

On the left, things went even worse for him – he failed on his first activation roll, leaving his regiments in a very exposed position…

…a fact of which I took full advantage of. My CinC finally managed to finally get his ‘s**t’ together and led the entire force on my right flank into firing position. Two artillery batteries I pulled from my left flank toward the center of my line also reached their newpositions, but were yet not able to deploy. The rest of my units just waited for orders to fire.

Once the order came, the Union fire was as effective as in round two. Multiple hits were scored on front regiments of L.’s right brigade. One of those units didn’t make its subsequent morale check and was destroyed. The other pulled through, but was shaken.

L’s other brigade suffered similar fate, only difference being that both of the regiments that suffered casualties managed to survive their subsequent morale checks. Both of them were however ‘shaken’ as we started fourth round of the game.

The game ends

‘Black Powder’ has this neat rule about brigade morale which says that once half or more of brigade’s units are either destroyed, retreated from the table or are in ‘shaken’ state at the start of controling player’s turn, that brigade has to break off the engagement. Furthermore, if half or more brigades reach that state, the entire army has to retire, in effect giving up the fight. Because of this rule, L. had to accept complete defeat at the start of round four - both of his brigades were at that time broken and needed to pull back.

Musings after the battle

Our little game clearly illustrated couple of things. First of all, ‘Black Powder’ and ‘They Couldn’t Hit an Elephant’ are two very different animals! Perhaps the most important difference between those two rulesets consists of fragility of individual units in ‘Black Powder’. Two hits in ‘TCHAE’ are, at least initially, nothing to think twice about. In ‘BP’ such event is a reason for very serious concern and could require immediate damage control. I’d go as af as saying that the thought process in a player used to ‘TCHEA’ robustness of even inexperienced units requires a major adjustment if he’s to have any success in a ‘BP’ game!

This game also confirmed another of the conclusions I presented here after the first ‘BP’ game L. and I played about a year ago – ‘BP’ is a very fast ruleset when compared to ‘TCHAE’. Not only are the units much more fragile, but movement distances are (potentially) much longer. This makes for very eventful games and quick decisions achieved in reasonable playing time. This is of course a good thing, but it also has a flip side – small games, with two or three brigades will with all probability end rather quickly, unless players really take time to nurse damaged units back to reasonable health state.

Finally, I can’t help but notice that nothing in our little engagement made me really feel we played an ACW battle. Don’t take me wrong, it was a fun and entertaining game, but it did feel like a generic game. Say what you want about TCHAE, but when you play a game with that ruleset, there are certain aspects in it that make you understand the difficulties and intricacies of the real conflict a tiny bit better. So far I have been unable to find that aspect in ‘BP’ and I can’t help but miss it a little allready.

Of course, there is a flipside also to this ‘coin’ – ‘period chrome’ has a natural appeal for a historical wargamer, but it comes at a cost of time. Many of my TCHAE after action reports include the phrase ‘…and then so and so left for home’, more often than not long before the game was decided. I suspect that ‘Black Powder’ games won’t suffer this problem and that has its own appeal.

To each his own, horses for courses, your mileage may vary…. One thing is for sure, this certainly wasn’t my last Black Powder game!

November 14, 2015

Review of “Seven Firefights in Vietnam” by J.A. Cash, J. Albright and A.W. Sandstrum

516j4MdO4lL._SY344_BO1,204,203,200_

”Seven Firefights in Vietnam” is a collection of seven reports describing specific combat actions in Vietnam that took place between 1965 and 1968. Five of the reports deal with engagements involving forces of battalion size, one describes an ambush by a mere squad, while the final chapter is dedicated to a fire support mission by an element of two Huey helicopters configured as fire-support birds.

The narrative is consistently of ‘after action report’ variety – brief, strictly descriptive, no dialogs or deeper analysis of events or decisions. Orders are given, units maneuver here or there, engage the enemy, fire is exchanged, casualties taken… rewind and repeat. While the writing style is definitely austere, the authors manage to give a pretty clear picture of chain of events and character of individual engagements. If that’s what the reader wants from this book, then he will be satisfied. If reader’s expectations go beyond mere report of events, then I’m afraid that this book will turn out to be something of a disappointment.

Selection of after action reports included in this volume is also something of a problem. The first of them, which is also the longest one, deals with battle at Ia Drang, made famous by the “fantasy” movie “We were soldiers once” couple of years ago. It’s inclusion in this volume is perhaps the most logical, since it was a first action involving air-mobile unit of battalion size and something of a test of the concept that has later become synonymous with Vietnam war. The narrative of action at Dak To in 1967 where a battalion size search & destroy mission was hit by a Vietnamese ambush seems also to be quite representative for combat actions of that conflict. The rest of this book is however something of a mystery for me. Remaining chapters describe an ambush against a large vehicle convoy with AVAC squadron acting as escorts, a huge battle between riverine units and extremely well-entrenched opposition, a small scale night ambush by a single squad, an assault against a major firebase which is not only successful but in which the Vietnamese use a company of tanks (!!!) and finally a fire support mission by a couple of ‘Hogs’. This selection surely provides a lot of diversity, but it also makes it very hard for me to understand the purpose of this book.

A reader genuinely interested in and already knowledgeable about Vietnam conflict will find a lot of interesting material in this book. For remaining audience it will probably be a very dry and ultimately unsatisfactory book.

For a wargamer, “Seven Firefights in Vietnam” is however a must buy, if one’s interested in Vietnam conflict. Each of five large engagements covered in the volume will easily provide material for a large reinforced battalion-size scenario. If split into smaller components, each of those chapters can be split into several company-size or even mass skirmish games. There are however two weak spots – the maps included in the book are inadequate and scenario designers will have to make their research. Also, the Vietnamese OOB:s are very rudimentary. This in itself is hardly surprising – the volume was first printed in 1970, while the conflict was still ongoing. But it’s a bit annoying nevertheless, because I doubt there are many books about Vietnam conflict that also resemble scenario books so closely as this little book!

November 12, 2015

New recruits for Dux Britanniarum

Some of you perhaps remember the budding ‘Dux Britanniarum’ campaign that I and H. started about two years ago. Last encounter took place about a year ago, but neither the campaign nor the ruleset has been forgotten by me. Unfortunately, real life pushed itself in repeatedly into both mine and H.’s life and it will probaly be a while before next clash between his Saxons and my Britons.

Luckily though, a number of my buddies expressed a desire to try their luck as Saxon warlordings looking for better life on British shores. There was only one problem – H. controls his Saxons with an iron hand and won’t allow anybody to lead them in battle. Thus, the only way to enable my other friends to be bashed and sent packing by my Britons was to paint up a bunch of Saxons they could lead to the inevitable slaughter.

As always, buying the miniatures is only the first step. Next, they have to be painted and it took me forever to get going with this project. Now however the first bunch is ready and spoiling for their first visit to British Isles.

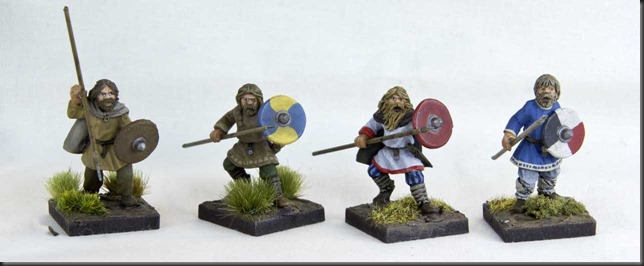
Couple of words about the miniatures – this lot was bought from a company formerly known as Musketeer Miniatures. These days though the company calls itself Footsore Miniatures. Absolutely lovely minis they are and a pure joy to paint. Recommended without any reservations!

EarlySaxons_Batch_I_010

EarlySaxons_Batch_I_014

EarlySaxons_Batch_I_016

November 04, 2015

C4 Open 2015–Part II

Second and last part of pictures from this year’s C4 Open exhibition. Hope you like them.


October 24, 2015

C4 Open 2015–Part I

The thing called ‘real life’ managed yet again to put all things wargame-related onto a backburner. Thus no posts over last couple of months. However, time nevertheless keeps moving forward and we’ve now arrived to the last weekend in October, which means… yes, you’re right – that today it was yet again time for the annual model kit exhibition in my area.
Model kits and wargaming are two different hobbies, but there is a lot of overlapping between those two. For me personally, both hobbies are really just an extension of my interest in military history. And that’s why, yet again, I’m now posting a bunch of pictures from the exhibition. First up, all the airplanes.
Hope you’ll enjoy the pictures as much as I enjoyed the exhibition. Ler

September 06, 2015

First taste of Charlie Don’t Surf

And so, more than two years after I decided to dive into this project, the day finally arrived – yesterday, I’ve run my first game with ‘Charlie Don’t Surf’, Too Fat Lardies’ company level ruleset for Vietnam war. T. took charge of Americans, L. run the local VC forces, while yours truly took upon the ungrateful role of game-master.

While ‘Charlie Don’t Surf’ has a full-fledged scenario generator, I’ve decided to keep things to bare minimum for this first try and put together a simple scenario without any bells and whistles – a reduced strength U.S. company with 3 x platoons with two squads each and a weapon platoon of two M60’s was to perform a search of a village suspected to contain a VC store. Local VC company of two platoons (3 squads each), an MG and a recoilless rifle stood for the opposition.

The game

Once again, I’ll rely on the pictures for the ‘meat’ in the AAR, with supplementary text providing the details. Quick comment about the pictures; for this first game I wanted as little distractions as possible, so I didn’t take any pictures while it played out. Instead, the pictures were ‘arranged’ today, while my memory of the game was still fresh. Mistakes were however committed, the most serious one consisting of me forgetting to deploy MG bases that were attached to two of U.S. squads, thereby augmenting their firepower. Furthermore, I didn’t bother with placing the ‘shock’, ‘pin’ or ‘suppression’ markers that were present during the game.

CDS_Test_Game1_02

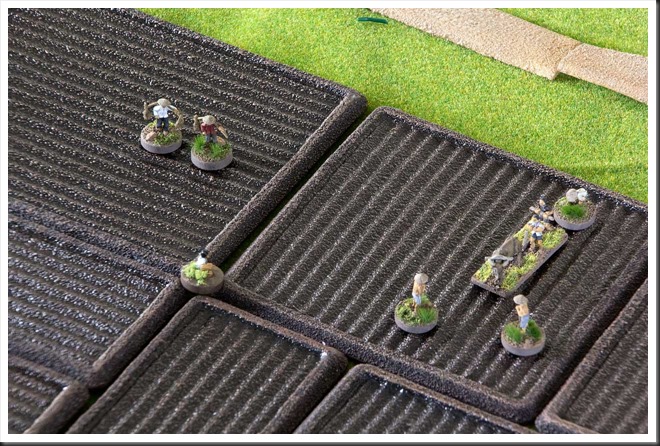
The picture above shows the terrain where the engagement took place. Once again, with goal of keeping things as simple as possible, the jungle was designated as ‘light terrain’. Clumps of vegetation are also ‘light terrain’ although they do block LOS. Elephant grass is designated in CDS as ‘light terrain’, but I’ve read multiple personal memoirs of how exhausting it was to get through them, so until further notice I’ll regard it as ‘hard terrain’.  Rice paddies, hills and houses are self-explanatory.

The game started with L. deploying his forces. 1:st platoon and recoilless rifle took up position in the woods and on the height above the village. 2:nd platoon was deployed in the woods on the other side of the road, while the machine gun was placed on the height nearby, guarding the flank (I guess).

In CDS, units of platoon size initially have to be placed under so called ‘blinds’, effectively disguising the type and strength of the units. Furthermore, each terrain feature can act as a ‘blind’, thereby making units placed in such manner totally hidden – so in our game, initially there was no indication of 1st platoon and recoilless rifle at the beginning of our game.

Additionally, each side has the right to deploy a number of dummy blinds. Number of such dummies varies depending on ‘fraction’, with local VC being the extreme case. They’re authorised to deploy one dummy blind for each real unit in their OOB. Transparent red rectangles indicate where L deployed his dummies (although I do believe there weren’t as many as in the picture! :-).

Finally, L. marked a grand total of five tunnel entries on the board, or rather on a snapshot of the board I took before the game and printed out for this very purpose; isn’t modern technology grand?!! Four of those secret entries were in the area where his 1st platoon was hidden. One entry was placed just beside the lone house near the road.

With L. ready to receive his ‘guests’, we were ready to start! Events of initial four or five rounds are shown in the picture – T. entered the board from the right, with two platoons above the road and one below. T. had to spend some time on spotting and removing of fake blinds L. placed in path of his advance. This was done without problems, but T. had to disclose content of his own blinds while doing it – false blinds can spot as well as real ones!

CDS_Test_Game1_05

Meanwhile, the local villagers minded their own business, doing their best to ignore American patrol.

CDS_Test_Game1_12

Contact! In fifth round, L. took advantage of the fact that T.’s 1:st platoon came into close range of his own 1:st platoon hidden in the woods at the end of the turn. This gave him the right to open fire and he blasted forward squad of T’s exposed platoon with massed fire from two squads that were in range. This could have had fatal consequences, but luckily for T., L.’s ‘famous’ bad luck with dices restricted the casualties to one KIA and some ‘shock’ points.

CDS_Test_Game1_13

T.’s luck held in round that followed, with his 1:st platoon being activated before its assailants. His return fire managed to cause several ‘shock’ points on one of VC squads, but no casualties. Next, he called on 2:nd platoon for support – the rushed at top speed into the woods, their goal clearly being the flank of VC position.

L. had opportunity to continue the engagement, but decided that discretion was the better part of the valour. When his platoon was activated later in same turn, he broke contact and directed his troops to the tunnel entrance conveniently placed behind his position. In subsequent round T. managed to drop one of the retreating opponents , but that was all he managed to achieve before the VC platoon disappeared from sight.

CDS_Test_Game1_15

With VC vanishing into thin air, T.’s 1:st platoon headed for the edge of village. As soon as one of the squads got inside the hutch, L.’s recoilless rifle pumped couple of 57mm shells into it. Yet again, the results of the fire were limited to couple of points of ‘shock’, although one of the civilians taking cover inside the hutch was instantly killed.

T:s response was rapid and similar to that of the reaction to the initial VC attack – concentrated fire from two squads suppressed the gun’s crew and caused two casualties. Next, 2:nd platoon came into firing position, opened up and killed two more crew members. With single VC soldier remaining standing, we removed the gun from the play, even though there are rules in CDS for handling such situations with a bit more detail.

This ended the game in this sector, even though T. took advantage of the lull in combat and tested the rules for interrogation of civilians. The peasant in question was however, as the ruleset expressed it, ‘not interested in conversation’. :-D

CDS_Test_Game1_17

Meanwhile on the other side of the road, T.:s 3rd platoon advanced slowly forward against one of L.’s dummy blinds after another, until they unwittingly got in range of L.’s hidden machine gun. It opened up on one of the squads and managed to kill one American soldier before extremly effective return fire from his comrades almost instantly eliminated machine gun’s crew to the last man.

With 1:st VC platoon skulking in the tunnels and 2:nd never being able to get into position, we decided that it was quite enough excitement for this time and called it a night.

Musings after the battle

What did the ‘combatants’ think of this first experience with ‘Charlie Don’t Surf’? Well… T. has never been a big fan of rulesets from Too Fat Lardies and ‘I Ain’t Been Shot Yet, Mom’ in particular has become something of his pet peeve during the years when we used it for our WWII games. So, considering the fact that CDS is a derivative of IABSM, it’s hardly surprising that his impression of the ruleset was lukewarm. As far as I understood it, his initial opinion could be summarised with single word –overcomplicated.

L.’s initial impression, while restrained due to the basic character of the scenario, was definitely more positive.

As for me, the goal of this game was for me quite simple and clear – I wanted to get familiar the core rules for command and control of troops, basic infantry combat mechanics, and if we managed it, get a taste of some of the rules specifically designed to handle peculiarities of Vietnam conflict. I feel that this little scenario gave me what I was looking for, but at the same time it hadn’t provided me with enough ‘data’ to form a definite opinion about the ruleset. Of course it won’t stop me from writing another, more detailed post about my initial thoughts of ‘Charlie Don’t Surf’ in next couple of days, so stay tuned! :-)

August 30, 2015

In a spur of a moment, or DIY dice trays

So… yesterday I had to make a trip to Systrerne Grene, this peculiar shop with all sorts of cute paper bags, boxes, ‘nice smells’ products, frames, decoupage stuff and dozens, if not hundreds of products that women seem to love to use for that ‘personal touch’. It’s the same place where I found those beautiful transparent plexiglas boxes perfect for my 6mm figures (which by the way have since been withdrawn from their product range Ledsen).

Anyway… as I walked through the shop, this item caught my eye.

Dice_Trays01

The thing is made out of cheap, lightweight wood and plywood and costs 40SEK, which if I am to be perfectly honest, is a bit steep! I have no idea what the original idea for this thing really is, probably some sort of display box.  But I am pretty sure that any wargamer worth his name will immediately have two words popping up in his head when he sees something like this – dice tray! Needless to say, two of these thingies immediately found themselves in my shopping cart.

Today, I gave the ‘trays’ a closer look and came to the conclusion that I wasn’t entirely happy with them. They’re quite shoddy, with very thin bottom and these stripes look a little bit weird. There was definitely room for improvement and luckily I had all I needed at home.

Dice_Trays02

First, I grabbed some wood stainer left over from another project and darkened the frame. I then left the trays outside (stainer smell is just plain awful!) to dry for several hours.

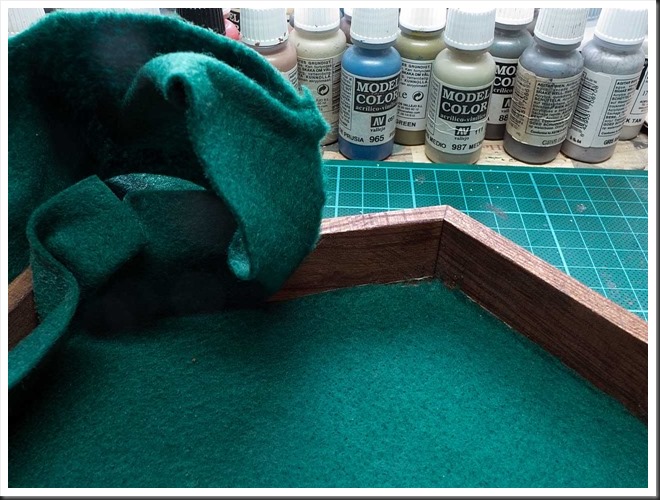
Next, it was time to do something about that ‘striped’ bottom. Lining of some sort was the apparent solution here and what do you know, I happened to have some leftover dark-green felt that fit the job! As for how to fix it into place, the choice was between white glue and spray glue. I decided to give the second option a try.

Dice_Trays03

Cutting the felt to size was the biggest challenge in this little project. I tried to measure and cut the felt to size, in two attempts the hexagonal shape turned out to be both irregular and too small. I then changed my approach and cut out an oversized piece of cloth. Next I sprayed the glue on it and pressed it into place. I paid extra attention to the edges, pressing the cloth into the ‘angle’ with the backside of hobby knife.

Dice_Trays04

Once the felt fit snuggly in place, I started cutting off the ‘surplus’, one hexagon side at a time. I tried to follow the ‘angle’ of the tray as closely as possible, but the end result wasn’t 100 per cent perfect. With practice I am sure that I would achieve the ‘professional’ look, but life’s too short for perfection.

Dice_Trays05

And so, here they are – two large hexagonal dice trays. Total price, a bit over 80 SEK, time expenditure – maybe an hour. What’s not to like! Ler

August 25, 2015

Silicone roads from Total Battle Miniatures

Well, it seems that two things have came here to stay – a complete dry spell when it comes to games and me being stuck with one terrain-related project after another.

Luckily, in this case, it was ‘quick and painless’. As I’ve mentioned on a couple of earlier occasions, one of the things I find really tiresome with those hex tiles from GHQ is the fact that as soon as you make some type of terrain, you need to make a bunch of extra road tiles.

The solution? Why, flexible roads of some sort, of course. Several companies offer this product these days, but since I like the stuff that guys at Total Battle Miniatures, I decided to go with their variant.

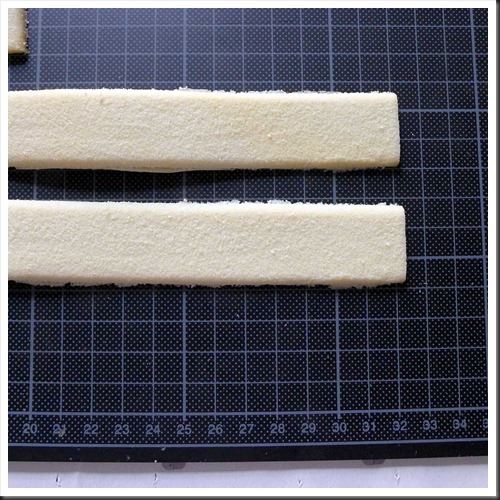
The initial batch I’ve ordered is perfect for 6mm – they’re two centimetre wide, long straight bits are thirty centimetre long and there is an assortment of curves, crossroads and T-sections which allow you to quickly set up whatever road system you require. Preparation is dead simple – wash the strips in soapy lukewarm water, leave to dry and drybrush with acrylic paint. I used three shades of wall paint – dark brown mid-brown and cream for highlights. The paint doesn’t really ‘stick’ to the silicone and can be peeled off quite easily, but with an occasional touch-up I should be just fine.

P1010752P1010754P1010756P1010762

July 18, 2015

Sidetracked

So if you take a look loong way back into time machine of this blog, you will discover that once upon a time one of my ambitions was to put together a small set of minis and terrain for World War II skirmishes in Normandy. That particular project had some success, I have two complete platoons of Yanks and Germans, as well as some terrain. If I recall correctly, I’ve had two or three games with T. (Arc of Fire), before the project died away. Cause of death – extensive requirements for hedgerows! As said before, I’m not that much into terrain making.

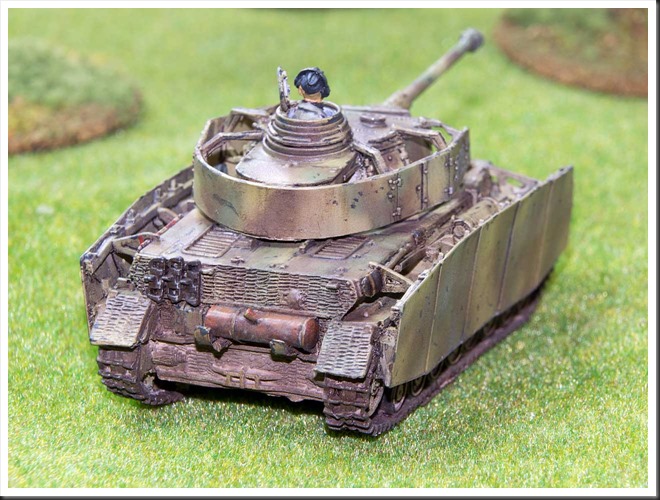
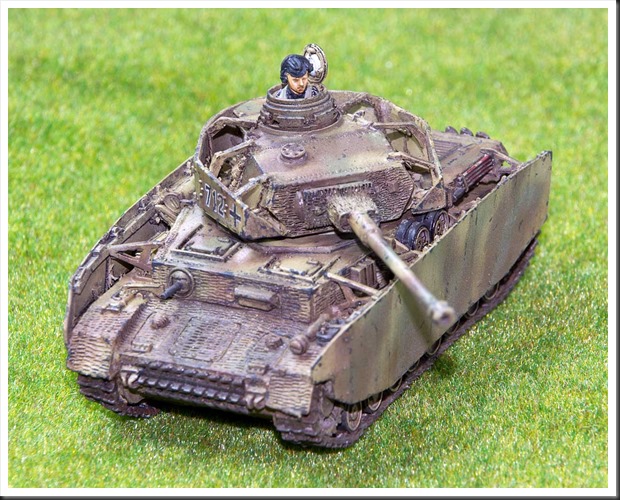
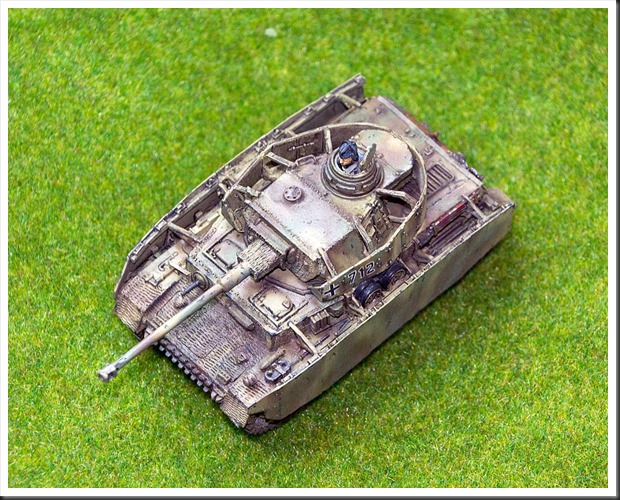
Anyway… with vacation period upon us and me being rather ‘sick and tired’ of anything Vietnam-related, I needed a quick side-project. So when I literally stumbled upon a resin PzIVH from Milicast that I bought many moons ago for above-mentioned skirmishes in Normandy, I thought ‘what the heck, let’s get this one done’.

Now, working with 1/76 resin kits isn’t exactly the same thing as their ‘little brethren’ from Flames of War or Forged in Battle. In case of Milicast kits, we’re talking about proper ‘models’, with detailed mouldning and small, fiddly resin parts that need to be cut out of their mould blocks and cleaned up. It maybe sounds more complicated than it really is, especially with Milicast’s Battle Range, which I think is simplified for wargamers, but there is some additional clean-up work involved with those kits. In case of this particular PzIV, the casting was mostly very clean. The exception was a nasty, solid blob of resin lodged between turret and one of front edges of turret shĂĽrtzen. Finally, after drilling a bunch of small holes and cutting and chipping away at it, I managed to get most of it out, but it was a real PITA.

Small resin parts can be either cut away with scalpel (gently) or sawed out with specialized tiny razor saws mounted on scalpel handles. Yes, it is additional hassle, but it’s worth the effort. The kit looks, at least in my opinion, really great with all its small details. Perhaps a bit softer that its plastic cousins, but on the other hand those shĂĽrtzen mounts won’t snap in two if you breath at them a little harder. Also, Milicast’s product range is simply bewildering, by far exceeding whatever is out there in plastics!

Paint job is in this case pretty straight forward ‘German’ routine. First, wash the kit in warm soapy water – this is really necessary with resin kits where rests of mould release materials are always present and can make painter’s life a real hassle. Next, I used Vallejo grey primer as initial coat. Funny thing about resin and primers – this is the only one that seems to stick to resin, at least for me. Generic primers for plastics and primers just seem to pool together on resin when I use them.

Next, default German ‘war paint’ was applied. Orche from Tamiya, followed by German Olive Green from LifeColor and German Cammo Brown from Vallejo Model Color. All applied with an airbrush, I’m afraid – I’m sure there are ways to paint mottle cammo with brushes, but if you have an airbrush handy, why complicate life?

Once the paint job was sealed with acrylic varnish, weathering process commenced, starting with an overall application of dark brown wash from MiG. Next, I ‘chipped’ the kit with Vallejo Panzer Grey and applied streaks with different products from Ammo. Finally, some pigments were added, before sealing everything with another coat of varnish. This of course resulted in pigments being virtually wiped out, but what can you do?

Here’s the final product, in my opinion as good, if not better as anything that Warlord puts out for their 28mm range and for a fraction of the price.

Milicast_PzIVG_01Milicast_PzIVG_02Milicast_PzIVG_03Milicast_PzIVG_04Milicast_PzIVG_05Milicast_PzIVG_06Milicast_PzIVG_07Milicast_PzIVG_08