April 21, 2019

Having another go at Chain of Command

Intro
After almost a year of unvoluntary hiatus, I’m quite happy to post a game report – this time around L. and I managed to find some time and play some Chain of Command. By now, this ruleset has been reviewed, analyzed and quite justifiably been discussed a lot on the net. I will therefore limit myself to saying that Chain of Command is a WWII skirmish ruleset with small teams and sections as tactical elements. If you want more information about this rulset, all you need to do is make a Google search.

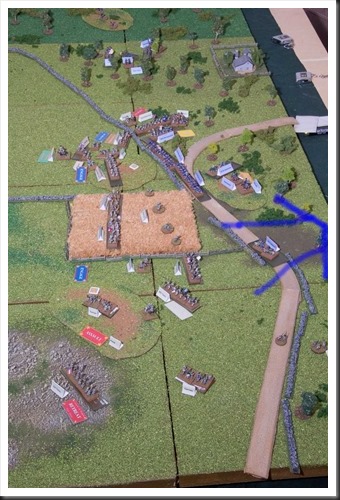
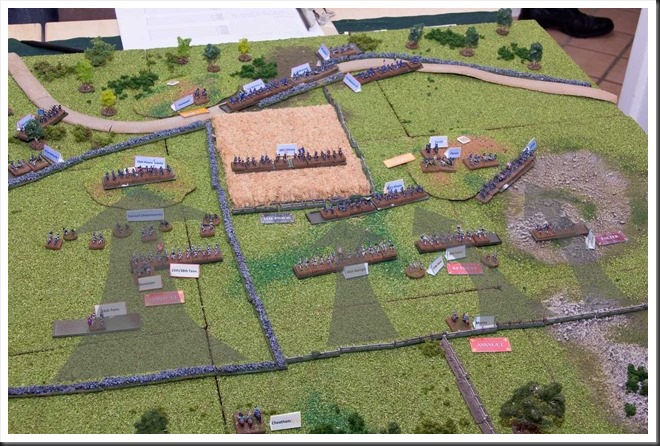
The game L. and I run yesterday was based on first generic scenario in the ruleset, called Patrol – two platoons bump into each other and mayhem ensues.

The game


The game started with me trying to get into the house complex to the left. All I managed to get in was a BAR team, which managed to get a drop on one German squad, but failed to inflict any damage. In firefight that followed, my team was wiped out to the last man. Their sacrifice paid however unexpected divident, as L. decided to send the squad that killed my BAR team on a long walk around the houses in an attempt to flank me. As things turned out, he never got the chance to spend resources on that march and the entire squad remained out of position for rest of the game.


‘Main event’ took place in the center of the board. L. was favoured by the powers that be on that particular day and managed to retain initiative on three different ocassions early in the game. This allowed him to push his two remaining sqads across the road and pin one of my rifle sections on the height to the left. He had an MG42 in perfect position and their fire slowly picked off my guys, one or two at a time.

In broken terrain section there was another stalemate – one squad on each side took potshots at each other without much effect. Somewhere in the middle of the game, I tired of it and closed the distance with one of my rifle sections. It was a close run thing and both sides suffered heavy casualties, but the assault failed.


In sheer desperation, I threw in my last squad from a jump-off point at the edge of the table. They were far away from the ‘action’, but in CoC, rifles have unlimited range so the distance didn’t really matter. I pushed them forward slow and steady while keeping a constant barrage of small arms fire – in the end, I had a bit of luck and managed to inflict serious casualties on opposing Germans.


L. retaliated by assaulting my isolated and seriously depleted section on the height in the center of the board. Close combat that ensued was surprisingly bloody, but decisive – once the dust settled, the high ground was in German hands.

At this time, with both sides seriously weakened, the game was in the balance. But we were at it for over four hours and were quite satisfied with what we achieved so far. Therefore, by mutual agreement we decided to call it a day.

Musings after the battle
The ‘special thing’ with Chain of Command is that the game starts at the moment of first contact. The action is therefore fast, furious and most importantly, pretty much immediate. This seems to be a litte of mixed blessing, because just as in our first game (run almost a year ago) our positions became locked pretty much instantly. As a result, the entire affair became rather static dice-trow festival, with both sides hoping to roll high for ‘shock’ (morale hits) and ‘kills’. In yesterday’s game, L. picked off my lads in rapid succession, but failed to give me any ‘shock’ points. I, on the other hand, seemed to have my weapons filled with blanks, but dished out serious amount of ‘shock’ points, forcing L. to pick them off and thus being unable to act more decisively with his leaders (despite three ocassions where he retained initiative and had two consecutive rounds at his disposal). The stalemate was finally broken by my third squad, which finally managed to kill three Germans and for all practical purposes broke L.’s right flank.

This rather static nature of the game (for second time in a row) is a bit troublesome, but perhaps not surprising. After all, both sides are of equal strength (a platoon each, with some minor support elements). Also, I read some comments on the net that this particular scenario tends to develop into a static firefight, while the other five scenarios included in the ruleset are of more fluid nature. Let’s hope that’s the case!

Until next time and let’s also hope that it will be sooner than in ten months time!

July 26, 2018

US Mine Clearing Team and US Engineers from AB Miniatures

Oh yes, AB Miniatures… pretty much everyone into Napoleonics and WWII has probably heard about them and if so, had a bit of a shock after realizing how much they ask for their minis. Personally, I’ve been lured by their Napoleonic sculpts on several occasions, but luckily choose the 6mm path in that department. When it comes to WWII… 20mm is my scale of choice and now that I’ve decided to commit myself to Chain of Command, the siren call of those AB minis was too hard to resist.

Now, my first AB minis are ready for gaming table. The price is still making me grind my teeth, but I won’t lie, I find those sculpts absolutely lovely! Crisp molds, very dynamic and useful poses, faces with character despite the tiny scale! As a consequence, painting them was pure joy and I probably spent a lot more time on them than I should.

So far, I’ve finished two sets. First of them is US Mine Clearing Team, consisting of six figures.

Blog_2018_08_27_011Blog_2018_08_27_019

The other set is US Engineers, consisting of eight miniatures.

Blog_2018_08_27_013Blog_2018_08_27_015

Paint job is a mix of recommendations from net, painting guides and my own ‘best guesses’. All paints are Vallejo Model Color unless otherwise specified.

  • Jacket and leggings – 60/40 mix of 884 Stone Grey and 821 German Cammo Beige
  • Webbing – 819 Iraqui Sand
  • Sachels and other engineering equipment – 821 German Cammo Beige
  • Helmets, flamethrower, bangalores – Game Color 64 Yellow Olive
  • Trousers – 873 US Field Drab slightly tinted with 941 Burnt Umber
  • Boots – 846 Mahogany Sand
  • Rifle belts – 940 Saddle Brown

June 24, 2018

Two for the price of one–Part two

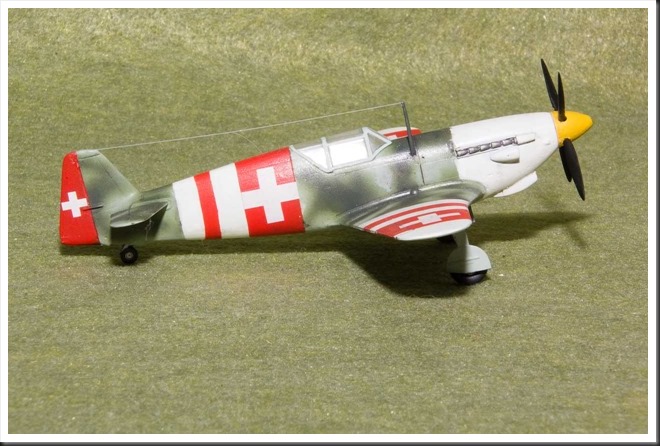
And since we’re on the topic of plastic kits, here’s the last build of 2017. This little fighter is another favorite of mine, mostly because of the way it looks. I dare you to guess what airplane it is and who made it! Smile

Didn’t figure it out? Neither would I before building this kit – it’s a Doflug 3802, a Swiss construction built in the middle of World War II. Every time I look at it, I think that if P51 and Me-109 had a bastard love child, it would look like this!

Of course, just as in pretty much every build, there were some unexpected chalenges with this one. In this particular case, the source of the problem was… primer I used for undercoating the kit. Having run out of my usual Vallejo Grey, I grabbed a can of cheap grey primer I once bought in a local DIY store. Big mistake! The paint job for this kit required a lot of masking. When I reached the step where the tape was to be removed, the paint followed! I admit, there was a lot of swearing and a tear or two, because I was really pleased with how the paint job turned out. I had no choice but to try to save what I could with a hairy stick – end result is far from as nice as just before the ‘disaster’, but I guess it’s the price for learning a valuable lesson (Don’t cut corners when it comes to materials!).

2018_Blog_1892018_Blog_1932018_Blog_1942018_Blog_1972018_Blog_1982018_Blog_199

Two for price of one–Part One

It is safe to say that 2018 has so far been pretty uneventful for me in wargaming department. But that is nothing when compared to my complete and utter letargy in regard of that other hobby of mine – scale modelling. But, as so often is the case, after months of complete inactivity (or even worse, absolute lack of interest!), suddenly something happened and I just had to build something.

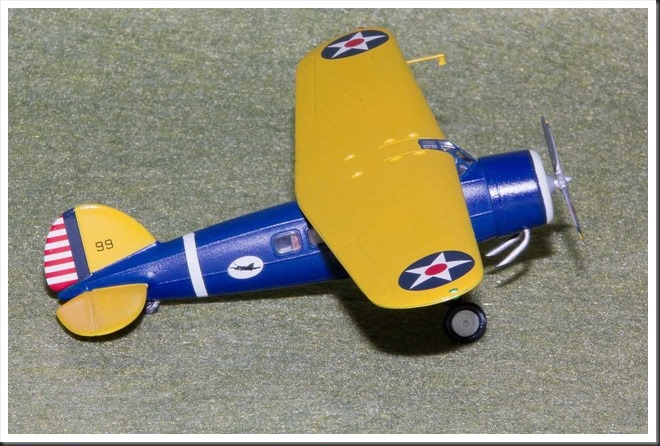
And after just a couple of weeks (very fast for me), here it is – a shiny new 1/72 Lockheed Vega from MPM. For some reason, I absolutely love this little airplane, even though it wasn’t as easy to put together as one could think. Being a short run kit, it demands a bit of attention and 100 percent correct allignment of wings and undercarriage… was impossible for me.

Major challenge with this kit was created by yours truely. For probably the very last time I decided to mask side windows with latex masking fluid – a decision which nearly ended up in me scratching the entire kit. Once I reached to the final step of removing the masks, it turned out that the latex not only turned into hard shell, but it also seeped into the tiny space between the windows and fuselage, making it impossible to remove it completely. The only thing to do was to detach the wing, knock out the windows, clean, polish and reattach them. And since misery likes company, carpet monsters stole one of the windows and refused to give it back! So one of the window panels had to be made from scratch. The kit took me maybe six hours in total, additional work on windows doubled building time!

There is something very ‘art deco’ with this blue-yellow paint scheme and I just loved how the model looked after I gloss-varninshed it. So much so that I decided to leave it in this state and refrained from doing any weathering.

2018_Blog_2022018_Blog_2032018_Blog_2042018_Blog_2052018_Blog_2072018_Blog_209

May 27, 2018

Chaplin’s Heights Redux–solo edition

So last Saturday, after the guys left for home, I took the stock of things. I could pack everything in and continue to feel seriously disappointed about the entire affair… or I could give it another try, this time all on my own. The choice wasn’t that hard.

Some decisions to make

My approach in a solo games is always to act more as an observer than a player – decide upon initial plan for both sides and then just ‘sit back’ and see how things will develop. With this mindset, I came to following conclusions:

  • As Confederate commander, I needed to show some patience. Before the real ‘push’, I would let Steward’s brigade get out of the woods. Hopefully, by that time, Field’s brigade (which failed to appear on the field in initial game) would show up on my right flank and put additional pressure on Union line.

    I also made a different judgement of situation on my left flank. Jones’ brigade, consisting of only two regiments and some skirmishers, was a pretty weak force. It seemed overly risky to charge against Harris, it seemed much more sensible to let the Confederates on my right to remain where they were, at least to begin with.

  • From Union perspective, things were what they were. The blue-clad boys were on defensive pretty much everywhere but on their right flank. So the question was – should Harris’ brigade immediately attack rebels on Hill 5 or should they wait? Since both options made equal sense, I let chance decide. A D6 was rolled and Harris’ brigade was issued orders to assault Hill 5.

The game

2018_Blog_112

Maney’s and Donelson’s brigades advance toward Union positions. Their job is to engage and pin the enemy in place.

2018_Blog_113

At the same time, Harris gathers together his somewhat spread out regiments and forms up in line for the assault against Hill 5. Jones observes the movemen to his front and sends forward his skirmishers of 34th Mississipi.

2018_Blog_116

Starkwater reacts to Confederate advance and establishes his line along the stone wall and the road. Rebels will have to work for it now.

2018_Blog_117

33rd Mississipi gets into contact with Union troops and is promptly sent packing with a well-aimed volley from 38th Indiana.

2018_Blog_121

Field’s brigade appears on the field without any delay on turn 3 of the game.  Union position on Hill 2 is now in serious peril.

At same time, rebels in Steward’s brigade appear out of the woods and halt at the stonewall, as ordered. The brigade is now ready to proceed with their advance toward enemy.

2018_Blog_123

33rd Mississipi gets their act together and starts to seriously molest Harris’ right flank with accurate sniping. 38th Indiana is hit especially hard! Still, the Union advance toward rebel line continues steadily.

2018_Blog_126

Union skirmishers on Hil 7 and Starwater’s regiments along the stone wall are doing pretty good job and casualties in Donelson’s regiments start to pile up at alarming rate.

2018_Blog_127

Harris’ brigade ready to assault rebels on Hill 5. If only those skirmishers stopped hitting everything they aimed at!

2018_Blog_132

Field’s brigade charges Hill 2. Union artillery beats hasty retreat as 1st Tennessee flanks their position.  Meanwhile, green 105th Ohio rattles 3rd Tennessee with a well-aimed volley and stops them cold.

 2018_Blog_135

Steward’s brigade gets over the stone wall and into the open field. 4th/5th Tennessee is immediately hammered with accurate artillery fire from battery deployed to the rear of Union line, on Hill 1. The ‘double-six’ throws their assault column into confusion and stops further advance. Steward himself is hit by a shrapnel… which is stopped by the Bible in his chest pocket!

Same ‘double-six’ gives Union CinC ‘Aim low’ chit, allowing him at any time an option to add +2 modifier to a fire or melee roll of a unit up to 15cm from him.

2018_Blog_137

On Union left, 105th Ohio cooly retreats to the crest of Hill 2. Intensive action along entire line.

2018_Blog_139

Harris’ gives orders to charge Hill 5 and things go to hell in a handbasket! Skirmishers from 33rd Mississipi take their final revenge against 38th Indiana for that painfull volley couple of rounds ago. They roll a ‘double-six’ at critical moment - Harris is wounded and put out of action for the rest of the round, while 38th Indiana’s casualties reach above 50 percent. Obliged to test their morale, they fail badly and disperse!  10th Wisconsin is blasted by rebel artillery and retreats in confusion. 2nd Ohio does manage to throw their opponents from the hill but it’s too little and too late, as entire brigade breaks and falls back toward their own lines.

2018_Blog_141

Round later it’s time for Confederates to charge the enemy. Union CinC (McCook) has his heroic moment as he rides forward and holds the fire of 24th Illinois until very last moment (remember that ‘Aim low’ chit?). 31st/33rd Tennessee suffers grevious losses, but led personally by Steward, still reaches the stonewall. Perhaps infuriated by that well-aimed volley, they show no mercy in subsequent melee and rout their opponents. A hole is punched in Union line!

2018_Blog_149

2018_Blog_153

Aftermath of two charges, at the end of round 6. Harris’ brigade falls back in disarray. 24th Illiois simply runs away. Union right flank is wide open, at least for the moment.

2018_Blog_157

With pressure mounting on both flanks, Union center slowly gives ground. Last ditch defence will be mounted along the road and the stone wall. Confederates in Donelson’s brigade, having already suffered surprisingly heavy losses, aren’t too keen to follow up and stay put.

2018_Blog_160

Harris tries to re-establish control over his brigade…

2018_Blog_166

…and McCook tries to do the same with battered brigades still in reach of his command. Artillery batteries on the left should be able to stop any further rebel advance. 79th Pensylvania pulls back in an attempt to form a defensive line on the right.

2018_Blog_168

Steward’s brigade tries to sort itself out after the charge, but 3rd/4th Tennessee is yet again raked by acurate artillery fire from Hill 1 and breaks. Remaining two regiments reform (24th Tennessee still in attack column!) and prepare to continue their advance along the stone wall.

2018_Blog_172

Round 8 – 105th Ohio continues with its obstinate retreat and seems to be living a charmed life. Their casualties mount slowly and their position makes them focus of rebel attention, but they refuse to fold! Field’s Tennesseans try to charge them yet again and yet again are stopped by combined fire of Ohioans and Union artillery deployed along the stone wall.

2018_Blog_173

Steward’s regiments in the woods are ready to continue their assault and 3rd/4th Tennessee returns into fray.

2018_Blog_181

Round 10 and final collapse of Union position finally takes place. Steward’s entire brigade rushes 79th Pensylvania from three sides at once. It’s too much, the Union regiments crumbles and runs away. McCook’s right flank is shattered.

2018_Blog_183At the same time, 105th Ohio finally has enough. Just as they reach the road, they’re hit with accurate fire from rebel skirmishers and artillery. Reduced to below half strength, they fail their mandatory morale check and disperse. Their collapse panics the rest of their brigade and it retreats in disorder. Union left is no more.

2018_Blog_184

2018_Blog_185

Round 11 and it’s all over but the crying! Steward’s rebels slam into flank of 21st Wisconsin by sheer impetus of the charge that begun in previous round. Inexperienced Union unit (raised only month before and hardly even trained) breaks instantly and, unable to run away, simply surrenders.

Musings after the battle

Phew… in simple terms, what cracker of a battle!

Guys, by now I’ve been having American Civil War as special interest for over two decades and have been playing it for almost as long. During that time I have never experienced a game events of which corresponded so closely to the narratives of Shelby, Sears or Cozzens! And the ‘cinematic’ heroics which I imagined in my head as I rolled the dice and moved tin soldiers around… 105th Ohio’s stubborn refusal to break agains overwhealming odds, that disastrous salvo Tennesseans took as soon as they went over the wall, McCook being at exactly right place as the rebels rushed against his line, rebel sniper hitting Harris at worst possible moment… I honestly can’t recall when, or maybe even if ever, I had such great fun with a wargame as I did with this one!

This game did take 12 hours to complete, spread over course of four days. Let me assure you, it was a time well-spent! It was also a great learning experience. Playing slowly and without stress, I was able to check and double-check rules for all those quirky events that always take place in a wargame. This allowed me to really understand how this ruleset works, how different parts are linked together. As it turns out, “Guns at Gettysburg” is a damn clever little ruleset!

Allright, that’s the last post about Chaplin Hills scenario, I promise!

May 26, 2018

Chaplin Heights or what to do when you hope for a bang and get a whimper instead

Last weekend it was finally upon us – a first, long overdue, game of 2018. As you can perhaps judge from the previous posts I was quite chuffed with the terrain, while the scenario looked (on paper at least) as the most interesting of the bunch in “Heartland” booklet… in other words I was really looking forward to it. For the game itself I decided to step back into GM role and let L. and H. duke it out while I took care of the rules and book-keeping.

While Chaplin Heights scenario gives the initial impression of being quite complex, if you study the setup it’s really pretty simple. Whoever controls majority of the seven heighs at the end of the game is the winner. Union side (that would be L.’s command) controls four of them at the start of the game, but the federal troops are pretty green. Their initial deployment is also somewhat disconcerning. Rebels on the other hand are poised for assault and get a reinforcement on Union right flank sometime after turn 3, so they have all the incentive in the world to be the agressive party at least at the outset of the game.

Both L. and H. quickly recognized those facts after inspection of the field and their lines. L. was warned in general terms about possible threat to his left flank and would be initially preoccupied with the challenge of sorting out the somewhat awkward lineup of his troops. Therefore it was hardly surprising that he assumed defensive posture to begin with. H. on the other hand decided to keep things simple – “There is the enemy, now go and kill ‘em!” seemed to be the inderlying spirit of the orders he issued at the start of the game.

Initial positions of the troops are shown in previous post, so I won’t be covering that again.

The game lasted all of three rounds. In that time, the rebels moved against enemy line, all Confederate units that were able to, did try to charge in second round… and all of them failed to get into contact. In third (and as it turned out final) round the Union line tried its damdest to shoot the rebels in front of them into pieces. L. had pretty decent return on his dice rolls, H. didn’t. All things added together, it was pretty clear that the game stalled and it would take time for H. to recover from this sharp rebuff. By that time we’ve been at it for more than three hours and I’ve made an executive decision to call it a day.

2018_Blog_108

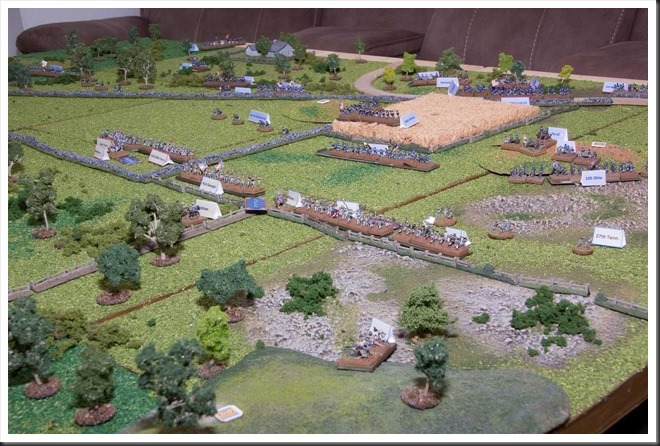
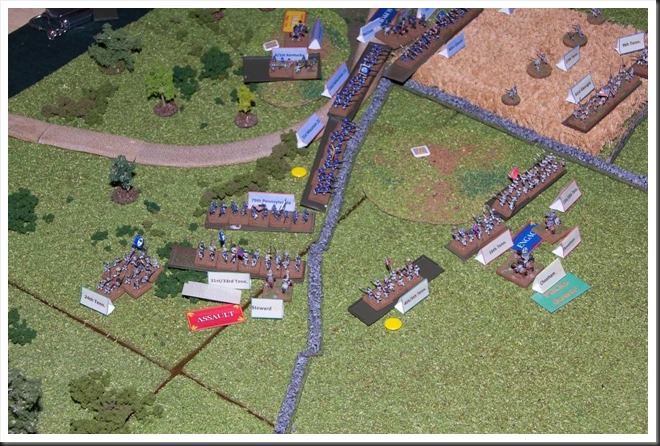
Situation at end of round three. The assault on southern right flank never got any momentum, with all regiments failing to get into contact. 6th Tennessee is in serious trouble – “Falter” status makes it unable to move, while 105th Ohio in front of it pours led into it. 6th Tennessee’s sister regiment, 9th Tennessee is in full retreat. The inexperienced 41st Georgia stands still and exchanges salvos with 123rd Illionis.  On the other side of stone wall, things don’t look much better for Donelson’s brigade. 16th Tennessee, is receiving a sharp lesson about the consequences of getting in effective range of rifled muskets even though you’re deployed in skirmish line.

2018_Blog_109

Meanwhile, Steward’s brigade is trying to get out of the woods…

2018_Blog_110

…and Jones’ troops are on their way toward a meeting with destiny (or at least Union brigade under colonel Harris’ command) that will never take place.

Musings after the battle

Perhaps not much of a battle, but a lot of musings nevertheless. First of all – why did I decide to call it quits when I did? After all, nothing was decided by that moment and who knows, maybe the rebels would recover? The answer is simple – time! Three rounds plus a quick and dirty rules walkthrough still required three and a half hours to complete. “Knowing my customers”, I knew that we had maximum of one more hour of playtime before the guys would leave for home and we would not achieve anything in that time. So, chances were that that final hour would be much more enjoyable if we spend it on a chat about the game and the rules… which we did!

In more general terms, let me put it bluntly – “Guns at Gettysburg” is not a quick ruleset to play, especially with players who are unfamiliar with it. And the fact that those 6mm minis can be quite fiddly to handle doesn’t help speeding things up. Those two statements bring me neatly to a conclusion I have arrived to while observing last Saturday’s game – with somewhat heavy heart I think I will have to accept the fact that large set piece battles are, at least under current conditions, not feasable as multi-player games for me. At least not with “Guns at Gettysburg”.

Please note however that I say ‘multi-player games’. So stay tuned, because we are not done with Chaplin Heights and “Guns at Gettysburg” just yet! Smile