December 01, 2011

Book Review

Battle Tactics of the American Civil WarBattle Tactics of the American Civil War by Paddy Griffith

My rating: 3 of 5 stars


Ok, first of the bat - if you don't know your American Civil War, THIS IS NOT THE BOOK TO START WITH. Instead, find McPherson's 'Battle Cry For Freedom' or Shelby's superb three volume narrative of the conflict.

This little volume deals with something very specific - it's an attempt to answer the ever raging (trust me, in certain circles, this is not an uderstatement) question wheter American Civil War was the last war of Napoleonic times or first of modern wars? All main aspects of armed combat during ACW are examined and evaluated on their own and a final analysis of the conflict is presented in the last part of the book. It is up to each and every reader to agree or disagree with author's conclusions (chances are they will make your blood rush faster, if you don't), but the entire book is very well thought out and author's ideas cannot be dismissed out of hand.

The thing is though that, regardless of author's apparent knowledge, his ideas don't feel 'fleshed out' - the book is simply too short to be able to convincingly tackle the topic. Those who know the topic of discussion will understand Griffith's logic without any problems, but then they will also already be familiar with the argument he's making. Those who are new to the topic of this book, will propably be left with more questions than answers after reading this book. Also, I can't help but feel that Nosworthy's 'Crucible of Courage', which attempts to achieve exactly same thing as Griffith in this volume, is much better spent time if you're genuinly interested in deeper understanding of American Civil War from more "technical" perspective.


View all my reviews

November 12, 2011

C4 Open 2011

Just a quick post with a link to pictures I've taken at this year's C4 Open exhibition. You can find the best of them in a gallery I've created at Facebook, click here to go to it.

October 27, 2011

Breakout From Fort Donelson

Last Sunday I had opportunity to run another ACW game with slightly tweaked "They Couldn't Hit an Elephant" ruleset from Too Fat Lardies. This time around I picked another scenario from Caliver Books' excellent scenario set "Heartland". Called "Break-out at Fort Donelson", the scenario deals with general Pillow's breakout attempt from... well, Fort Donelson.

At first glance, the scenario I selected is that it is pretty straightforward affair - a rather superior Objective of Confederates is to smash through a Union line deployed on high ground and open an escape route for the troops in the fort. In other words, a typical slugger match with numerical advantage of rebels counter-balanced by strong defensive position of the lads on the Union side. I also believe that this scenario is quite good for learning a new ruleset – limited number of troops, with one side pretty much stationary and few regiments in brigades that are on the attacking side.

The twist in this one is provided by terrain and weather - both of them were pretty rotten, which translated into drastically reduced visibility. As things turned out, this fact was the deciding factor in our game.

Initial setup
As Union commander, I decided to take maximum advantage of the terrain and deployed my two brigades on the heights that separated rebels from their goal. Feeling generous toward myself, I also allowed myself to place one dummy blind on my exposed right flank in an attempt to disguise my numerical weakness.
H.'s deployment was hampered by scenario deployment instructions - three of his six brigades had to start from behind the field works. Remaining brigades could enter the battlefield from pretty much anywhere on his side of the gaming area.

IMG_0465 Union deployment before at the start of the game

The game
To be perfectly honest, I may just as well admit that our game was pretty much over by the time we deployed our blinds. Right at the start, H. made correct observation that the reduced visibility and a fatal flaw in dispositions of my blinds gave him a perfect opportunity to turn left flank. He decided to focus his effort on this one spot and aided by fortunate draw of cards managed to reach his main objective - the road - in four rounds. Once that position was reached, the rest of the game was a formality. His brigades were now in perfect position for a devastating assault on my flank, while I didn’t even had a proper chance to deploy from my blinds.

IMG_0470
Union line outmanovered

Actually a bit mentally paralyzed by this sudden turn of events, I scrambled to save something out of the looming disaster. I managed to deploy the brigade on my left flank before H’s. hammer fell, sending at the same time desperate instructions for my other brigade to march double-quick toward my exposed flank. However, even before it had a chance to start moving, the Confederate assault did strike the vulnerable end of my line, with predictable results. One of my regiments was pushed back after a hard fight. Their retreat exposed in turn the flank of the regiment to their right. It was struck almost immediately by another rebel unit, promptly routed before the onslaught and causing further confusion among the Union soldiers of the regiment that was forced out of line in previous round. With two of my eight regiments routed and my line on the verge of being swept away, I decided to accept the fact that I was in hopeless position and called it a day.

IMG_0473 Union troops pinned down by diversionary rebel attack
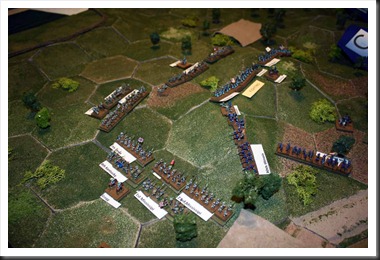
IMG_0474 Rebel brigade preparing for assault uphill

IMG_0481 They’re running, boys… they’re running!

IMG_0492 Confederates reach the ridge, aka “wow, entire picture is in focus, did I finally learn how to use my camera?”

Musings after the game
This time around, I have a mixed bag of things that I feel needs to be adressed. Let's start with the good stuff - when the "They Couldn't Hit an Elephant" works, it works very, very well. I was especially impressed by the nasty little engagement that developed between the two regiments that H. sent to pin the Union brigade to the left of my line and my artillery battery that covered that part of my front. The brief firefight that developed did feel like something taken from Shelby's narrative. The assault that decided the day also had the right feel to it - I especially appreciated the fact that one of highly probable outcomes of direct assaults (in TCHAE they are called 'decisive combat) is possibility of defender breaking and running away before contact is achieved (apparently, bayonet assaults were pretty common in ACW, but melees were quite rare). In other words, the combat model of the ruleset is very nice and has a period-specific "flavor".

As for the bad, well... is anybody surprised when I say 'Coffee Break' card? Outcome of our game was dictated by two factors. First of them was the reduced visibility (caused by the weather and difficult terrain) - H. took full opportunity of it to outflank my position. There is no argument against this from me, in fact I find it a rather realistic effect of the environmental conditions dictated by the scenario. The second factor was however far less entertaining - by pure chance, H. managed to draw his blinds card thrice in the four opening rounds of the game, while I failed to draw mine every single time. This unlucky sequence of events put me at a disadvantage I had no hope to recover from, because of the simple fact that, as far as I understand, voluntary deployment of troops in "They Couldn't Hit an Elephant" is allowed only when ones Blind card is drawn. In other words, during those four opening rounds I was pretty much a sitting duck. If my interpretation of the rules is correct, then an unlucky card draw sequence of the kind that I experienced can upset balance of even most carefully planned game. All sorts of argument can be made in defence of such events, but the fact remains that ‘Coffee Break’ card is a game mechanism that can defeat a player all on its own. When that happens, it can cause a bit of frustration.

To be fair, I have to admit that in regard of my bad luck with ‘Coffee Break’ card, I may have made things worse with my tweaks to the ruleset. In an attempt to alleviate the sometimes dramatic effect of 'Coffee Break' card, I play with two of them in my deck. The irony here is that having two of those cards in a deck consisting otherwise of only the Blinds cards for both sides actually reduces the chance of both Blinds cards being drawn in same turn from 66 percent to 50 percent. So the lesson for the future is to have only one 'Coffee Break' card as long as all troops are under blinds.

October 13, 2011

GHQ Terrain PART 2 – Basic Hexes

Let me start by clarifying a couple of things. First of all, stuff I intend to cover here is pretty basic and familiar to anyone who's been wargaming for a while. Second, the way I handle GHQ hexes isn't the only way to do it, nor is it the right way to do it, it's just the way I do it. When I decided to use those hexes, my goal was to get functional and flexible terrain setup, quickly and with minimum fuss. Thus the techniques I use are really very simple. If you think that there are better ways or could give me some advice about how to improve my results, any comments are appreciated.

OK, with that out of the way, let's move on. Basic hexes are just that -basic plain, probably green terrain. 1/2 inch thick tiles are perfect for that type of hexes and you will need a whole bunch of those. I would say that two packs, total of 48 hexes, is pretty good amount for basic setup.
Besides the tiles, you'll need following materials:

  • Paint - don't bother with the expensive, artistic stuff. Find a DIY shop and grab a good sized jar of acrylic wall paint. It's much cheaper and it's thick, so it protects the hex pretty well.
  • Sand - in my opinion, texture of expanded polystyrene is pretty unattractive, so I prefer to cover my hexes with sand. I got mine from pet shop, 5 kg of sand intended for the bottom of an aquarium, which is enough to cover thousands of hexes.
  • Flock - since I wanted to have green, grassy hexes (standard for wargaming terrain), I needed flock and a lot of it. Stay clear from the stuff from Nine Force Gale and Warpainter, their small jars of flock are very nice, but they are insanely overpriced. GHQ provides its own brand of flock, but it's a bit hard to find in Europe, so the simplest solution is to find a model railroad shop and get as large bags of flock as possible from one of the major producers. Faller, Woodland Scenics or Noch will probably work equally well and big bags of flock from one of them is probably the cheapest alternative short of making flock from scratch (and who would want do that).
  • PVA glue - common white glue, commonly available in DIY shops. Grab a big bottle, you'll need it.
  • At least one medium sized flat brush - the kind with synthetic bristles, normally used for wall painting.

And here's how I do my basic tiles:

  1. Paint the tile with wall paint.
  2. Cover the hex with sand, wait for couple of seconds so that the sand sticks to the wet paint. Next, pour the excess sand back into its container. Leave for at least couple of hours for the paint to dry.
  3. Since the sand I use is orange-red, I have to paint the tile again to get more suitable base color. If you use more naturally colored sand, you may want to skip this step.
  4. Once the paint is dry (again), I next flock the top of the tile. Pour some PVA glue into a container, add some water (normally I go for 3 parts glue and 2 parts water) and mix it together. Cover the part of the hex that is to be flocked with the glue/water mix and cover it with flock. Wait for couple of seconds and pour excess flock back into its container. Let the glue dry completely.
  5. Paint over the flock with mixture of glue and water again. This will harden the flock and fix it to the surface of the tile. At that stage I also sprinkle the hex with another shade of flock in an irregular pattern to break up the monotony of same color, but it's a question of personal taste and can be skipped. Once again, leave the tiles to try.

Basic Hexes
Main stages of basic tile “production”

Some final thoughts... If I had to do it all over again, I would have painted sides of the hexes in color that is as close as possible to the color of the flock. Why? Well, for some unexplainable reason GHQ doesn't bother to cut their hexes precisely, with the end result being that the hexes don't align perfectly. This means that once the tiles are set up on the table, there are gaps between them. As can be seen in the pictures I've posted before, those gaps are quite visible when the paint on the sides is of different color than the flock. I believe that this rather unaesthetic visual effect can be reduced if the paint on the sides of the hexes is of same color as the flock.

Also, in case you haven't already figured it out on your own, working with one tile at a time isn't very efficient. I usually work with one pack of tiles at the time, one step at the time.

September 11, 2011

Preparing for assault on Fort Donelson or using GHQ Terrain – part 1

Over last couple of months, I've been toying with the idea of writing a couple of posts about GHQ Terrain system. I am not a master terrain maker nor do I claim to be an expert in GHQ Terrain "field", but I've been using it for a couple of years and I do believe that I have gained a bit of insight about advantages and disadvantages of this system, as seen from the point of view of average wargamer. Also, just like with most of things, there seems to be a right way and a wrong way to do stuff with GHQ Terrain. I think that by now I have made most of the common mistakes and figured out few things that could be of benefit for others, so why not share it with people for whom this information could be useful?

My plans about more in depth posts are for the moment hindered by real life obligations, but since I am in process of setting up terrain for an ACW scenario, it occurred to me that I could use that process as a background for an introduction to the topic. So... below is the picture of preliminary terrain setup I intend to use for Grant's assault on Fort Donelson. There is still some work left to do, but for a "first fitting" things don't look too shabby.

FortDonelson_final

Here is a couple of facts in connection with this setup, just to give you a general idea about GHQ Terrain system. It is about 140 cm by 95 cm (sorry guys, metric system is the way to go) and consists of about 250 hexes. mostly of 1/2 inch variety. In case you wonder why so many hexes are needed, the reason is the elevation that runs throughout the board and covers about 2/3 of it. After giving it a bit of a thougt about how to depict that terrain feature, I decided to try two 1/2 inch hexes on top of each other and it seems to work pretty fine. Reason why I’m mentioning it is that there is a couple of approaches to deal with elevations when using GHQ Terrain tiles – each of them has its own set of drawbacks and advantages.

Another thing that can be of interest is the fact that this board is built of five different basic tile types and four of those tile types have several variations. Basic plane hex is one of those tile types, obviously. Road hexes are of two different types - one with road running between straight vertices and one with roads running between diagonal vertices of the hex. Then there are elevation hexes - if I'm not mistaken, there are five possible shapes of those, although in this setup only three are used.

By now two things should be apparent - it is a work intensive system and it demands a bit of effort and dedication before a certain level of versatility is achieved. Furthermore, a bit of an financial inverstment is required even for basic setup. Those things need to be considered carefully before choosing GHQ as the terrain solution for wargames.

September 04, 2011

Brushes from Rosemary&Co

Ordering brushes from a webshop in a different country? Isn’t that a bit of an overkill? Well… yes, I guess you could say that. But what if I told you that this webshop sells brushes that have the same quality as those almost mystical Winsor Newton Series 7 wonders, but that they cost only about a third of the price that W&N demands for their tools of magic? And what if I told you that this webshop sells not only the vanilla brushes that we use every day, but also brushes with such strange names as a rigger, side-loader or cat’s tongue? If that’s not enough, then listen to this – when you buy brushes from that place, you not only get your stuff two or three days later, but you also get a handwritten note from the owner of the shop and it says “thank you for your business”. Yeah, I thought that would catch your interest!

OK, joke aside and down to the business. Purpose of this post is quite simple – to spread the word about a small enterprise called Rosemary&Co. From what I understand it’s a small, family-owned company located in England that manufactures and sells hand-made brushes. By now, I have ordered brushes from that company a couple of times and couldn’t have been happier with their products. Brushes from Series 33 are perfect for the stuff I work with (over last couple of years mainly 6mm and 28mm). What’s more important, despite the fact that they are from pure Kolinsky sable, they wear out at far slower pace than DaVinci brushes I used previously and they keep their point pretty much ‘til the bitter end. I’ve also bought a couple of their less orthodox brushes and their quality is just as good (although I still haven’t had the chance to do anything meaningful with them).

Anyway… you can find Rosemary’s webshop here. Take a look at all the goodies she makes and give them a chance. I think you will be very positively suprised by both the price and by what you get for your money.

August 14, 2011

French FOOT Artillery from Adler

One of my favorite figure manufacturers is Adler Miniatures. However, I always find it a bit disappointing that there are so few published pictures on their site. So, just to give a lending hand, here is a picture of my next step toward French OOB for my first General De Brigade scenario - French foot artillery 6/8 pound battery, code FBAT1, in their original bare metal condition.

Pictures of painted figures will be posted when I'm done, whenever that may be.

Adler_French_FootAdler French foot 6/8 pound artillery battery (FBAT1) straight from the plastic bag

August 07, 2011

Dogfight over Convoy BOSOM

My Stukas didn't have long to wait until their combat debut - just a couple of hours ago we run a simplified version of scenario "Dogfight over Convoy BOSOM" from scenario book “Over The Channel” with four of my friends. Since we had one completely new player, I decided to remove certain elements of the scenario, most significantly clouds and spotting rules.

"Dogfight over Convoy BOSSOM" is a very neat little scenario for 2 to 4 players. German side runs a pair of Me-110:s and Me-109:s escorting ten Stukas. RAF is represented by a flight of Spitfires and Hurricanes. This scenario is also quite interesting from the tactical perspective - British planes can deploy in a perfect position for a head-on pass against Stukas, while German fighters are hindered from engaging British fighters until they fire. However, after first salvo, British players have some decisive decisions to make - do they make another pass against Stukas or do they act defensively and counter the German escorts?

Our game followed the by now quite familiar script (I’ve actually played this scenario once before in Copenhagen, with remarkably similar results). The critical first fire phase from British players was quite ineffective (only one Stuka damaged). To add insult to injury, one of Hurricanes run out of ammo almost immediately and left the engagement in a hurry. Spitfire flight then turned around to get the Stukas from behind, while Hurricanes continued straight forward, gaining altitude at the same time. Results of those maneuvers were predictable - Spitfires gained perfect position for attack against the Stukas and managed to damage three of them. Unfortunately, they were by now unsupported and exposed to German escorts, which shot down two of Spitfires (the “stunner” of the game consisted of the fact that it took four very potent hits from Messershmidts to down one of the Spits). By round six, three British planes were opposed by four German escorts in advantageous position and we decided that it was time to call it a day.

P1000782 Situation in the middle of our game – front group of Stukas are out of harm’s way, while Spitfires are hammering the second group of bombers from behind, while being hammered by the escorts.

Conclusion of this game is once again that trying to gain 6 o'clock position against bombers, while ignoring their escorts is a suicidal proposition. Attacking side must instead keep maximum speed and either engage the escorts in a head on contest (unhealthy proposition for the British because of 20mm cannons of Messerschmitts) or try to position themselves in a position for a deflection shot against the bombers several turns later in the game.

Stukas from Tumbling Dice

Just a short post to keep the blogg alive – just finished a batch of Stukas and they deserve a photo opportunity. Miniatures are from Tumbling Dice, decals are from Dom’s Decals.

Paint scheme is simplified cammo for 1940 period – upper surfaces are painted with Valejo Olive Grey 888 and Bronze Green 897, lower surfaces are painted with Valejo Pale Blue 906. In 1/600 scale differences between two shades of green are almost invisible, so I choose to lighten Olive Grey with a healthy dose of dull yellow (any kind will do, as long as it’s not some sort of bright lemon shade).

P1000797

Stukas_Resized

July 06, 2011

Baby STEPS with green stuff

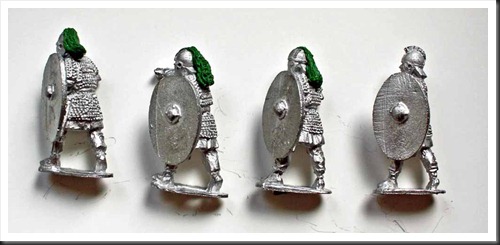
I’m not saying that Perry brothers or Copplestone need to start looking out for new competition… But I have to say that I am a little proud to announce that I have attempted my miniature conversion and didn’t botch it completely.

Just to flesh out this post, here’s the background story. As those few that follow this blog already know, the WAB army I have been working on for last couple of years (has it been that long already?) has been inspired by Cornwell’s “Winter King”. An army of Arthur based on that source would of course be incomplete without the Wolftails. Those cunning buggers at Gripping Beast are fully aware of that fact and do provide a rather sweet set of 12 miniatures that are perfect for that role. Yours truly has already grabbed, painted, based and fielded that unit.

Unfortunately, as it turns out, in WAB a unit of 12 Roman commanipulares has about as much chance against 24 charging Saxon Dughuts as a snowball has in hell. And it doesn’t help pointing out that they are Derfel’s invincible warriors that can’t loose – I tried that and H. just laughed at me as he exterminated them to the last man… eh, I mean figure.

After seeing Derfel’s boys being swamped by the Saxon horde in their inital engagement I quickly came to conclusion that to reach their full potential, they needed reinforcements. But were from? Any warrior that wished to be included in this elite band had to provide a mandatory wolftail on his helmet and such things were rare, very rare indeed! The only choice other than getting duplicates from Gripping Beast (boring!!!) was to make my own.

Well, without further comments, here’s the end result. The miniature on the right hadn’t completed his initiation ceremony, so he’s still wearing the original helmet.

Remake

May 14, 2011

Not Dead Yet…

When I look at the date of my latest entry in the blog, I can't help but wonder about how fast time passes these days. Also, I wonder about how often the phrase 'Not dead yet!' has been used on half-abandoned blogs, followed by explanations and excuses. In this case, my long silence was caused by several different factors,but first and foremost - I moved to a new place. The bad thing here is that fixing the new place is taking ten times longer than I expected. The good thing is that I finally have both a nice painting area and plenty of space for a decent gaming table.

Returning to the age of Arthur
This blog is supposed to be about miniature wargaming, so enough about my new flat and let's move over to last Sunday’s event. On that day H. came over with his Saxons and we gave Warhammer Ancient Battles another go. It was our third game, so we were finally starting to get a grip of the ruleset. Nevertheless, I was a bit anxious, because our previous games ended in a rather inglorious whooping of yours truly. Now, I don't mind having my behind being handed over to me every once in a while. In case of H.'s Saxons however, the single reason for my defeats was the monstrous special character of his king, who so far managed to vaporize anybody who dared to stand in his way. Romano-British army list doesn't really offer any direct antidote to that monster, something that I admittedly started to find tad unfair and frustrating.

Same, same, but different
Since we are both still fumbling our way through WAB ruleset, we decided to run yet another set piecebattle with few pieces of terrain for sake of variety.

Our deployments were rather unimaginative. I placed a huge swarm of skirmishers in the rough ground to my right, while the rest of my infantry - two units of milites and one of peasant rabble were placed in the centre. My mounted mounted milites in skirmish order were placed on my right flank, while mounted commanipulares were held in reserve.
H.'s dispositions were pretty much a mirror of mine - his skirmishers, although heavily outnumbered by mine, intended apparently to meet mine in a straightout shootout contest. Three units of Saxon warriors were placed to the left of the skirmisher, while his cavalry concentrated on the Saxon left flank.

H's intention was apparently to repeat the events from our second game - smash with his cavalry through my rightmost milites unit and then take care of my cavalry. With that suspicion in my mind, I choose a purely defensive strategy - infantry would take the charge and hopefully hold. In the meantime, my light troops would try to annoy the crap out of the Saxons with missile fire.


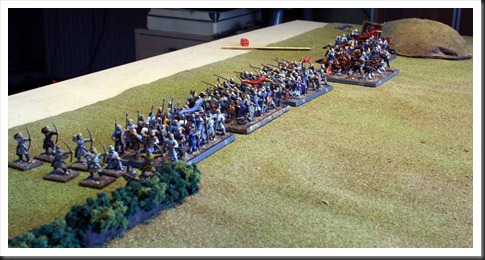
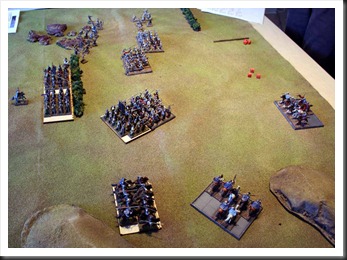
001_Initial_Dispositions001 Birds view before battle

002_Romanl_Dispositions002 Romano-British deployment

003_Saxon_Dispositions003 Initial deployment of Saxons

When events actually follow the plan
The battle that followed can be described in very few words. H moved his entire army forward, while I awaited the onslaught. My foot skirmishers on right flank exchange missile fire with H's archers and mass of Saxon infantry. The results were inconclusive, the only source of real excitement being caused by an uncontrolled charge of some of his infantry, which my skirmishers avoided by a hair's breath.

Main action was once again initiated by H:s cavalry. His light cavalry unit charged bravely into my rightmost milites as soon as it was in range... and was promptly sent back with a bloody nose. I must admit it caused me no small pleasure, because similar charges in our two previous games started disastrous chains of events that led to catastrophic defeats of poor Romans. Not this time though; it's nice to know that WAB is capable to handle cavalry charges into formed infantry in proper manner. It’s even nicer to know that my army doesn’t always trip over its own legs at slightest push.

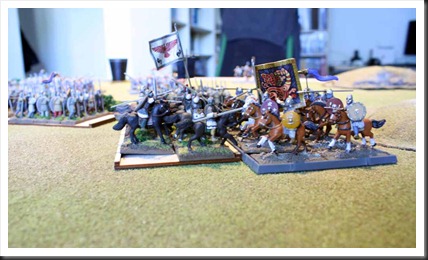
004_Failed_Saxon_Charge004 First Saxon charge bounces against Roman shieldwall

His initial setback failed however to disturb Saxon king's retinue, who in following round managed to completely mangle mounted milites on my left flank. Poor buggers came a tad too close to Saxons in open formation and were caught while trying to evade the predictable chagre that followed. This success placed Saxons in perfect position for a clash of arms with my mounted commanipulares, a contest which on both previous occasions proved to be catastrophic for my general’s retinue.

Sure enough, the Saxon king charged and to everybody’s suprise failed to make any impression whatsoever on my cavalry. The fact that I cunningly equiped them with heavy armour for this battle did help. To be fair though, H:s hopeless luck with dices helped even more. My retinue also managed to cause enough Saxon casualties to make them flee. This rout would have once again been been a decisive one, but for the fact that in this battle Saxons were as skilled at running away as they were in close combat on previous occasions.

006_Decisive_Moment006 Decisive moment

007_Halfhearted_Clash_of_Shields007 Inconclusive infantry engagement in the center

008_End_of_Battle008 Situation at the end of the game

By that time we were both satisfied with the outcome and decided to call it a day. It turned out to be yet another Saxon victory, although this time it was a mariginal one. Personally, I was mostly relieved that my Romano-British army didn't (once again) crumble like a paper mug. H. was probably a tad relieved over and certainly very entertained by happy escape of his king's retinue. Overall, a pretty decent Sunday afternoon.