May 26, 2017

When Wargamer’s Magpie Syndrome pays off

Let’s face it, we all suffer from it to some degree – new period catches our interest, a new range of minis is released, a book or a movie gives us ideas for a cool scenario or campaign. When this happens, small parcels start being delivered by postal service to our doors. I’m sure that vast majority of wargamers is far more disciplined than I am and manages to put contents of those parcels onto wargaming table within a couple of weeks… In my case though, these newly acquired ‘treasures’ are as often as not inspected, admired, put in some box and then doomed to linger, half-forgotten, in my basement storage room. Sometimes for years, sometimes for decades.

Every once in a while though, a small miracle happens and my interest in the period or theme awakens again. As for example, with the WWII skirmish due to ‘Chain of Command’ ruleset. As I started to seriously consider putting together last week’s test scenario, I realized that I really didn’t have much terrain suitable for such game. And then I remembered… sometime in late ninties I’ve bought a shedload of bits and pieces from Gamecraft Miniatures. It took some effort, but after a small archeological excavation I’ve managed to dig up a bag of resin walls and stones. I am pretty sure that a dozen or so resin buildings are hiding somewhere, so the search is not yet complete!

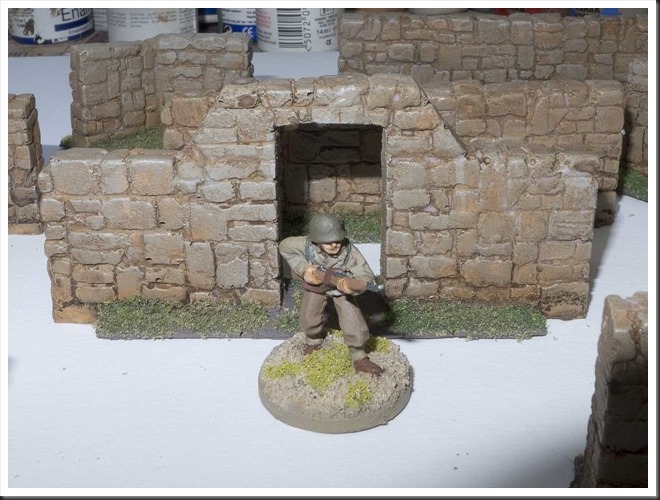
Anyway… getting these walls and stone formations ready for a game seemed like a plausible goal over a period of two weeks I had for preparation of the game. In ‘raw’ form, the terrain pieces are made of off-white resin. So the first step was to wash them in luke-warm water with some detergent. An old-fashioned toothbrush is quite useful for this task.

Gamecraft_Miniatures_Bits_n_Pieces_005

Gamecraft_Miniatures_Bits_n_Pieces_009

While the resin lumps were put aside to dry, I started to wonder how to approach this particular painting job. Normally, I start with a coat of Vallejo (or these days Plasticoat) grey primer and then get to work with acrylics. But in this case we’re were talking about stone. In nature, both stone walls and outcrops have a lot of subtle tonal variation, but in a limited color range. Browns or greys shift in saturation due to varied exposure to elements – to get a realistic effect, I would have to do a lot of blending and washes. And I have to admit, after all these years blending with acrylics is still a challenge for me. And so, I arrived to a somewhat surprising decision – this time around I would go ‘old school’ and dust off my old Humbrol enamel pots!

Gamecraft_Miniatures_Bits_n_Pieces_014

Enamels may be an unfamiliar medium for ‘younger’ wargamers, but they were pretty much all we had before acrylic ‘revolution’ of early ninties. They are not water-solvable and need either white spirits or terpentine to thin (and wash the brushes). They stink (especially some of the older Humbrols can make your nose hair curl in panic as soon as the lid is off) and they take forever to dry. So when acrylics arrived on the scene, enamels didn’t stand a chance. But… this last drawback – long drying time (and I speak about several hours) is under certain circumstances a blessing in disguise. It allows for blending and lifting off techniques (that’s what I call painting and then ‘taking off’ paint from painted surface) that one only can dream of with acrylics.

I started the painting process with an uniform coat of Humbrol 98 for the stone formations and Humbrol 118 for the stone walls. Once this was done, I let the pieces dry over night.

For stone formations I next proceeded with building up several thin layers of 72 and 187 mixed in different ratios. Darker shades were applied all over the stones. I did however try to let the dark base color to get through here and there. That’s where ability to pick off the paint with the brush was very useful. As I successively lightened my mix, I blended it with underlying layers in the areas that would be exposed to sunlight and elements. For final highlights I added some light grey Humbrol 64. Addition of light neutral grey desaturated the mix. It was added to the sharp edges and surfaces that were visibly raised. Normally this step would be done with drybrushing technique. However, since enamels don’t dry in a blink of an eye, I had plenty of time to do proper blending.

I did however switch over to drybrushing once I started working on the walls. Blending of individual stones would simply take too much time. So a heavy drybrush of Humbrol 26 was applied to the raised stone areas with a flat brush, followed by lighter passes of Humbrol 187 and 72 in irregular patterns.

Next, I returned back to the stone formations. I dilutted heavily the dark brown Humbrol 98 with white spirits and used it as a wash, applying it to lower parts and around crevices of stone formation. Once done, I left everything to dry over night.

Last painting step consisted of a wash with Vallejo’s acrylic washes, which I applied on the walls in an attempt to bring out the detail of the walls. I mixed together Black and Oily Earth and applied it all over the walls. Not entirely happy with how this step turned out, but it did add a bit of variation in color tonality.

Once everything was dry, I flocked the terrain bits with turf and foam clumps from Noch/Woodland Scenics.

Overall, I am not entirely happy with how the walls turned out – the reddish tone of Humbrol 118 that I used as base color looks a bit unnatural to me. But from a couple of meters away the walls look perfectly serviceable. On the other hand I am totally delighted over the visual effect of stone formations. The stones have subtle but clearly visible shifts in color, which is exactly what I was after and the dark brown wash that was added in spur of the moment did a lot for creation of ‘natural’ look.

It was a very happy return to an old medium of enamels, which I’ve neglected almost completely over last two decades. For the future, I will have to remember about their special characteristics and positive properties.

Gamecraft_Miniatures_Bits_n_Pieces_018

Gamecraft_Miniatures_Bits_n_Pieces_022

Gamecraft_Miniatures_Bits_n_Pieces_023

Gamecraft_Miniatures_Bits_n_Pieces_026

Gamecraft_Miniatures_Bits_n_Pieces_027

Gamecraft_Miniatures_Bits_n_Pieces_034

Gamecraft_Miniatures_Bits_n_Pieces_037

May 21, 2017

First impressions of “Chain of Command”

For the wargamers who just arrived from outer space, let’s start with a short introduction to “Chain of Command”. It’s one of the “newest” rulesets from Too Fat Lardies and it’s a WWII skirmish ruleset. One miniature represents one man and one vehicle or artillery piece model represents a corresponding single real world piece of equipment. The ruleset focuses on combat between forces of platoon size with some reinforcements. While it allows the player to directly control every individual figure, the basic manouver and fire units are squads of 8-12 men. Those can be further split into (usually) two teams, which is how most units of that size operated in real life. Specialized weapon teams, such as bazooka or medium machine gun teams provide additional firepower. Command and control is performed by ‘leaders’ of two types; junior leaders usually lead individual squads and weapon teams, while senior leaders provide control at platoon comman level, allowing coordination between individual sub-units of the platoon. Ruleset caters for support units in all forms and shapes – tanks, mortars, artillery (both on the table as well as off-board), engineers, etc are all handled. D6 dice is used throughout the ruleset.

“Chain of Command” has been around for a while now (about three or four years, I believe) and many reviews have allready been written about it, both in printed publications and online. So I will not try to reinvent the wheel by writing yet another lengthy review that will hardly add anything new to what’s already been said and written. If you’re interested in a detailed analysis, I recommend for you to listen to episode 106 of Meeples&Miniatures podcast or read an excellent review posted on Anatoli’s Game Room blog. Both of them provide a very good overview of this ruleset.

So what’s the point of this post of mine then? Well, I hope to provide a ‘rookie’ gamer’s initial impression based on two games I’ve run yesterday. In the first one I acted as Game Master, in the other one (enriched by my impressions of the first game) I took over one of the gaming seats.

The setup

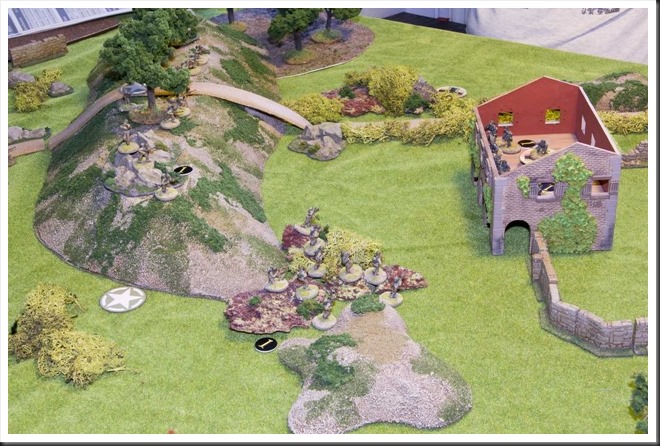
Since it would be a first experience of the ruleset for all involved sides, I’ve picked up the most basic generic scenario that is included in the ruleset – an encounter between two patrols in no-man’s land. In this setup, the players start by establishing their initial zones of control with help of simple meta-game. Basically a bunch of markers are moved over the board until they come into 12’’ of one of enemy marker. Once this is done, players select their jump-off points in territory they control – computer game players can think of those as spawning points. These define where individual squads, teams and leaders can be deployed on the table.

To further simplify the task of ‘first game’, I decided to play on smaller area than recommended 6x4’ table. The game would be played on my kitchen table, which is only 5x3’. The terrain setup was my own creation – i basically threw whatever terrain I had available on the table with hope that this random arrangement would provide for a good game.

Finally, I decided to limit order of battle to a single basic platoon and no support units. So both sides (German and American) had their three squads consisting of an LMG team and rifle team to play with. Each of the squads was led by a junior leader. Furthermore, Americans had at their disposal two platoon leaders and a bazooka team, while Germans had a single platoon leader and a panzerschreck team.

CoC_First_Game_003

Game one

In our first game the Americans, played by T., managed to gain control both of the hill and the house in the initial phase. This gave him a huge advantage from the start and set the tone for the game. He deployed one squad in the house and the other two along the ridge of the hill. L. responded by deploying one of his squads in the hedges by the crossroad and the other one in the woods by the ‘northern’ foot of the hill (by the chairs in the picture above Smile). The MG team of that squad gained a foothold on the hill, deploying in the rock outcrops in its northern end. And that was it… both sides started to hammer each other, with Germans clearly getting the worst of it. After a fire-fight lasting over several phases, L. suffered eight casualties to two of T, the  machine gun teams of both of his deployed teams were wiped out and the remainder of the squad in the hedges by the road was pinned by T.s fire from the house. To put it plainly, he was screwed and he knew it. Thus, we ended that game.

CoC_First_Game_007

Game two

T. left our company by that time and L. and I gave it another go. Wiser by the experience, L. managed to claim the posession of the house in the initial phase of the game, while I grabbed the hill and the high ground to the south of it.

L. then proceeded by deploying a squad on second floor of the house and another by the wall outside the walled house court. I responded by establishing the line of fire along the ridge with one squad, deploying the second in the rough ground at the southern foot of the hill. I deployed my third squad behind the hill, out of sight. My plan was to move it around the hill and hit the house from the north. Once again, L. never bothered to deploy his third squad, probably waiting with it until he found out my intentions for the squad behind the hill.

CoC_First_Game_009

In some respects our game developed in similar manner to the previous. L. blasted at my guys in the rough ground, while I tried to hit him hard with fire from the hill. The pressure mounted on units on both sides, but yet again an impass seemed to occur almost instantly. After a couple of phases I grew tired of this static character of the game and decided to take a risk. I ordered the squad on the hill to fire suppressive fire at the Germans in the house – this is a temporary state where the incoming fire won’t cause any damage, but automatically reduces fire effectivness of any enemy units that are in the sector where suppressive fire is ‘applied’. This was a preparation step for my next action, which was a mad dash across open field toward the house by the rifle team of the squad in the rough ground.

CoC_First_Game_008

As Germans hunkered down under suppressive fire, the advancement was completed without any casualties. L. reacted by dropping a couple of grenades on my guys who were now huddling directly below, hiding behind the arcade walls of the house. My luck held and noone was hurt by the explosions. Naturally, as soon as I had the opportunity, I pushed on into the house. A vicious close combat for control of the house now took place… with disastrous consequences for the my side. Once the dust settled, six out of my soldiers were dead, with the sole unhurt man trying to patch up his wounded leader. Normally, such outcome would rout the survivors, but considering the enclosed surroundings we agreed that my survivors were now POW;s.

L.s triumph came however at a cost of three casualties and a wounded squad leader. Another round of whittling fire from the hill completed the grim job, breaking the German squad and forcing them to flee the house.

At this time we were at it for five hours and were more than satisified with the entertainment of the day. Thus, the second game also ended inconclusively.

Musings after the battle

After a single evening, it is far too early to say anything definite about this ruleset. But there is a couple of things I can say with conviction even after this brief exposure.

  • First and foremost, I am not at all surprised that so many people have been raving about ‘Chain of Command’ over last couple of years. It is a cracking ruleset and I will definitely invest much more time and effort into it.
  • In one rather important respect, ‘Chain of Command’ seems to be a very different beast when compared with other similar rulesets (‘Arc of Fire’ and ‘Bolt Action’ comes to mind). Let me explain.

    Over the years, I have learned to identify (and also exhibited myself) in gamers a phenomenon that I believe can be called ‘a stress cone’ – once a player sets his mind on a ‘target’, be it an enemy unit or a specific location, its destruction must be accomplished. And as the game progresses, this target increasingly becomes the sole focus of gamer’s attention. When this happens, a certain blindness to alternative solutions seems to occur. Flanking manouvers, an often valid option of breaking of contact and re-deployment or employment of less obvious assets is no longer considered – the initial goal must be accomplished. What’s even more important, it must be accomplished by direct assault and destruction by fire or close combat. To an unengaged observer, such behavior may seem odd, sometimes even bisarre. But if you think about it, we all occasionally exhibit it and many of us much more often than not!

    So what does this have to do with ‘Chain of Command’? Well, in most wargame ruleset, the initial phase of the game consists of manouvering the units into contact with the enemy. As this takes time, it also allows players to logially consider their options. Once the units come into contact and ‘combat’ starts to happen, player’s attention shifts to the actual action. He may then enter further and further into this ‘stress cone’ I’ve mentioned above. What seems to be special about ‘Chain of command’ is the fact that with this ruleset, the opposing units can be deployed pretty much on top of each other directly at the start of the game. And indeed, this is exactly what the designer of the ruleset states – a game of ‘Chain of command’ starts with opponents already in contact with each other! In other words, players are placed immediately at the small end of the ‘stress cone’ with consequence of ‘shootout’ games being a very tangible possibility if one is not careful and remains cool-headed. But if a player manages to keep his cool and remembers the simple fact that you don’t have to shoot at an enemy as soon as he’s visible, this ruleset has a possibility to provide a damn realistic experience of low level combat in WWII setting.

Allright, enough of ‘deep thoughts’ for this time around. Let me round this post up with repeating the sentiment that ‘Chain of Command’ seems to be an excellent ruleset. If you haven’t yet, you should definitely give it a shot (pun intended). Smile

May 09, 2017

Price of more than one hobby

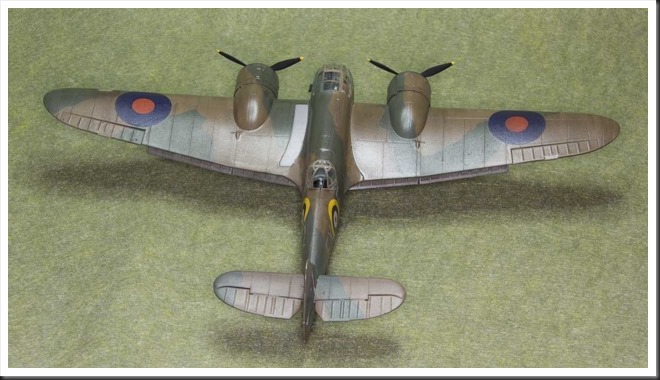
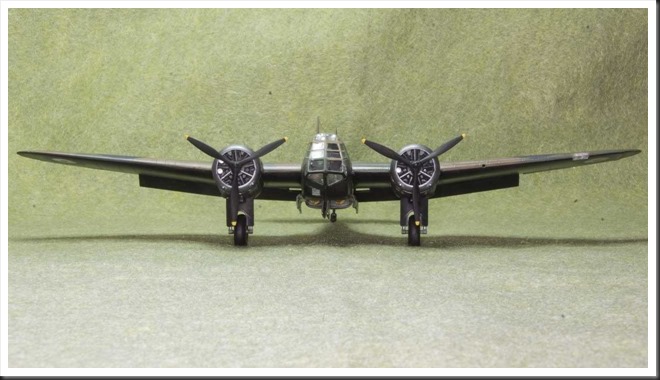
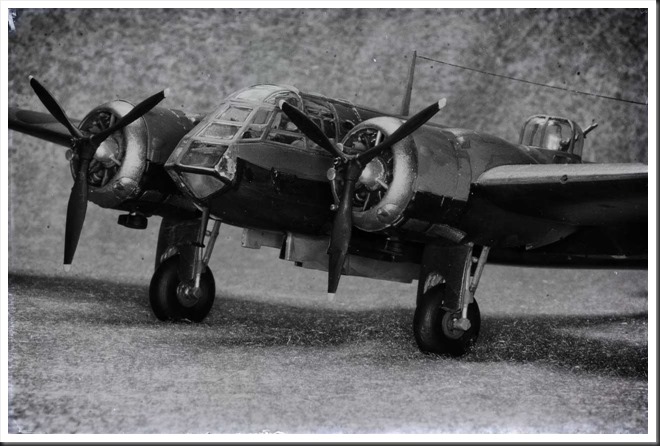
No point denying it, the goal of having one game per month is pretty much a pipe dream by now, largely due to the fact that my focus has mostly been on ‘that other hobby’. Well, at least I have something to show for time spent on model buildning… This time around I’m proud to present Bristol Blenheim Mk I from Airfix. A truly splendid kit that builds like a dream.

Airfix_Blenheim_I_001Airfix_Blenheim_I_002Airfix_Blenheim_I_004Airfix_Blenheim_I_006Airfix_Blenheim_I_009Airfix_Blenheim_I_011Airfix_Blenheim_I_017

April 29, 2017

Quick and cheap 6mm stone walls

Last post related to Peter’s Hill scenario… Just a couple of days before the game, I realized that the terrain setup required a long stretch of rough stone wall. I didn’t have time to order any, so it was time to improvise.
Stone_Walls_001
Without having any real concept of how to make the walls, I picked out the materials that made sense:
* PVA glue.
* Medium size tallus I use for basing.
* Small popsicle sticks.


Stone_Walls_004
My initial idea was to mix PVA glue and tallus into a thick grout and spread it across the sticks. This turned out to be a completely impractical idea – the stone/PVA glue porridge stuck everywhere but where I wanted it to, but mostly to my fingers.


Stone_Walls_002
It was time to regroup. Next, I cut up the sticks into smaller bits and then put a thick wad of PVA glue across their length. Then I just strossled the tallus into the glue.


Stone_Walls_003
This approach seemed to work much better, but the ‘wall’ seemed a bit low with just a single layer of tallus. So I waited an hour or so and then repeated the process – I put another blob of PVA glue on top on top of initial layer and more stones were sprinkled on top.
Also, just to make the ‘wall’ a bit more compact, I squeezed the stones together a bit. With the first layer semi-dry I had actually a bit of control when shaping the wall.


Stone_Walls_005
I left the walls to dry over the night. I was a bit concerned about possible warping, since there was a lot of PVA glue pulling at these sticks from the top. But, possibly due to the fact that the wood pieces were no longer than 10 cm, they stayed flat.
Painting process started with an overall black coat.


Stone_Walls_006
Next, I drybrushed the walls with successively lighter shades of grey. Here’s the final result (althogh I did flock the bases with some green turf).
The entire project took me less than two hours to complete. It’s nothing complicated, but I have to admit that I was surprisingly pleased with how those little walls turned out. Mostly because it was a true scratch build and I don’t do those very often.

April 11, 2017

‘Guns at Gettysburg’–initial impressions

So let’s discuss ‘Guns of Gettysburg’ for a moment. After one game it is hardly possible to draw any definite conclusions, but my initial impression is definitely very positive. However, it’s not all smooth sailing and even this single game disclosed some ‘holes’ that I know will be bugging me in the future.

The ‘game engine’

‘Guns of Gettysburg’ is a derivative of Partizan Press’ Napoleonic ruleset ‘General de Brigade’ and its origins shine right through even after a single game. If one were crass, it could be said that there really is no justification for ‘Guns of Gettysburg’ to have been released as a separate ruleset, since it’s pretty much ‘General de Brigade’ tweaked to work in ACW period.

I have once upon a time posted my thoughts about ‘General de Brigade’ and its game mechanics. These comments are still valid and may serve well readers wishing to get a better insight into that ruleset. Here, I will limit myself with short walkthrough through a game turn and then concentrate on differences between two rulesets.

The turn sequence in ‘Guns of Gettysburg’ is exactly the same as in ‘General de Brigade’:

    1. Initiative roll where opposing players roll 2D6 who’s gonna have initiative in this particular turn. The initiative give the winner right to be the first to send out new orders to his brigades, declare charges, move his troops and shoot in fire phase.
    2. Change of orders phase - CinC for each side may attempt to change orders for a single brigade. One brigade commander may attempt to change his orders on own initiative.
    3. Mandatory moves - all units trying to get away from the battlefield, as well as units in so called pursuit state move at this stage. This is done ‘simultaneously’ by both sides.
    4. Charge declarations and movement - here things start to get a bit messy. Any charges are declared and if passed, the units so ordered move into contact. This stage is a bit fiddly, as reactions of units on defensive depend a lot on the distance that needs to be covered by the chargers. But in simple terms, if charge can be completed, chargers move half the distance, then defenders choose their actions, which most often is either shoot or evade. Next chargers check their morale and if it is passed, defenders need to do the same. If everyone is still willing, the two sides come into contact and a melee is fought at later stage of the turn.
    5. Normal movement - pretty self-explanatory. Side with initiative moves first.
    6. Firing - everyone who hadn’t shot yet, has a chance to do it now. Side with initiative shoots first, the side without initiative does so after reduction of strength due to losses (which may not be to everyone’s liking).
    7. Melee phase - any melees are processed at this stage.
    8. Morale checks - any units and brigades that need to make a morale check, do it at the end of the phase. Failed checks may result in anything from formation disruptions to ordered retreats and complete routs.

        Any dice rolls in ‘Guns at Gettysburg’ are done with two six-sided dices. The game engine is pretty dice-heavy - all morale checks, firing and melees are decided with dices and even with few units, the amount of rolls does mount up. At the same time, once one gets the grasp of the basics, the game moves along rapidly, without major hick-ups. Consistent use of 2D6:s throughout the ruleset simplifies things and the amount of dice modifiers is kept within reason.

        The new stuff

        As already mentioned above, ‘Guns at Gettysburg’ isn’t really all that different from ‘General de Brigade’. Here and there one can spot small tweaks in the ranges and casualty tables. Some modifications have been done to the dice roll modifiers (some of them are a bit surprising and maybe even questionable, more on that later on). If anything, it’s the parts that have been removed from ‘Guns at Gettysburg’ that are making the biggest difference in my opinion - a lot of fiddly rules related directly to Napoleonic period have been yanked out of its ACW derivative. Ironically, in my opinion, these removal seem to have a positive effect of providing much smoother gameplay!

        There are two significant changes that need to be mentioned. The first is related to formations; squares are no longer available for infantry - a reasonable and hardly surprising decision. Two new formations have also been added. The first - open order - allows the regimental lines to extend their width. This is clearly an attempt to reflect more flexible character of linear formations during ACW and a very justified addition. Addition of second formation - brigade attack column - is a bit harder to justify. It allows regiments of a brigade to ‘stack’ one behind the other, with bonuses to morale when casualties are taken. Clearly, it’s an assault formation intended for brigades with orders to charge the enemy. To my best knowledge, such battering rams were organized on few occasions during the conflict and were hardly a standard modus operandi for ACW armies. Therefore, I’m not entirely convinced that this addition is really necessary.

        The other significant change when compared with ‘General de Brigade’ is of far more importance. Section regarding skirmishers has gone through significant overhaul. In ‘General de Brigade’ there are three options to use skirmishers - throw out light companies as screens for individual battalions, create a brigade screen of combined light companies of a brigade or use light battalions as skirmishers. In ‘Guns at Gettysburg’ options for use of skirmishers have been significantly extended. Individual regiments can deploy into skirmish order either completely or with half of its strength. Brigade screens can consist of up to fifty percent of strength of regiments, with variable number of troops committed from individual units. Perhaps most importantly, skirmishers are no longer regarded as separate formations, but can be deployed and recalled by parent regiments at will. This change is yet again reflecting differences in tactics of the two periods. Added choices deepen the complexity of tactical deployment and I suspect it will take me a while to understand cons and advantages of these new options.

        Other changes to the ruleset aren’t all that dramatic, but couple of things did provoke a reaction from me. On the positive side, the ‘double-six’ rule has been modified and expanded upon. In ‘General de Brigade’, any roll of two sixes in firing or melee phases could cause additional effects on units and generals. In ‘Guns at Gettysburg’, this mechanism extends to all rolls in the game and may give the players ‘bonus cards’ that can be played at subsequent stages of the game. Player may for example move a brigade of his choice at double time, add a one time bonus modifier to his fire/melee dice-roll or call for a morale check with negative modifier upon an enemy unit of his choice. All such actions are ‘one time events’, gained randomly after a roll of a double six. While this game mechanism in itself strikes me as rather gamey, it’s obvious it adds to the fun factor.

        On negative side, few of the modifiers did make me raise an eyebrow in wonderment. One I’m very sceptical to deals with effect of overall losses in regimental morale checks. As default, for each ten percent losses a -1 is added to the morale check dice roll. But… Confederate regiments have here a maximum cap of -3, which definitely gives them an edge in a prolonged firefight. As a compensation, Confederate units rout do suffer a -2 modifier when attempting to rally. And since the rally from rout can only be made once with either success or dispersion of unit as possible outcomes, it is a significant penalty. The designer, apparently aware that these modifiers will be discussed, addresses them specifically in his notes and explains that it’s a simple attempt to differentiate both sides from each other. But at the same time, in his opinion at least, this difference is justified by historical performance of both sides. Well… I will be honest and admit that I am not at all convinced by that explanation. Luckily, it’s an aspect of the ruleset that can be tweaked to one’s heart’s content.

        What seems to be missing

        Actually, ‘missing’ may not be the right term here, but the rules dedicated to cavalry do strike me as a little bit funny. They are very detailed and a lot of space is dedicated to charges, formations and so on… but they all seem to be a carry-over from ‘General de Brigade’ and as we all know, the role of cavalry was very different in ACW from that during Napoleonic Wars. And so, I find it peculiar that cavalry charges are dealt with in detail, but behavior of dismounted cavalry is barely touched upon. This oversight was starkly illustrated in my game, where Union troopers were charged by Confederate infantry. This situation isn’t even considered in melee rules - charge and melee procedures between infantry/artillery on both sides and cavalry as charging party are described in detail, but there is nothing about charges against dismounted cavalry troopers. A slight gap in otherwise solid ruleset, but annoying nonetheless.

        Final observations

        As already said in my reaction immediately after the inaugural game, my initial impression of ‘Guns at Gettysburg’ was very positive. The ruleset is comprehensible and detailed, but didn’t get in the way of the game flow. Some glitches did occur, but nothing major. One thing that I liked very much was in the formating of the ruleset - on a couple of occasions I needed an answer to some very specific questions and every time I found a clearly labeled section dedicated specifically to that aspect of the game. On the other hand, lack of printed number pages in the ruleset is seriously annoying.

        At the same time it must be remarked that ‘Guns at Gettysburg’ is a stripped down and slightly altered version of ‘General de Brigade’. So in it’s core it is still a very formulaic ruleset based on traditional and old-fashioned game mechanisms. So why did I like ‘Guns at Gettysburg’ so much, while ‘General de Brigade’ failed to impress me? I must be honest and admit that my initial reaction to ‘Guns at Gettysburg’ may very well be simply caused the fact that it is something of a relief to use something different than TCHAE for an ACW game. Further research is needed, so stay tuned...

        April 01, 2017

        Part two in my ‘Soviet Period’–Mig 3 from Zvezda

        Allright, just as an interruption in ongoing series about my latest ACW game and ‘Guns at Gettysburg’, here’s my latest modelling effort – Mig-3 from Zvezda. I could claim that it was a quick and dirty build, without much effort put into it… except it took me more than six week to glue on the antenna and put the canopy in place. Anyway, here’s a couple of pictures of what turned out to be a basic, but nifty little kit.

        Zvezda_Mig_3_001Zvezda_Mig_3_004Zvezda_Mig_3_005Zvezda_Mig_3_006Zvezda_Mig_3_007Zvezda_Mig_3_008Zvezda_Mig_3_009

        March 27, 2017

        Peter’s Hill with “Guns at Gettysburg”

        And so, after long period of thinking about it, I finally pulled the trigger and switched over to “Guns at Gettysburg”! Last weekend L. and I gave this ruleset a chance and used it with Peter’s Hill scenario from… well you guessed it, “Hearthland” scenario book by Caliver Books.

        The scenario
        At first glance, this particular scenario looks very interesting – not only is it a meeting engagement, but the entry time for vast majority of different brigades is decided by dice rolls at the beginning of each round. Majority of Union brigades enter on 5+, while Confederate brigades enter on 6+ once first Union reinforcements enter the field. Further caveat for the rebels consist of the fact that their cavalry removes itself from the battlefield on a subsequent roll of 4+. I found it a bit harsh and increased this condition to a 6 roll only.

        Initial dispositions are as follows – Confederates have Liddell’s brigade on the table at the start of the game. One of its regiments is deployed on Peter’s Hill itself in skirmish order, while the rest camps at the opposite edge of the field, behind a dry river bed. Federal troops enter along the road from the opposite side of the field; McCook’s brigade enters on first round, with the rest of brigades appearing after rolling 5+ at the start of subsequent turns.

        Confederates are heavily outnumbered, but compensate for it with their troop quality – Liddel brigade is elite, while Johnson’s are regular troops. Vast majority of Union units deployed in line are green, while their skirmisher screens and artillery are regular.

        The game

        Following the by now well-established tradition, I’m illustrating development of the game with pictures and complement with short descriptions.

        Peters_Hill_20170321_001

        Hardly surprisingly, L. ordered McCook’s brigade to take posession of the hill. In reaction, I moved skirmishers of 7th Arkansas to the crest and engaged blue-clad columns in an attempt to slow down their advance. I managed to draw first blood, but without any noticeable effect on their pace. At the same time, the remainder of my only brigade currently present on the field was quickly scrambled into columns before being directed toward the sound of guns.

        Peters_Hill_20170321_003

        Eager to slow down the Federal troops and unfamiliar with the rules, I made an early mistake in not taking full advantage of freedom of movement allowed to skirmishers in “Guns at Gettysburg”. Instead of keeping my distance, I allowed L. to get into effective small arms range and cause grevious casualties on 7th Arkansas. As result, the went to ground. In subsequent rounds, unable to retreat and exposed to fire of three regiments in line, they were quickly wiped out.

        Peters_Hill_20170321_004

        Situation around round six. McCook’s brigade is about finished with 7th Arkansas by this time and L.’s second brigade (under command of Laibolt) has also made its appearance. On rebel side, the remainder of Liddel’s brigade starts its climb up Peter’s Hill’s eastern slope while Johnson’s brigade enters the field. To the north-east, Confederate cavalry makes a very brief appearance – in very next round I managed to roll the dreaded six and they briskly rode back to wherever they came from.
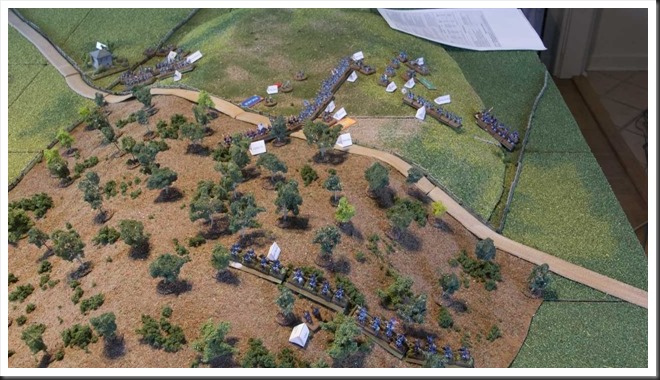
        Peters_Hill_20170321_005

        In contrast to my useless cavalry, L’s troopers made a strong appearance with one huge regiment thundering into the woods that covered northern part of Peter’s Hills. They were accompanied by another cavalry regiment, dismounted and acting as skirmishers.
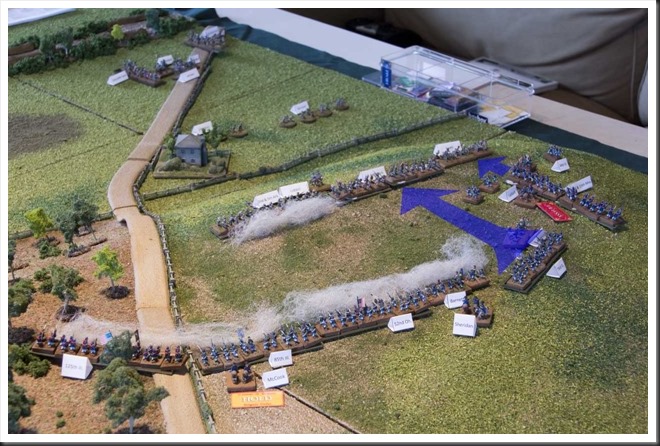
        Peters_Hill_20170321_006

        As Liddell’s brigade advanced over the crest of the hill, it was met by withering fire from compact Union line. 2nd&5th Arkansas on my left flank was especially hard hit. Lashed by extremly effective cannister fire from Barnett’s battery directly in front of it and infantry line to its left, it lost one fourth of its strength in two rounds. It didn’t break, but was forced to go to ground. Both sides suffered serious casualties in this intial clash, but it became clear to me that sticking my nose into this hornet’s nest was my second mistake of the day. Green or not, the Union line was just too strong to penetrate with just two regiments.

        However, I wasn’t the only one who made mistakes in this game. After inital successes, L. apparently decided to deal me a knock-out blow. He pushed Laibolt’s brigade, coming into line established by McCooks troops, to the right of Barnett’s battery and ordered it to assault my line. Somehow he managed to manouvre 2nd&15th Missouri right in front of my only artillery battery engaged at this time… and still in march column nonetheless. Green 73rd Illinois was to accompany them and charge my hard-pressed 6th&8th Arkansas. Upon achieving this somewhat questionable deployment, L. decided it was enough excitement for one day (we’ve been at it for about four hours by then) and left for home.  Before he left, he described his plan for me. Myself, unable to resist the temptation and unwilling to prematurely waste all the preparations for this game, I decided to continue the engagement on my own.

        It took however until next weekend until I gathered enough enthusiasm to carry on. After my failed attempt to withdraw Liddell’s brigade to the foot of the hill, L.’s charge went in. The result was a perhaps predictable disaster. 2nd&15th Missouri was shreded by point blank range salvo from cannons of the battery they tried to overrun. Crossing the field turned also to be much of a challenge for inexperienced 73rd Illinois. The Missouri regiment routed decisevly. As a result,  rest of Laibolt’s brigade failed their brigade morale test and was forced to hastily retreat from Peter’s Hill.

        Peters_Hill_20170321_008

        This is the situation on the top of Peter’s Hill after the failed Union assault. Immediate threat to Confederate line has disappeared, but my situation was still grave. The only logical move was to withdraw Liddel’s brigade, wait for Johnson’s troops and try again with combined forces.

        Peters_Hill_20170321_009

        I expected for next couple of rounds to be spent by both sides on reorganization and catching a breath. It was also a good opportunity for Union cavalry to improve their position. Knowing the plans for the rebells (after all, they were formed in my head), I decided to introduce a bit of uncertainty and exploit ‘solo’ aspect of this game. I came to the conclusion that there were two logical courses of action for Union cavalry regiment to take – a) move to the foot of the hill, possibly saddle up and attack Johnson’s column in the flank as it moved up to support Liddell, or b) deploy along the road, taking up enfilading position in preparation of Confederate attack. I rolled a dice – 1-3 would be alternative a), 4-6 would be alternative b. However, I waited with ‘uncovering’ this dice roll until I decided what order to issue to the rebells. In the end, I went with the do or die frontal assault on Union line occupying Peter’s Hill. Only then did I reveal to myself the die roll result dictating actions for Union cavalry – they were to move to the road!

        Next, a strangest thing happened. As Johnson’s brigade came into vicinty of the hill, its numerous skirmisher screen run up the hill and started taking potshots at Barnett’s battery in front of them. Those potshots turned out to be quite effective, causing enough casualties to force the battery to take a morale test. This it failed, badly! I must admit that it was with certain glee that I placed ‘Routed’ marker beside it, as it was this very battery that cut my Arkansasians to pieces! But the freak event didn’t end with the rout of Barnett’s battery! In unexpected ripple effect, its sudden collapse caused a brigade check for McCook’s brigade. It too failed just as badly and in a blink of an eye, the southern part of Peter’s Hill was completely clear of Union troops!
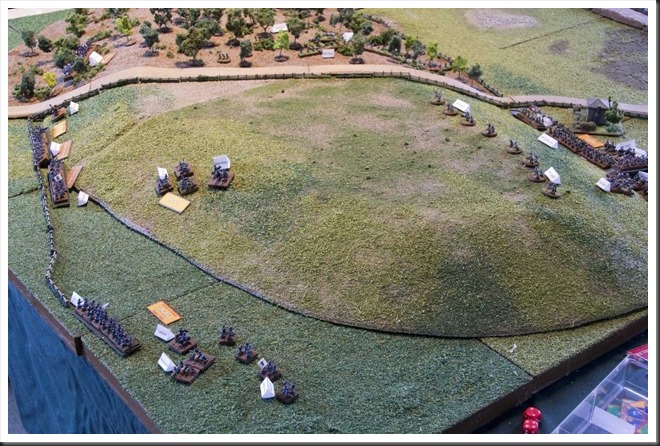
        Peters_Hill_20170321_010

        Only now did I start reorganization of both sides. On rebel side, 2nd&5th Arkansas, with its casualties approaching 60 percent, was a spent force. I detached it to the farm at the foot of Peter’s Hill. Remainder of Liddell’s brigade would take on Union cavalry line, which was about to take up its extremly well-situated flanking position. Johnson’s brigade was ordered to make one final attempt to break main Union line.

        Sheridan, acting as overall CinC for the federal troops, had his own problems. McCook’s brigade was relatively easy to sort out – it halted at the foot of Peter’s Hill and even Barnett’s battery managed to recover from its temporary stampede. Laibolt’s brigade however refused to move from its spot for a couple of turns. And the last brigade under Sheridan’s command, that under leadership of Fry, still hadn’t even turned up on the battlefield!

        Peters_Hill_20170321_011

        After about twenty turns, the time for final showdown has arrived. Once both sides reached the top of Peter’s Hill, salvo after salvo of musket fire and canister swept across the field in both directions. Severe casualties were suffered by both sides! On Union side, unlucky 73rd Illinois was pounded by close range fire from Sweet’s battery and went to ground. On the opposite side, both regiments of Johnson’s brigade suffered from the fact that they were equipped with smoothbores, while Union troops wielded rifled muskets. To add to their troubles, Barnett’s battery seemed to try its best to make up for its temporary panic and poured cannister shot into rebel line as fast as its crews could manage. With casualties mounting rapidly both rebel regiments were forced to ground, unable to close the distance.

        Peters_Hill_20170321_012

        Along the road, the fight was equally vicious, if not more so. 6th&8th Arkansas’ fire was extremly effective and swiftly reduced numbers of 9th Pennsylvania . Union troopers gave however as well as they received. Taking advantage of the fact that they were equipped with breach-loaders, I risked depleting their ammunition and gave order to really pour it into Confederate line as it reached the stockade. This sudden increase of rate of fire from the wood’s edge had however a perhaps unexpected outcome – realizing the deadliness of these breach-loaders, I ordered my Arkananians to charge Union position. With Union trooper’s position just across the road, once the charge started, the rebels were upon them in a blink of an eye!

        Peters_Hill_20170321_013

        Union troopers would not stand and broke away from onrushing rebels, trying desperately to get away. To no avail though! Rebels caught up with fleeing troopers in the wood and scattered the entire regiment in a couple of minutes!

        Peters_Hill_20170321_014

        While these dramatic events took place, Fry’s brigade finally decided to turn up and do its duty for the flag, Union and mamma’s apple pie. One can only speculate what words were said once this Johnny come late came eye to eye with Sheridan after the battle.

        Peters_Hill_20170321_015

        Fry needed not to bother appearing though, as the writing was already on the wall for the Rebels. Despite the somewhat unexpected success in smashing Union position in the woods, it was plain to see the the Confederate assault has stalled. There were simply too many soldiers clad in blue on that hill! With both regiments in Johnson’s brigade hugging the ground and taking a pounding, I’ve decided that the only logical course of action was to give order for general withdrawal before Confederates were completely overwhelmed. The battle for Peter’s Hill was over and the hill itself was firmly in posession by Union troops.

        Peters_Hill_20170321_017

        Musings after the battle
        I intend to write a detailed review of ‘Guns at Gettysburg’ and about my initial impression of this ruleset in a separate post. My post-game comment will therefore be brief. In simple terms, it was a blast of a game. In fact, I would go as far as claiming that it was the most fun I’ve had with ACW wargame ever since I’ve decided to engage into this period.

        The funny thing is that my opinion about ‘General de Brigade’, the Napoleonic ruleset from which ‘Guns at Gettysburg’ is derived, is that it’s quite traditional and maybe a bit boring ruleset. But for some odd reason though, this ACW rendition of the ruleset managed to tick off all the boxes for me. It seems to provide a fun, fast-flowing and easily manageable game. And while it may be to early to draw any definitive conclusions, the ruleset has at least on this occasion managed to deliver ebbs and flows in the game which I never experienced with TCHAE.

        Needless to say, I am quite impressed by this initial tryout of ‘Guns at Gettysburg’ and really look forward to next game.